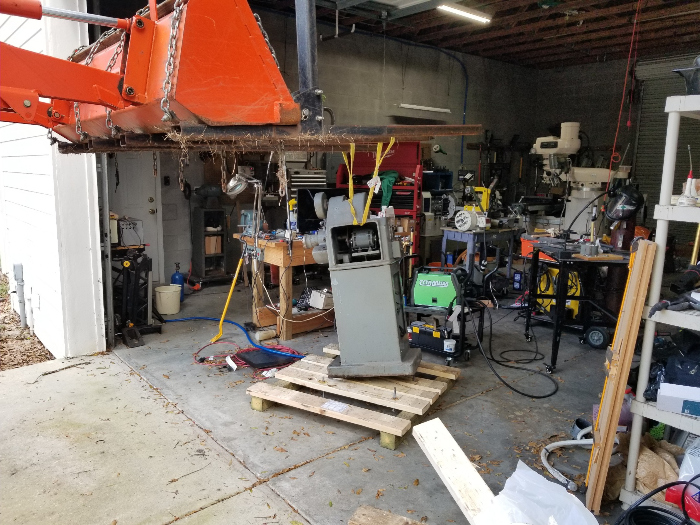
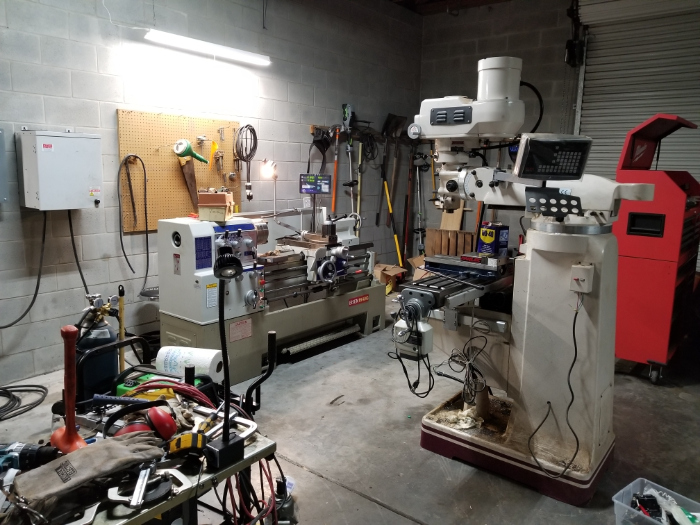
Today is a day of triumph. I completed a mobile base for my cutter grinder, and I mounted the grinder on it without killing myself. Although I came close.
My grinder is a Gorton 375-4. Wild guess based on what I’ve read: it’s about 50 years old. They say you can do just about anything with it, including making a fluted drill bit or end mill from scratch. I don’t know if that’s true, but it’s supposed to be capable of many things, including sharpening the ends and sides of end mills.
When I started learning about these machines, I read various figures for their weight. Some people said they weighed 550 pounds. A guy on a forum claimed the real figure was below 300. He said he unloaded one from his vehicle by himself. The freight bill for my grinder listed a weight of 490, including a very heavy pallet.
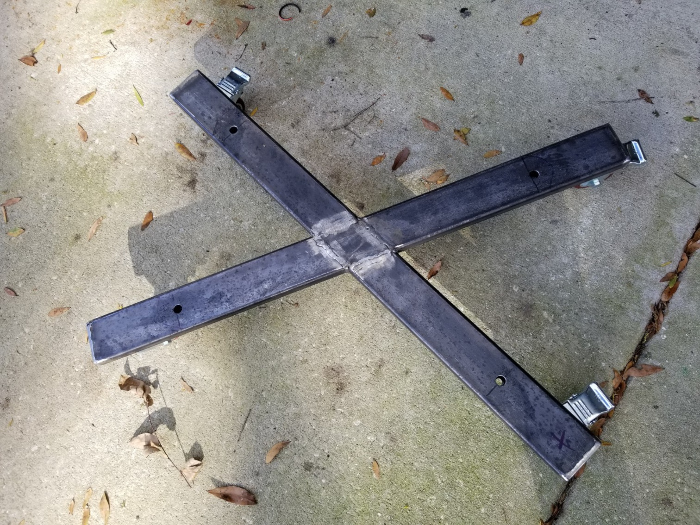
When I began thinking about a mobile base, I thought, “One guy lifted a machine like this out of his truck and onto the ground. He has to be right about the weight.” Based on that misconception, I designed a very simple X-shaped base with casters. The base adds something like 5 inches to the height of the grinder.
The X design is extremely appealing for a number of reasons. First, it’s the cheapest, simplest, lightest way to create a base which is wider than a machine and can be installed using bolt holes at the machine’s corners. Second, it only requires 8 tubing welds, 4 of them short. Third, because of the small number of welds, it won’t have a lot of warpage issues to fix.
Tubing is smart because, unlike ever-popular angle iron, it’s extremely rigid. I made a base from heavy angle iron once, and it jiggled like Jell-O.
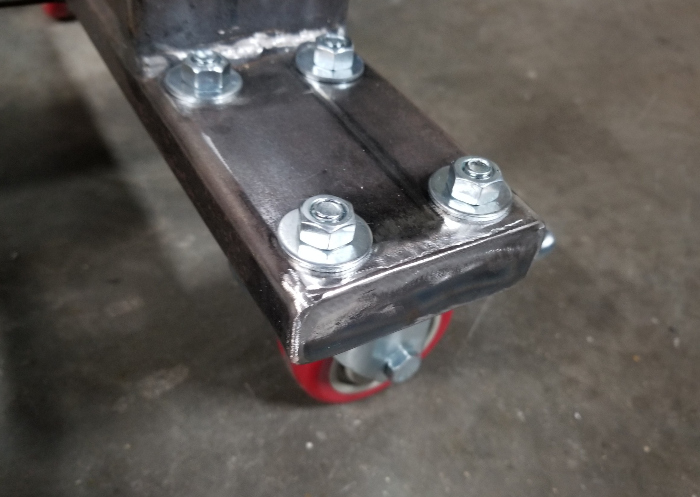
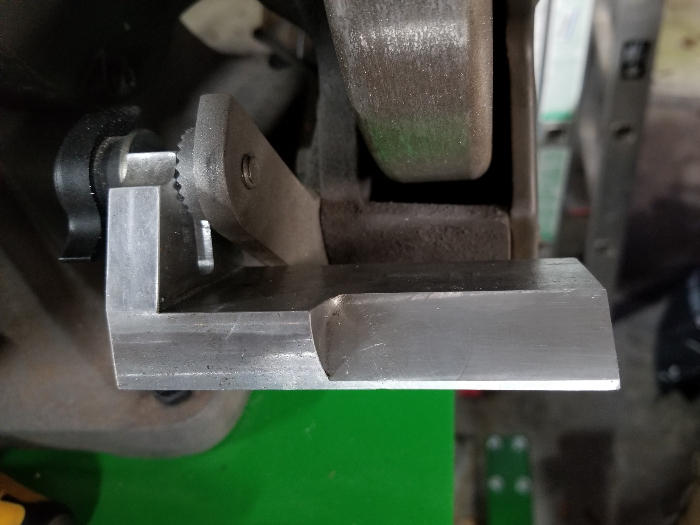
I decided to put 4 holes in the base for bolts. These would go through existing holes in the grinder’s stand. I chose to weld nuts to the underside of the base to receive the bolts. This made it unnecessary to struggle with loose bolts while trying to attach a dangling grinder to the base. It lowers the risk of death by crushing somewhat.
I chose to weld the casters to the tubing instead of bolting them in place. Welding is fast. Locating and drilling holes is very, very slow. Bolts also have heads which stick up in the way. I got the welding idea from Jimmy Diresta, a Youtube whiz. Sure, I marred up my new casters. So what? They cost something like $22 for a set, and anyway, no one will see the welds under the base.
It took me about 10 minutes to install the casters. It was wonderful. Bolts would have taken maybe 90 minutes.
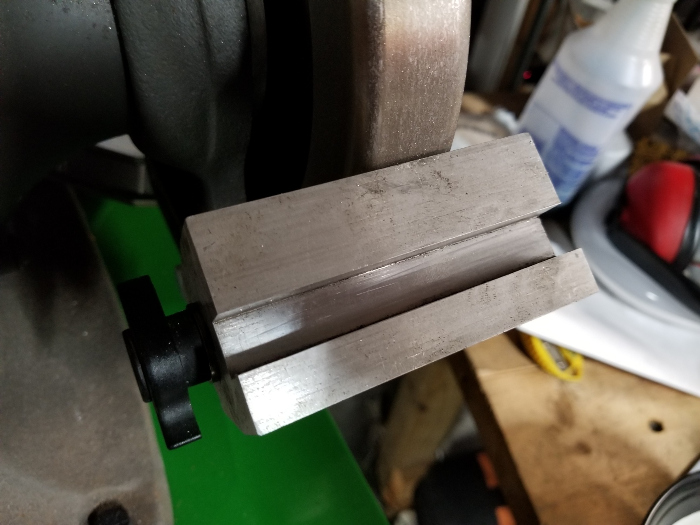
Building an X-shaped rectangular base is much, much harder than building a square one. When I started out, I thought the grinder’s stand was square. When I measured it, I found that the bolt holes were on 20.5″ by 13″ centers. This drove me into the realm of trigonometry. For a former physicist, the math was simple, but doing the measurements was not. I had to make an angle jig on the band saw. I could not cut straight across the tubes to make recesses so they would fit together, so this limited my use of the milling machine and band saw. I had to use an angle grinder. Locating the holes was impossible using measuring tools. I had to lower the grinder onto the base, mark the base with a Sharpie, lift the machine off, and cut the holes.
Lifting the grinder was interesting. First of all, it does not weigh 250 pounds. The guy who believed that must have been posting from a mental hospital. I lifted it with my tractor, using a strap, and I can tell you it weighs a lot. I think the shipper’s number is correct. I think he actually weighed it. Subtracting about a hundred pounds for the packing and pallet, the grinder probably comes in at a little under 400 pounds.
The weight is concentrated on the right side, toward the front. This is bad, because it makes the grinder easy to pull over…on the operator. It also means that when you lift the grinder, it tilts sideways. When you put it down, it tries to lie on its face. You have to put one corner down and then swing the tractor to rock the grinder back on its feet.
I did not enjoy working on the grinder while it was in the air. My strap will hold 1200 pounds (working weight), but I don’t care. I was nervous with all that weight swinging around. Working around a lifted unsupported load is a good substitute for stool softener. It’s nerve-wracking. Besides, even if the strap holds, the tractor can always blow a hydraulic line, dropping the grinder in a hurry.
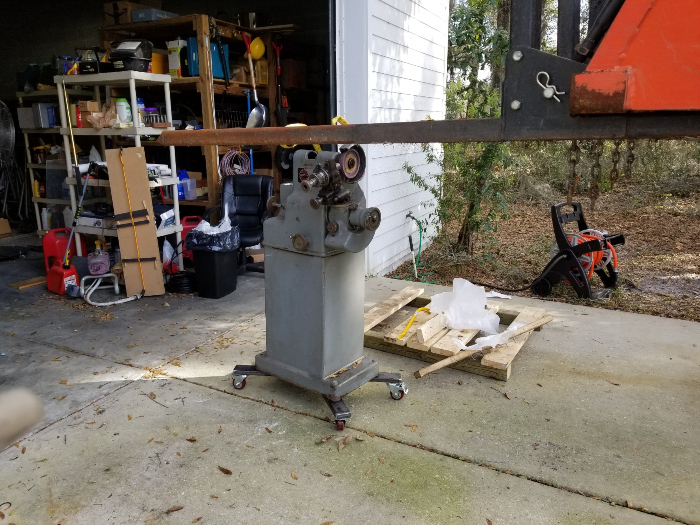
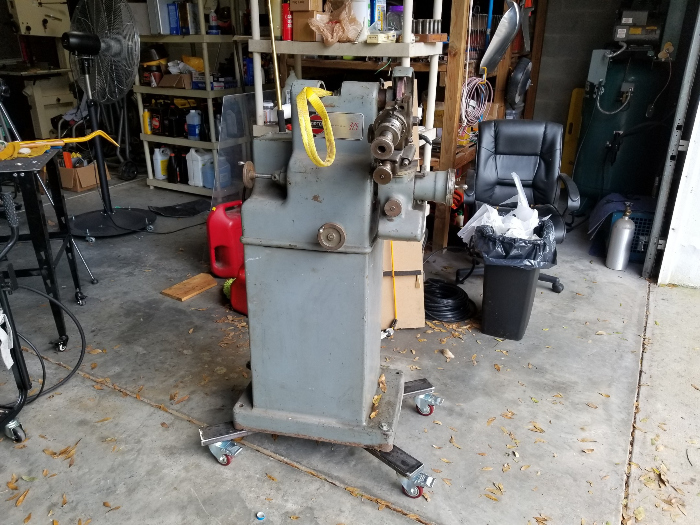
When I got the grinder onto the base, I found that my bolts weren’t long enough. I only had two bolts in the shop that were the correct length, so I put them in diagonal corners. When I lowered the grinder, it rolled around very well. The base is extremely strong, too. It doesn’t sway one bit. As for safety…I am not satisfied. You could not push this grinder over from a standing start, but a determined idiot could get it rolling, hit an obstruction at speed, and put it on the floor.
If the grinder weighed 250 pounds, I would not be concerned. It would be less top-heavy and easier to control. At 400 pounds, it’s harder to deal with.
I’m thinking I may redo the base. When I first started considering this, I thought I would have to start from scratch. Then an idea came to me. I can get two long pieces of tubing and run them across the short ends of the base, on top of the existing tubing. The long pieces can extend past the existing tubing. I can remove the casters from the old tubes and put them on the new ones. This will give me a much wider base, and it will also lower the grinder by an inch. If I want to, I can put tubing spacers between the old tubes and new tubes, lowering the grinder even more.
This mod would be very simple. I could do it in one day. I may go for it. The alternative is to make a really big rectangular base with room for a toolbox beside the grinder. Rectangles are less elegant and more work, though.
The base isn’t painted. It is impossible for one person to install it without destroying paint. Maybe truck bed coating will work. Also, I don’t want to paint it until I’m satisfied with it.
Even though I may make changes, I’m very happy with this project. It’s very good, and it only took three days. I’m getting much better at making things. In the past, I used to hear about people making things like welding carts, and I thought it wasn’t worth it to try, because I would do such a bad job. This week, I was thinking about buying a second Vulcan cart from Harbor Freight, and without thinking about the difficulty, I thought, “Why should I do that when I can make a better one in a couple of days?”
That’s nice.
Now that the grinder is mobile and therefore out of the way, I can move on to my next mobilization project: the dry saw. I’m always leaving it on my lift cart. That’s no good. It has to have its own cart. I already have the casters.
I have no idea how to run the grinder. I fixed the bearings, so I guess it’s time to start learning to grind things.
I’ve been working on my compressed air system. I got the tubing and drops set up, and then I started working on details. Earlier this week, I sat down and made a list of things I needed, and I got on the web to see where I could find them. Some things were available at Home Depot. Some were available at Lowe’s. Some were available at Northern Tool. No store had everything.
I started putting things in online shopping carts in order to keep track of them, figuring I would then use the shopping carts to make a list so I could get in the car and buy these things locally. After a very long time, I got frustrated with the effort, so I looked at Amazon. They had everything I needed, much cheaper.
What was I supposed to do?
It’s a bummer to see the Internet eating local businesses (even chains like Sears and KMart), but what can you do? It’s the future. You don’t want to be like an old 1930’s coot who refused to have a phone installed in his house. You don’t want to be like Snap-On’s remarkable CEO, who just told investors Snap-On isn’t interested in the Internet. The way we shop has changed permanently. As long as they don’t make me take the mark of the Beast, I’m not going to fight it.
I placed an order a day or two ago, and today everything arrived.
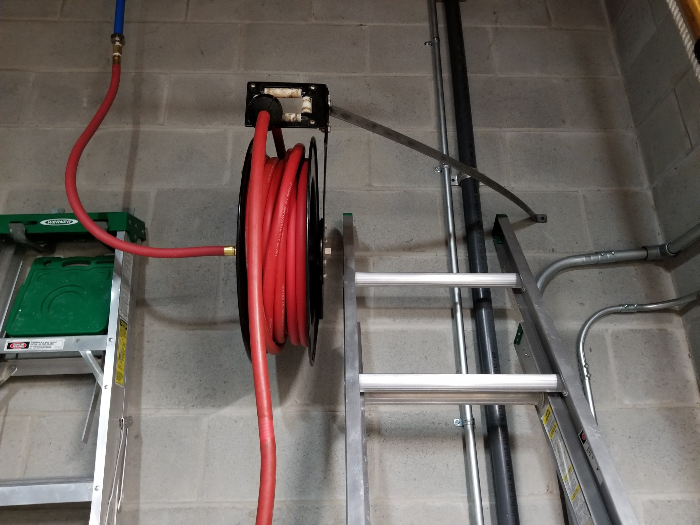
My system has three drops and an air hose reel. Actually, one of the drops is connected to another reel, so I guess I have three drops and two reels. I have an air-powered finger press brake and an air-powered planishing hammer. I wanted to hook them up to one drop, while providing a third coupler for one of those little coily air gun hoses.
I found an interesting product. It’s a manifold, but they call it a splitter. One one end, it has a male industrial air plug. On the other, it has three female universal quick couplings. They cost $20 at Lowe’s, but Amazon sells the same thing, probably from the same factory (as people often say concerning Chinese goods), for $11. I had a female coupler sticking out of the drop by the finger brake. I replaced it with a 3-foot snubber hose and put the splitter at the end of it. I then put a 6-foot snubber (Amazon) in the splitter and hooked it up to the finger brake.
I didn’t want to plug the splitter, which is a rigid part, into the female coupler that was sticking out of the drop. That would have given me about 8″ of poorly supported metal sticking straight out of the wall. The short snubber hose gave me a flexible connection and also added more length to the splitter.
I also got a drain extension for the compressor. When you use a compressor, water condenses inside it. At the end of every day, or more often, you have to open a valve at the bottom of the compressor tank to let the water out. This reduces rust. The valve on a new compressor is about 7″ off the ground, under the tank. It’s no fun to reach down there to open it. I put a 12″ steel hose on my compressor today. I still have to bend over to open the valve at the end of it, but I don’t have to get on my hands and knees. Very nice. Some people use electric valves that open automatically from time to time. I don’t think I need one.
My final achievement was the stabilization of my biggest air hose reel. Far as I know, all reels are Chinese, and none are sturdy. Mine has a set of rollers the hose passes through, and the rollers are supported by one thin sheet metal arm. It flexes when I pull on the hose. Annoying and not good for the reel.
Today, after I got my press brake hooked up to the air supply, I made a brace for the reel and attached it to the wall. I used the brake to bend two tabs into the ends of a 1″ by 1/8″ steel bar about 30″ long. I drilled holes in the tabs. I attached one tab to the reel and the other to the wall. Now the arm holding the rollers doesn’t flex. The little piece of metal that actually holds the rollers moves a little. Maybe I’ll fix that, too.
As you can see in the photo, I didn’t do a good job of estimating the angles needed for the tabs at the ends of the brace. As a result, the brace is flexed. I think this makes it stiffer, however, so it’s not a flaw. It’s a feature. Isn’t that what Microsoft always says? I saw it coming and did not do anything about it. I hoped the stress in the brace would do what it’s doing. Point for me.
Like bags of sold-by-the-pound fasteners from Tractor Supply, Tapcon screws, and a Harbor Freight drill index, flat steel bar is one of the greatest things you can keep in your shop. I buy it when I buy metal whether I have a plan for it or not. I know I’ll end up using it for something. Today when I was buying metal, I asked for 60″. The guy cutting the metal cut me 36″ by mistake. He thought he would have to put it in with the drops and start over. I told them to go ahead and cut me another 24″ and not worry about it. I didn’t pick 60″ because I needed that length. I picked it because that was the longest piece I could conveniently put in the car.
The air-powered press is a godsend. Without air, you have to pump a lever about a hundred times in order to shape anything. With air, you press a trigger and wait 10 seconds. Very nice.
It’s hard to think of anything I need to add to the air system, with the possible exception of a larger compressor. Well, that’s not true. I still don’t have a little coily air gun hose. But Amazon sells them, and of course, they’re cheaper than Lowe’s. And they come with a plug on one end and a coupler on the other.
Regarding the planishing hammer, I bought it for one reason: it was on sale. Harbor Freight slashed it to $89, and at that price, it didn’t matter whether I had a use for it. I knew the next time I saw the same model, it would be over $200, and I knew I wanted to learn how to use a planishing hammer. Done deal.
A planishing hammer stretches metal. You can turn a flat disk into a metal dome, for example. If you really want to, you can turn a flat piece of metal into a motorcycle fender, but it would be very slow. Mainly, planishing hammers are used to smooth out metal workpieces you’ve created with other tools.
Obviously, I need those tools.
I don’t see myself springing for an English wheel any time soon, but there is a cheap alternative. You can shape metal with a hammer and a bag full of sand. I might go for that. It would be fun to be able to make things from sheet metal. Look around you and see how many sheet metal items your house contains. If you can do sheet metal work, you can make custom lampshades, belt guards, chain covers, and lots of other common items which are otherwise unobtainable.
I now have steel for a tool grinder mobile base, and I also have steel to complete my arbor press stand. I’m going to add a storage shelf, which I plan to trick out with 1″ vertical flanges at the sides and rear to keep stuff from sliding off. I’m hoping I can bend them correctly on the press. This shows what a nice tool the SWAG Offroad press is; with a typical press, it would be impossible to bend a 14″ length of 1/8″ steel to a nice sharp right angle, but the SWAG press will do it if you can summon the skill.
My other addition to the press will be a removable catch bin. It will sit under the forks of the press, and it will catch broaches that fall through. I bought a 5″ length of 4″ square tubing. I’m going to weld a bottom in it, and it will be the bin. Then I’ll weld some bar to it and put some hooks on the stand to hold onto the bar. Think of those old bars they used to use on village gates in old movies. It will work. It’s been done.
The grinder base will be an interesting job. I’ve decided to use 1″ by 3″ tubing. I’m going to arrange it in an X pattern under the grinder. The ends of the X will extend past the bottom of the grinder, and I’ll weld casters to the bottoms. I got the welding idea from Jimmy Diresta, a Youtube whiz who welded casters onto a band saw base. If I weld, I won’t have to spend an hour and a half measuring and drilling so I can use bolts, and I won’t have to spend half an hour installing the bolts.
The big problem with welding is that I won’t be able to paint under the caster plates. Or maybe I will, but welding will not be kind to the paint. Maybe I can touch it up later. It’s not like people will be coming to my shop to look under the base, so I don’t think it matters.
In order to make a flat X, I have to cut material out of both tubes so they can interlock. To do that, I’ll have to know exactly where to cut, and I’ll have to get the angles right. The base is not square, so I can’t just use 90° angles. I had to do a little trig. It appears that I need 65° angles. It may be tricky to get it right.
The grinder has holes for bolts. I plan to run bolts through the holes, through the tubing, and into nuts I’ve welded onto the underside of the base. This will make it unnecessary to hang onto the nuts while I install the bolts. It should be pretty sweet.
I made a mistake when I bought the casters. I thought I was buying a set with 4 swiveling wheels. If you put non-swiveling wheels on an X-shaped base, parallel to the tubing, the base won’t move. The wheels arrived, and it turned out I had two that didn’t swivel. I ordered new ones. I thought about sending the ones I have back, but then I thought some more. I’m always putting wheels on things. It will be nice to have a set of casters on hand before I start another project.
My final buy for today was a roll of clear plastic shelf paper from Lowe’s. It was very cheap. I got 20″ by 30′ for $13. I couldn’t beat that anywhere. It’s for the trays in my Harbor Freight tool cart. When I bought the cart, I thought I would be clever and protect the trays. I applied heavy coats of Flex Seal to the insides of the trays. Then I found out Flex Seal will dissolve in almost anything. If you put rubber or plastic parts on a surface painted with Flex Seal, there is a good chance the solvents in the other materials will melt the Flex Seal, gluing your parts to it. While Flex Seal melts easily, the only thing I’ve found that removes it fairly well is turpentine. My plan is to remove as much of the Flex Seal as I can stand to and then install the clear plastic shelf liner. This should protect the trays fairly well, and because it’s clear (not the universal black generally used for tool drawer liners) it will also give good visibility instead of seeming to swallow small parts.
A number of plastic drawer liner materials don’t get along with rubber and plastic. It’s a real issue.
The cart’s main weakness is the fact that the wheels are too close together, which makes it a tipping risk. Harbor Freight had to reinforce the bottom with two metal strips, and in order to save money, they made them narrow, put them pretty far inboard, and used them as mounting areas for the casters. I’ve been thinking I might get a couple of strips, attach them in better locations, and reattach the casters. This would make the cart less tippy. Better yet, I could attach two lengths of 1″ by 3″ tubing across the bottom of the cart, extending past the sides, and then put the casters on the tubing. This would be much, much better, and it would be very easy. It would cost about $15.
I really like the cart. It was $39, and I think they gave me the 20% discount even though the coupons say tool carts are excluded. It’s somewhat flimsy, but not too flimsy to do its job. A lot of people modify these carts and get excellent results. I may continue to jazz mine up, just to see what I can do. It would be nice to have several points on the sides for hanging angle grinders. They’re always in the way, and they are extremely useful, so you can’t just put them away.
I have the 3-shelf cart. I’ll post a video that shows how people have modified the 2-shelf version.
If I keep fiddling with the cart, I may reach the point where adding better casters, or at least better wheels, makes sense.
If I end up using the cart for machining accessories, as I plan to, I’ll have to get a second cart for general cart purposes. Who didn’t see that coming?
Things are going so well, I may not completely lose my mind when the hot weather sets in and the bugs come back. The shop may be so great, I’ll be content with the big fan and a can of Off.
When I set up my majestic Harbor Freight miniature wood lathe, I needed some wood to test it. I used a mop handle from Home Depot. Past experience had taught me that these handles turned well, and they’re very cheap.
When I cut into the handle, I got a surprise. It was made from multiple pieces of wood glued together. There was an inner piece that was red in color, and it was rectangular in cross section.
Why would the mop handle maker in China work so hard to put a mop handle together?
Somebody had to plane and joint several pieces of wood, glue them together precisely, wait for the glue to set, and then turn the result on a lathe. How can that make good economic sense?
I can’t figure out how they did it, unless they made a big rectangular blank to start. That would waste a lot of wood, though.
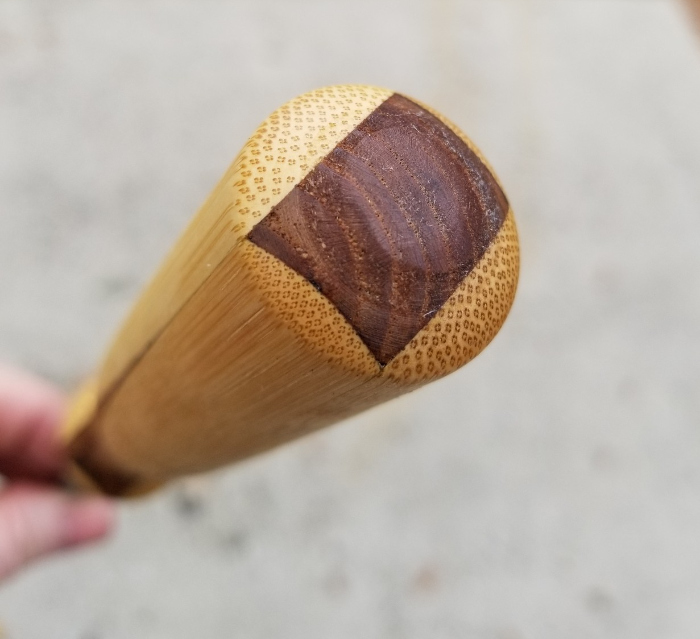
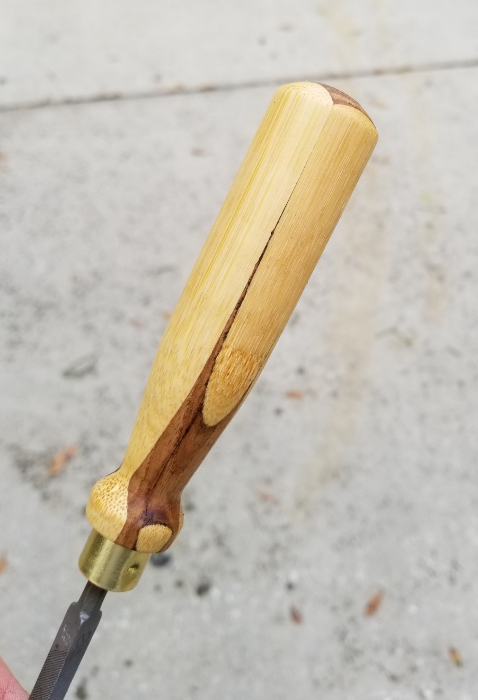
I just finished making a file handle from this stuff. Here it is. It looks fantastic, considering what it is and how much I paid for the wood.
I bought the brass ferrule online. I got two bags of them. File handles are not as cheap as they should be, and they’re not that good. Making your own produces better results for less money.
Youtube woodturners are gung ho about making handles, but they don’t seem to discuss the big problem with it: you can’t mount a finished handle in a wood lathe in order to drill a straight hole for the file or chisel or whatever. Wood chucks aren’t made for holding long objects, and even if they were, chucking a finished piece would mar it. Unless you have a different tool or some kind of jig, you have to drill the holes by hand and hope for the best.
Today I tried to put my handle in the metal lathe. I wrapped thin aluminum around it to keep the chuck jaws from scratching it. I couldn’t get it to run true, so I quit and winged it on the drill press. I think it would work if I had a sheet of rubber to wrap around things.
I don’t know why I’m using the wood lathe. I made a banjo for the metal lathe so I can use it to turn wood. With 7.5 horsepower, I would not have to worry about bogging the motor down, which is a big concern with the Harbor Freight lathe. I still need to make a good arbor to make the wood chuck fit in the metal chuck, but I can turn things now if I don’t mind holding them in the metal chuck.
The Harbor Freight lathe is a totally legitimate tool of good quality. Things like that do happen. It belongs to a class of weak tools, however, so even though it’s a good machine for what it is, what it is is a tool without a lot of power. You have to be careful about applying too much pressure to the wood, because the spindle will stop turning and the belt will slip.
I don’t know what would happen if I applied too much pressure while using 7.5 horsepower. I’m afraid to find out. I guess the wood would fly out of the lathe.
That reminds me; I forgot to use a face shield today.
My shop finally has air. I was relying on a 4-CFM compressor until yesterday. Now I’m up to 17.3, which, while somewhat less than I would like, is much better. Most people get by with small compressors from Home Depot and Lowe’s, so I should not complain.
I opted for a Maxline system from Rapidair. This is a prefab system that comes with tubing made from polyethylene, which is the plastic used in 5-gallon pails. The plastic has a layer of aluminum in it, and I suppose this is why it stands up to high pressure.
When you watch big-time Youtubers who get free tools install this stuff, it seems about as hard as decorating a cake. In reality, the job was very unpleasant. I had to install the lines 12 feet up, so I had to move a ladder all over the shop. The tubing comes in a 100-foot roll (which isn’t enough), and it’s very stiff. Straightening it is not easy for one person. Finding ways to get long segments of tubing up over my trusses was not fun, either. I had to use the ladder to climb on top of my giant storage shelf unit. The kit comes with plastic clamps to hold it on the wall, and the clamps are pretty bad, so I had to buy 1″ conduit straps and use them instead. I had to buy a number of additional fittings because Rapidair doesn’t give you enough, and I also had to buy 50 additional feet of hose.
I had long periods when I couldn’t work on the system because I was waiting on additional parts to arrive. If you install a Maxline system, and your shop isn’t tiny, budget one month to get the job done. You will run into delays, believe me. I hoped to get things working in a couple of days, but I was dreaming.
If you’re a free tool guy, the system will install itself while you drink beer and watch TV.
It’s amazing how great tools are when they’re free. The guys who get free tools never seem to have problems. Everything they receive is wonderful. A cynical person might say they’re gushing over the free stuff because they want more of it, but I would never say such a thing. That’s just not me.
Now that the system is installed, it works beautifully. I have an air dryer, three drops, and two hose reels. Compressed air is all around me. I think the Maxline kit is very good, even if installation is harder than you may expect at first.
I’ve learned a few things about air systems. My opinion, for what it’s worth, is that Rapidair and copper are the best choices. Many people have systems made from iron pipe, but I have read that iron pipe (now Chinese) is not what it used to be. The quality gets a lot of criticism. Copper doesn’t seem all that much more expensive than Rapidair tubing, but it comes in straight 10-foot lengths, so you have to deal with that instead of bending flexible tubes with your bare hands. You have to be willing to solder the fittings, and these days, solder is leftist garbage made without lead, so you may be in for some frustration. I assume you can get solder with lead if you look around. I have not checked. The lead-free stuff is a pain to use. Maybe it’s great after you’ve done a hundred practice joints. I don’t want to go through the learning experience on a ladder.
I would guess I have $350 in the Rapidair tubing and fittings. That is acceptable. I am guessing because I didn’t add everything up. I had to buy it, so why add it up? It would just make me feel bad about something I was going to buy no matter what.
Now that I have air, I am tempted to muffle my compressor. I’ve learned a few things about that. Compressor noise comes from air intakes. If you can muffle the intakes or relocate them, you can cut your noise way down. You can put hoses on your intakes and run them outside your shop. This is kind of mean to your neighbors, but it works. You can also run hoses to a simple container with baffles or even a car muffler. Factory-made compressor mufflers are ridiculously expensive, but you can make one yourself for a few dollars, so I can’t really see myself buying one.
Thing is, the compressor isn’t that loud. I put it in a corner of the shop, and it’s almost never closer than 12 feet from me. I have to decide if killing what little noise there is is worth it.
I hate noise.
What air tools should I get, now that I have air again? I’ve asked myself this. I have a pencil grinder, a stapler, two needle scalers, an air hammer, a planishing hammer, an air gun, an inflator, an impact wrench, and one or two other things. People have suggested a sheet metal nibbler, but I bought a cheap swiveling electric shear from Harbor Freight, and it’s great. I’ve considered getting a die grinder, but electric ones are really good now, and they don’t require the hassle of using a compressor and hose. A blast cabinet would be good, although most of the time, blasting is the bubba way of cleaning things. Generally, it’s not the best approach. It damages things.
I like the little narrow belt sanders they sell. That could be useful. An air ratchet might be good, but I have a Ridgid Jobmax ratchet. It’s not great, but it would do 95% of the work of an air ratchet, and it can be used with batteries, which makes it convenient.
Someone recommended a 90-degree air angle grinder. Sounds nice, but I have an attachment for a corded angle grinder that turns it into a 90-degree grinder. The electric grinder runs at 16,000 RPM and seems to work fine, so I’m not sure why I need an air version. I was planning to buy a grinder and leave the attachment on it all the time. You really can’t get by with a single angle grinder. You need at least 4.
Look how hard it is to think of useful air tools. Maybe I should just get rid of the compressor!
I kid.
The blow gun alone makes compressed air worth the hassle. There is nothing like blowing crud out of things with a blow gun. Not that I need a large compressor to do this.
I’m sure I need the big compressor. I’m sure of it. I’m taking it on faith.
Installing my big hose reel on the wall was a surreal experience. I am going to guess that it weighs 45 pounds with the hose attached, and it’s very awkward to handle. I had to climb up a ladder with it on my shoulder and screw it into the wall while holding it in place. Access to the screws was very bad, so I couldn’t just line an electric screwdriver up with it and shoot the screws into the wall. I had to turn them slowly with a wrench while trying not to drop the reel. Then I broke the reel’s swivel, so I had to fabricate a new stud and buy a swivel online. That meant I had to remove the hose and reinstall it…on the ladder. I had to do this at least three times. I can’t even describe how unpleasant this job is.
I need to put an extension on the compressor’s drain valve so I don’t have to crawl on the floor to drain it every day. The existing valve is really glued in there, so I’m not looking forward to trying to remove it. People have suggested I get an automatic valve, but it sounds like overkill. These things open periodically to let water out, and my guess is that the noise scares the life out of people. They cost something like $200, and turning a valve by hand isn’t really that hard.
With the compressor more or less fixed, I now have to get my tool grinder off the pallet it arrived on. The grinder saga is so long, complicated, and horrifying, I want to leave it for its own series of posts. I assume I already wrote about it here. I bought a Gorton 375 grinder. It’s about 4 feet tall, and it probably weighs between 250 and 300 pounds. I thought I might try to send it back, because it had bearing issues, but now that I have decided to be a man and fix it, it’s time to commit to removing it from the pallet. I just ordered casters so I can make a mobile base.
The pallet is sitting in the workshop doorway, and it’s about 4 feet square, so it’s a major obstacle.
I also need to make a base for my mini-lathe (metal, not wood) or take it to the dump. I never use it. I converted it to CNC, but I never fixed the step-loss problem, and it really needs to be converted to ball screws. It’s sitting in my shop, in the way, on a Workmate I now can’t use. Maybe I should just buy a Harbor Freight 26″ tool chest and put the lathe on it.
Anyway, once the grinder is mobile, I should have a shop again. It’s the biggest problem I have at the moment.
Things are going well. If I ever stop working on tools, maybe I’ll get a chance to use my tools on a real project.
As I wrote a while back, I managed to come down with pink eye. The symptoms appeared on the same day I finished major welding on my arbor press stand, so I thought I had burned my eye with the welder’s arc. In retrospect, that would have been a more favorable diagnosis. A welding flash burn goes away in a day or two. It has been two weeks, and I am still having symptoms.
This particular type of virus likes to take a tour of the body. It may start in an eye, but during its junket, it may make the rounds of other parts of the body, like a tourist trying to see every landmark in Europe in 5 days. The list of things it does to people is long and annoying. It can give you cold symptoms. It can make your bones hurt. It can give you pretty amazing diarrhea. It gives some people meningitis. It’s a very versatile microbe.
The first time I looked it up, I saw the phrase “3 to 5 days,” and I was pretty happy. I could stand awful things such as living in Chicago without a pistol for 5 days. Then later I read stuff that completely blew this rosy prediction out of the water. One said the incubation period alone can last 9 days, and another said the illness itself could last two weeks, which has proven true in my case.
Initially, the bug was in my eye. Then it got bored and moved to the general region behind my face. Then it moved into my nose, which is where it is today. Yesterday and the day before, I also had fatigue, and my mood was not great. These are typical pink eye (adenovirus) symptoms, believe it or not. It dabbles in everything.
Of course, I have been praying and so on. I’ve been asking God which doors I left open, to let this thing in.
Today I tried something that had worked well in the past. I simply told it to leave. I didn’t get total healing, but within an hour, I was much better, and that’s how things stand now.
Because I felt better, I decided to take some actions which were pretty aggressive. I decided to torture the invader with spicy food. I ate the better part of a theater-size box of Ferrara Red Hots, and I followed it up with some homemade kung pao chicken so hot it nearly glowed. I have a lot more energy now. Let’s just hope I don’t have to expend it on multiple trips to the bathroom later on tonight.
This virus is extremely contagious. I read a lot about it because I didn’t feel like doing anything else. It usually hits kids, and it spreads like crazy in schools because a) kids are filthy, and b) it makes infectious fluids pour out of practically every orifice in the body. I read that a person’s poo remains full of viruses days after the infection is over. What lucky researcher was assigned the job of looking into that?
In Japan, pink eye is known as “swimming pool fever” because–get this–you can get it from chlorinated pool water! Nice, right? I had no idea pool water could spread disease. Makes me wonder what chlorine is actually good for. Something inside me shrivels when I think of all the pools I’ve been in. Nobody showers before getting into a pool these days, and let’s face it, most kids don’t get out to pee. Think of all the used Band-Aids you’ve seen lying on the bottoms of pools. Imagine the things you didn’t see, yet which were there all the same.
If you can get pink eye, what else can you get? Something like a third of Americans have venereal disease, and I’ve been swimming with them.
It just proves I’m right when I say public pools are disgusting and foul. And hot tubs…who thought that was a good idea? A guy I knew led an all-male prayer group at his church, and one week, they met in his hot tub. So basically they sat in hot man soup and exchanged every possible type of bodily filth. Which they then took home to their families.
I must wash my hands 30 times a day, I use disinfectant wipes all the time, I leave the house about as often as Boo Radley and Howard Hughes, and somehow I got the filth disease! Where is the justice?
Anyway, I feel much better. I still have some chicken. Tomorrow I’m going to add even more heat to it and eat the rest of it.
In other news, my compressed air system should be working by Saturday night. All the parts have arrived. A couple hundred more trips up and down the ladder should get it done. It’s amazing how many complications set in to slow me down.
Here’s something I did not expect: I destroyed the swivel on one of my air hose reels. I didn’t know it had a swivel. Maybe this is why it got destroyed.
My reel has a little brass fitting attached to the hub. A horizontal thread goes out of it, to the compressor. There is a thread perpendicular to the horizontal thread, and it goes to the air hose. When the reel turns, a swivel between the threaded parts lets the reel rotate without twisting anything.
It looks like I failed to use Teflon tape or pipe dope when I installed the hose back in Miami. I used to do a lot of work on my dad’s boat, and it was full of brass and bronze. Someone taught me that it wasn’t necessary to use Teflon or dope, and I guess that’s why I didn’t put any in the hose reel. It was not great advice. When I installed the hose reel here the other day, I had to remove the hose, and when I did, I had to apply so much torque I screwed up the swivel.
It looks like other people do the same thing, because you can find these swivels online. Of course, the best one I found for a good price was backordered just when I needed it. Luckily Amazon had one somebody had returned, so I bought it and saved some money.
I had also bent the stud that held the swivel on. I measured it, and it was an M10-1.5 thread. I figured I was going to have to drive to a store, buy a bolt, cut the head off, and make this weird stud. I decided to look around the shop first, thinking there was no hope. Unbelievably, in an old box of fasteners a tenant had left in one of my dad’s warehouses, I found an M10-1.5 bolt just big enough for the job. I cut the head off with a hack saw and cut two screw slots in the ends. Now I don’t have to search online for a metric air hose reel stud.
Now that I have everything I need, I just have to install the swivel and hose, finish the air lines, fire up the compressor, and look for leaks. I really hope I don’t find any, because nearly all of the connections are 12 feet off the ground.
Once the air line job is done, I’ll be able to move on to other jobs that will improve order in the shop.
I really sabotaged the whole shop organization plan last week. I bought an old Gorton tool grinder on Ebay. Of course, it has turned out to have undisclosed problems, so now I’m buying tools to fix it. I had hoped to be working on a mobile base for it by now. I haven’t taken it off the pallet. I was afraid to take it off because I was thinking I should send it back. The spindle that holds the grinding wheel needs new bearings, and the motor blows my GFCI. The whole thing made me feel discouraged. Then I asked myself why I had so many tools if I was going to give up on a grinder rather than use them. Ouch.
Right now, I need a gear puller to get the arbor off the spindle. Once the arbor is off, I should be able to use an adjustable pin spanner, which arrived today, to get the spindle open. Once that’s done, I should be able to replace the bearings. I hope.
I might as well go ahead and make the mobile base. Now that I have my mill running, I can make pretty fancy cuts on steel tubing. I may cut a couple of pieces of rectangular tubing so I can weld them together in an efficient X configuration. That would make for a very simple base. I would have to have casters with swivels, because they wouldn’t be parallel. It’s not easy to mount parallel casters on a base shaped like an X. If you put 4 casters on a base, and they aren’t parallel (at least on two sides), it won’t move.
Why make an X-shaped base? Because it’s the simplest way to make a base wider than the machine. It will be more stable than a small base.
The grinder is sitting in the floor taking up a tremendous amount of space. It has to be dealt with.
This is my sitrep. I hope you enjoyed it. My advice, as it already was prior to my illness, is to avoid public pools and, when possible, human beings. I hope to cease shedding microbes soon, and then life will return to normal. Or what passes for normal around here.
I guess I should blog about the physical issues I complained about last week.
On Thursday, I finished up the welding on my arbor press stand. It was my second effort. I had had a lot of problems with it. I’m still learning how to control welding warpage, and the first time I put the stand together, I found a significant bow in the top. It would not have affected the stand’s usefulness, but part of the purpose of welding is to learn how to weld better. It’s not just about function. I cut the top off the stand, added some crossmembers under the top, and put the stand back together. Now it’s much better. I’ve written about this already.
In the days prior to this welding session, I had noticed I wasn’t feeling quite right. One night last week, I felt as though a cold were trying to get ahold of me. I prayed and so on, and it went away. After that, I didn’t think much about it.
The night after I put the stand together for the last time, I started feeling a sensation in my left eye. It was as though there were a grain of sand under my eyelid. I assumed I had somehow managed to flash my eye with the welding arc. Welding arcs give off a great deal of UV radiation. You can actually get a severe sunburn from welding in short sleeves. If you let the radiation reach your eyes, you can get what’s known as a flash burn.
When you get a flash burn, you feel as though there is sand in your eyes. It goes away in a day or two and doesn’t do any lasting harm.
When I went to bed on Thursday, I knew I was not going to sleep well with my eye bothering me, so I took some painkillers. I always keep a few on hand. Doctors treat everyone like an addict these days, and it can be very hard to get painkillers when you need them, so if you don’t finish a prescription, it’s smart to keep the leftover pills.
Oddly, doctors don’t treat addicts like addicts. Every city has a bunch of down-and-out or foreign-born doctors who will gladly write painkiller prescriptions for people who are obviously addicts, but it can be very hard for the rest of us to get help when we need it.
People who abuse drugs can get them whenever they want. People who need them can’t get them. It’s a lot like gun control.
The first time I had a kidney stone, they sent me home from the hospital on a Saturday morning with 4 Percocets. A Percoset lasts 4 to 6 hours, and I had over 48 hours to go before I could get to my regular doctor. I had been on intravenous Dilaudid all night, so little Percocets, even in amounts corresponding to the time period in question, were not going to get the job done anyway. That’s never going to happen again if I can help it.
On Thursday, I took more than one pill, but they didn’t seem to help. I didn’t feel much of anything, except that I was drowsy. I took several doses, figuring I would know if I were taking too much. When you overdo painkillers, you don’t just drop dead instantly. You can tell when you’ve had enough.
The next day, I had some nausea early in the afternoon. I wondered if I had poisoned myself with the pain pills. I threw up several times. That wasn’t a big deal. Throwing up doesn’t bother me at all. After all, I went to college, where I learned all about throwing up.
The pain in my eye did not go away the next day, so I wondered if I had a really severe burn. I asked God if I should go to a doctor, and I felt the answer was “no.”
Yesterday, I finally figured out what was going on. It was pink eye, or an adenovirus infection. This is a condition like a cold which can affect your eyes, your respiratory tract, and your intestines. It can cause vomiting, diarrhea, eye pain, and lots of tear flow. My symptoms fit the description perfectly. I even had some weird, otherwise-inexplicable lower-GI stuff that was consistent with an adenovirus infection.
You can’t treat an adenovirus infection, so there was nothing to do but pray and wait. I would like to say I prayed and the symptoms disappeared instantly, but that has not happened yet. That’s not a problem. Apart from a slight annoying sensation in one eye, I feel fantastic.
I thought I had discovered a new way to get a flash burn while wearing a welding helmet and doing things right, but it appears that I was wrong. That’s a relief. A flash burn lasting for days would be a rare and serious thing.
I’m still waiting for my tool grinder to arrive. It’s exciting. If you have a lathe, a mill, a drill press, a tool grinder, and a surface grinder, you have everything you really need in order to claim you have a machine shop. After the tool grinder arrives, all I’ll lack will be the surface grinder. One day I’d like to have a horizontal mill, but that can wait.
While I wait, I’m fixing the shop up. Today I’ll be working on a new 50-amp socket next to the air compressor, and I’m planning to get an air line kit so I can run air lines all over the shop. Right now, all I have is one spool of air hose with a 3/8″ ID. It’s connected to my little compressor, which is only good for filling tires, running the impact wrench, and running a blowgun. I have a big 1/2″ reel I want to put on the wall, and I also want to have “drops” (local connections) in three areas of the shop.
Traditionally, people have used black iron pipe for air lines. I’m not doing it. It sounds like a pain. I don’t even know if Home Depot–my main resource–sells black pipe. I’ve never used it. I’m not sure what it looks like.
Some people use PVC pipe, which is cheap and easy to install. It’s great. Unless it explodes. When that happens, it sends sharp pieces of PVC shrapnel into the air at high speed. Most people agree this is a bad thing. It’s okay to run PVC underground, but if it’s exposed, it’s dangerous.
These days, a lot of people use hose. There is a company called Rapidair that sells kits for compressed air. You get 100 feet of expensive hose, plus some fittings. It will allow up to 175 psi, and you can get 3/4″ ID hose, which ought to be good for air flow. There is no point in buying a big compressor and using skinny hoses.
I’m thinking of getting a Rapidair kit. I considered buying PEX hose from the hardware store. It’s cheaper, and it works. The problem is that the connections are restrictive. That’s what I’ve read, anyway. I may want to upgrade my compressor eventually, and the last thing I want is to have to redo my air lines because the air can’t get through.
Adding electrical sockets will get cords off the floor, and adding air lines will get hoses off the floor. It all adds up to a more mobile shop. Moving wheeled tools is not easy when you’re constantly lifting cords and hoses.
In conclusion, things are going well, and my record of not burning myself with the welder remains unblemished.
I hate to shock people, but here goes: I bought another tool.
Last week, I got all excited about tool and cutter grinders. I saw a Stefan Gotteswinter video in which he demonstrated the ways in which he used his Chinese single-lip grinder. He wasn’t just sharpening tools; he was modifying tools for new uses. It was startling. I started looking around for a grinder.
Here’s what I learned: for a certain amount of money, you can get a used Deckel single-lip grinder. These machines are made in Germany, and they work very well. Unfortunately, used ones don’t always look so hot. Buying any used grinder is scary because grinders throw abrasive dust into the air, and a lazy operator won’t take care to remove it before it damages things. For a little less money, you can get a Chinese grinder from Shars.com. These machines are based on the Deckel, and they work just fine. Shars is known for expensive shipping, however, and that makes their machinery less attractive. I was quoted $265 for a 100-pound machine. The up side is that Shars is a very reputable company that sells grinders that have proven themselves. If you don’t want a Shars grinder, you can buy the same basic machine on Ebay for a couple of hundred dollars less. The problem here is that you get a Chinese mystery seller who may or may not send you a decent product. Chinese mystery sellers can be very difficult. One guy on Youtube received a Chinese grinder via Fedex, and his seller was so obnoxious he wouldn’t even sign a Fedex damage claim.
If you take the Shars route, you will get a nice machine that does a lot of stuff. It won’t be a bargain, but it will function.
I considered the above alternatives, found them lacking, and kept looking. I learned that there are some other neat options. For example, you can get a K.O. Lee tool and cutter grinder. This is a pretty large machine that also does small surface grinding jobs. It’s very versatile. It’s also very big, it weighs a lot, used ones tend to be worn out, and it has a table design that lends itself to severe damage from ordinary jolts such as might occur during shipping.
I think a K.O. Lee grinder would be great, but what are the odds that a) I would find one in good shape, and b) my shipper wouldn’t ruin it? Freight companies are so untrustworthy, it’s almost as though they compete to see who can damage machinery the most. They’re also very dishonest about compensating people for losses.
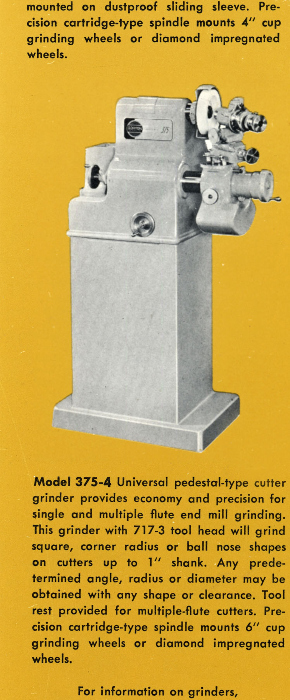
I learned about another machine: the Gorton 375. This is a small grinder on a big cast iron pedestal. It will do everything a single-lip grinder will do, and more. It’s big, but not so big I’m scared to buy one. A Gorton 375 weighs around 450 pounds, and it’s the size of a chest-high filing cabinet. You can sharpen the ends of mills with it. You can also sharpen the flutes. You can sharpen small drill bits without losing your mind. It will accept cutters with shanks up to 1″ in diameter. I don’t know what size square bits it will take, but I’m sure there are ways to accommodate fairly large ones if you’re determined.
Gorton makes a small grinder–the 265–which is much less useful than the 375. People confuse them, so a lot of folks don’t know what the 375 can do.
You can see the Gorton 375 in the scan below.
The problem with the Gorton 375 is that many people think they’re worth a lot more than they really are. It used to be that machine shops and factories were full of machines that needed freshly-ground tools. This is not nearly as true as it used to be. A lot of present-day machining is done with disposable carbide inserts. That means many tool grinders, like shapers and metal planers, have been pushed out the side doors of businesses. Many of the people who sell them don’t realize this, so they put ridiculous prices on them. Some guy near me wants nearly $3000. That’s so insane, I’m not even willing to make an offer. That guy needs to spend a year trying to sell his machine. Then he’ll wise up.
I found someone with a nice Gorton at a price that was only moderately inflated, and I got him to come down to a number I was willing to pay. I bought the grinder, and now I’m waiting for him to ship it. I hope the freight people don’t destroy it.
Now I have to prepare. My understanding is that the 375 requires certain parts, including grinding wheels, that aren’t common today, so I will have to look into things like adaptors. I’ll need to find out if there are used parts I need to look for online. I also need a manual. I found one on Ebay. There are no free PDF’s on the web. The company that bought Gorton sells manuals, but I read that they charge an obscene amount. I’m also going to need to buy or build a mobile base.
I need to learn how to grind things. I guess that would help. I have a book which is supposedly very informative. I better start studying.
Once I’m sure the grinder is coming, I’ll order the manual. That should give me correct dimensions for a mobile base. When the grinder arrives, I should have the mobile base ready, and I’ll be able to lift the grinder and drop it in the base.
Hope this works out. Apart from a surface grinder and a small CNC mill, this is pretty much the only major tool I still “need.”
This may sound incredible, but I usually have a subject in mind when I sit down to blog. No, seriously; I do. Today is different. I’m blogging to kill time because I’m not feeling all that well.
It’s nothing serious, so don’t worry. I should be fine by tonight. Feel free to pray if you want, however. I would love that. All I’m willing to say right now is a) my condition proves it’s very important to pay close attention to eye protection when you weld, and b) my condition does not involve my eyes.
I’m trying to think of something interesting to write about.
I got some more neat tools, and I’ll tell you why I bought some of them.
I carry the 9mm Glock I bought for my dad years ago. When I bought it, I sprang for night sights, which your carry piece really ought to have unless it has the other accessory I got for him later: a Crimson Trace laser sight.
I am not an laser sight expert, but I know a little bit, so I will provide some information which will be extremely helpful to anyone who carries and doesn’t already have a way to aim quickly in low light.
When I bought this sight, there were two well-known companies making laser accessories for pistols: Crimson Trace and Lasermax. I have a Lasermax on my 10mm. A Lasermax is really a replacement guide rod with a laser on the front. I thought it would be a great sight because it’s always parallel to the barrel. Pistol guide rods are mounted that way.
The original Crimson Trace is different. It’s a somewhat bulky gadget that wraps around the upper part of a gun’s grip. The laser is situated to the right of the slide. You can’t pick up a gun that has this type of Crimson Trace on it without turning the laser on. The obvious benefit is that when you need to draw your gun, you won’t have to ask your murderer, rapist, or overly enthused Antifa kid for a time out while you turn your laser on. Not that Antifa kids are using guns yet. Guns are so cisgender. I think they’re still throwing bottles of THC-enhanced urine.
The Lasermax on my gun has a little button sort of thing you push to turn it on. For many people, this can be a problem. If you don’t practice, you won’t remember to turn the laser on when the fun starts. Also, the bar the button belongs to can move around and become dislodged.
Somewhere I got the idea that the Crimson Trace was not adjustable for windage and elevation. I was totally wrong, but that’s what I thought. This is why I got the Lasermax for myself. I thought it would work for me because I’m sufficiently familiar with my gun to be able to operate it in a hurry. I wanted an accurate sight, because I shoot well, and I want to hit what I aim at.
Some time last year, I started feeling something sharp poking me when I handled the gun with the Crimson Trace. I found a little pin sort of thing protruding from the right side of the sight. I made a very weak effort to figure out what it was, and I did not succeed. I put off fixing it.
Eventually, the pin (actually a screw) made a hole in the pocket of a pair of Carhartt jeans, and I knew I had to act. By Googling for more than three minutes (because this was an urgent matter), I learned that the protruding screw was there to adjust the windage. I also learned that I needed a 0.028″ Allen wrench to adjust it. Of course, I had lost or misplaced the original tool Crimson Trace thoughtfully provided with the sight.
Let me digress. I would not buy another Lasermax, and I wholeheartedly recommend the Crimson Trace. I have had an important part of my Lasermax wear out, and the part is too soft, so it will wear out again. Changing the batteries is harder with a Lasermax, too, and the batteries don’t last long at all (“Excuse me, Mr. Mateen…could you put your rifle down while I change my batteries?”). Finally, it’s not automatic.
The best thing about the Lasermax is that it replaces the Glock guide rod. The original rods tend to fail. It has happened to me twice. Maybe I can keep the Lasermax and use it as a guide rod while relying on a Crimson Trace for targeting.
My Crimson Trace works perfectly, and I’m still on the batteries it had in it when it was new. The windage screw can walk out over time, so you need to watch it, and a pin that holds the sight in place can also drift, so you may have to push it back in at some point. These are the only problems I’ve had, and they’re trivial.
To get back to my repair saga, I took the Glock out, activated the laser, and sure enough, the dot was off by maybe three inches at 10 feet.
No problem! I have a ton of tools. Several tons, actually. I have multiple sets of Allen keys. I have multiple sets of tamper-proof driver bits. There was absolutely no doubt that I had a 0.028″ Allen wrench somewhere.
Except I didn’t.
I could not believe it. What a void in my tool arsenal. How could it have happened?
Precision screwdrivers come with caps that rotate, so you can put the tip of a driver in a fastener and turn the screwdriver while holding onto the cap. This is a great thing, and it’s why I leapt at the chance to get Wiha precision Allen drivers.
Some people say there are better precision drivers than the ones Wiha makes. As far as I know, the ones that get all the praise are all German.
Here is some useful information. Many Allen wrenches on the market today *cough cough China* are made from soft “steel.” This is bad. Allen screws *cough cough more China cough* also tend to be pretty soft, and, well, the whole business stinks to high heaven.
Whenever you buy a Chinese tool with Allen screws, you should check the screws for hardness. If they’re not hard, replace them before they get stripped out and make your life miserable.
Do I do this? Yes. Of course!
I did it once, I mean.
I think.
When you buy Allen wrenches, you really need to avoid the cheap ones unless you have solid evidence that the set you’re buying isn’t garbage. An easy way to avoid getting burned is to stick with top brands. Bondhus is a top brand, and Wiha makes great…everything. It’s a German company. Need I say more? Yes, BMW’s and Porches break down a lot, and our faith in Germany received a powerful blow when we found out about Milli Vanilli, but German tools are very nice.
If you want American screwdrivers, check out Grace. They look sort of crude, but they’re excellent. They have square wooden handles. Yes, they will stain, but they won’t roll away, and there is no solvent in your garage that will dissolve unfinished wood or make it slippery.
Grace makes screwdrivers that are especially good for gunsmithing.
I have Klein screwdrivers, and they’re American. I should not have bought them. I’m sure they’re wonderful for electrical work (Klein specializes in electrician tools), but when you get gasoline on them, the rubber on the handles starts to dissolve. Eventually, you are likely to find yourself working on something that runs on gas, improbable as it sounds.
My love affair with Klein is not what it once was. I have two pairs of expensive Klein pliers with handles that started falling off in big chunks. They have a lifetime warranty, but you have to pay for shipping, so it’s worthless. The shipping cost is about the same as the cost of new handle covers, and if Klein gives you the same covers you had to begin with, they’ll just fall off again.
Here’s something weird: Klein makes a different type of cover. The product is called “Klein-Koat.” You can buy them and install them yourself. They look a lot better than the originals.
I also bought myself a decimal chart. This is a poster-sized chart that tells you how big drill bits and other cutting tools are, in decimal inches.
As you surely know, SAE drill bits come in three types of sizes: fractional inch, letter, and wire gauge. They don’t come in decimal inch size as far as I know, and that’s bizarre. Very often, when you work with drill bits, you’ll need a bit in a certain size range, like 0.310″-0.320″. If you have a chart on your wall, you can just look up and get the information you need. If not, you may have to open a book or get out a dial caliper.
The Starrett company mails out free decimal charts as well as free pocket charts. This is pretty sweet, but the wall charts are paper, and you can guess what will happen to yours if you don’t enclose it somehow. In the old days, many companies put their names on charts, and they made them from metal. They’re very collectible now, unfortunately. MSC Industrial sells a 24″-wide chart which is either plastic or laminated, and I believe it also has holes so you can hang it without damaging it. It only costs a few dollars, and mine is arriving today.
You would be surprised how useful these charts are. There are also metric charts. I don’t know what kind of information is on them. I don’t do a lot of metric. I wish I did. The metric system is far superior to SAE or Imperial or whatever you want to call it.
Also among my recent scores: two Noga magnetic bases. These babies are magnificent. They stick like glue, they’re very tough, they have little adjustment knobs that make indicating a pleasure, and they’re made by Jews in Israel. What more could you want? They cost a lot, but how often do you buy magnetic bases? I’ve been machining for 12 years, and I only have 4.
Jews are the best at science and technology. I’ll just say it. Has anyone else discovered relativity and developed the first atom and thermonuclear bombs? Didn’t think so. And I love knowing my money occasionally makes it to Israel without passing through the United States Department of the Treasury first.
Let’s see. I bought a small copy of The Engineers Black Book. This is a small, handy reference which serves the same purpose as Machinery’s Handbook except that it probably contains only the most useful 5% of that book’s staggering content. Unlike Machinery’s Handbook, which has flimsy paper pages, the Black Book has some sort of plastic pages you can wipe clean. That’s a huge thing in a metal shop.
The price of Machinery’s Handbook has gone through the roof lately. Because the information changes very slowly over the years, smart people buy used copies.
Why is it so expensive now? Is it being printed by Snap-On?
A while back, I needed to chase the 1″-8 UNC threads on a tractor attachment, and I realized I did not have a suitable single-point indexed tool. A guy on a forum recommended one from Ebay, so I picked that up. It looks like it’s made very well. It came with a box of carbide inserts, and I got the whole shooting match for $18, shipped from…wait for it…China. I had already fixed the tractor part when the threading bar arrived, but it’s still an important tool to have.
Speaking of carbide, as in “indexed carbide tooling,” I heard a wild claim on Youtube today, and I’m really hoping it’s true. Two of the best-known Youtube tool guys are John Saunders (NYC CNC) and Stefan Gotteswinter, who, in spite of his Chinese-looking name, lives in Germany. Saunders visited…the other guy’s shop…(I am not typing that name again), and they agreed: HSS is obsolete! I should add that they didn’t mean it was obsolete for everything, but they believe it’s no good for end mills.
HSS, which means “High Speed Steel,” is a century-old invention used mainly for cutting tools that cut metal. It’s a wonderful material. In the distant past, carbon steel (or “plain old steel”…humorous initials not intended) was the best thing available. Carbon steel has a problem. When it gets hot, it gets soft fast, and it can permanently lose its hardness in an instant.
There are two reasons why steel that has these properties is inferior. First, when you sharpen steel, you are likely to get it hot enough to undo the hardening and tempering processes. Second, when you cut at high speeds, with a lot of pressure, or without generous lubricant, you can melt your cutting edges very quickly. This adds up to slower sharpening, more frequent sharpening, more discarded tools, and slower work. When you’re paying workers by the hour, you want a drill bit that can drill 20 holes a minute, not three holes, and you don’t want them wasting time on the sharpening machine.
HSS is a huge improvement over carbon steel, and it will always have lots of uses, but when it comes to end mills, it can’t compare to tungsten carbide, which is extremely hard and even more tolerant of heat.
A lot of noob machinists love carbide because it lasts a long time. They love it in lathe tools because you don’t have to shape carbide cutting edges yourself; you just buy new ones. Old codg…I mean “experienced machinists”…tend to look down on people who love carbide, because it takes much less skill to use it, and there are some things HSS does better. I have been taken to task for my love of carbide. I almost never grind my own HSS lathe tools.
There is also a widespread belief (which I held until an hour ago) that carbide can’t get as sharp as HSS. This matters when you want really nice finishes. Saunders and…the German guy…say this is not true. They say they sharpen carbide until you can shave with it, and they even say HSS does not have the sharpness potential of carbide.
That would be nice, if it were true. And because both of these guys are professional CNC machinists, my guess is that it is true.
Stefan–we are on a first-name basis because I don’t want to type “Gotteswinter”–had something else to say in the video. He says he sharpens carbide inserts. If true, this is a huge thing for home machinists. Carbide inserts often cost $10 or more per piece, and it’s not hard to screw them up. If you could touch them up (or just plain customize them) yourself, you could save a lot of cash, and you would be willing to try new things that had suddenly become easy and economical.
He also says you generally don’t need a chipbreaker on an insert in a home shop. A chipbreaker is a little groove that runs around the border of an insert. It would be nearly impossible to reproduce in a home shop. The purpose of a chipbreaker is to prevent chips (metal shavings) from getting so long they turn into dangerous, razor-sharp “birds’ nests.” Obviously, the smaller a job is, the smaller the nests will be, so they become inconsequential. I never thought about it until today.
I admit, it’s generally possible to find excellent inserts on Ebay for very little money. I don’t know why. Surplus, I guess. But finding sharp ones is not that easy. Most carbide inserts have rounded edges. Sometimes a sharp tool is better. It would be great to redeem worn inserts at home by adding sharp edges.
Even if you manage to find good inserts for a dollar apiece, the ability to renew and alter them would be a big plus.
Yesterday I blogged about the possibility of getting a Chinese tool grinder for my shop. Now that I have this new information about carbide, the grinder looks even more useful.
I’m feeling considerably better now, and it looks like I killed an hour or so. I’m having a great day in spite of the way I felt earlier. Hope you are, too.
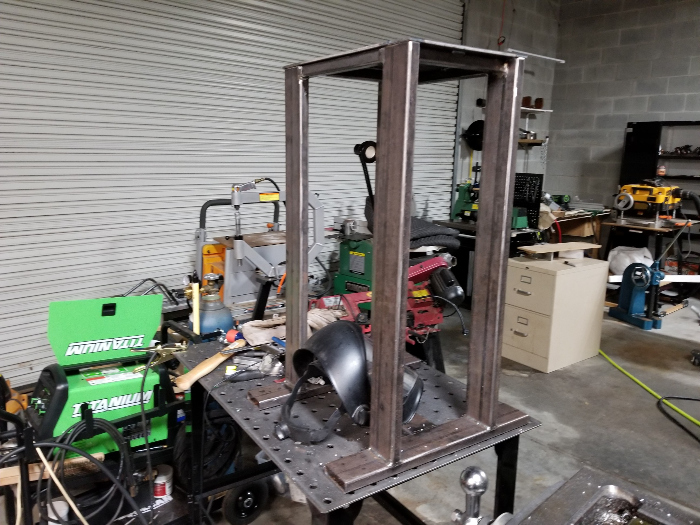
If memory serves, and it may well not, I started building an arbor press stand in November. I have a cheesy Asian arbor press, and the first stand I built for it was pretty bad, so I wanted something better. I threw the old stand out. This left me with a heavy iron object sitting on the workshop floor where it was always in the way. The shop is incredibly cluttered right now, and I needed to get wheels on the press so I could roll it around while I arranged things, so I have been working hard to get the stand together.
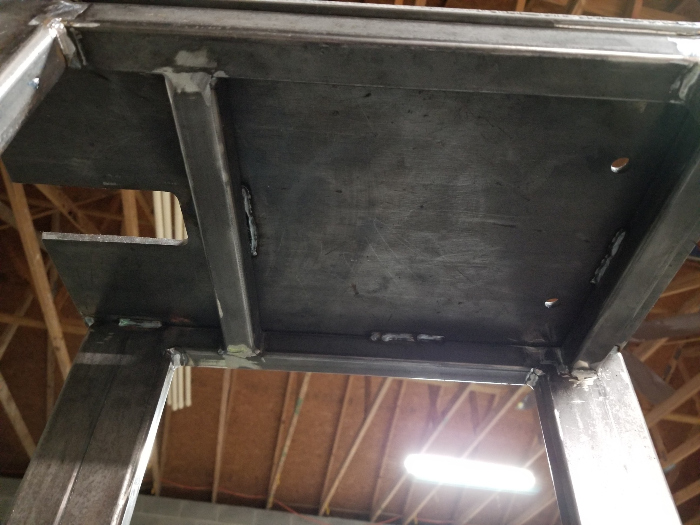
The press was pretty much welded together last year, but I wasn’t happy. There was some slight warpage on the bottom. I had already made one warped stand, and I didn’t want another one. I took the new stand apart, added bracing, added some weld beads to pull the warps out, and put it back together. It’s still very slightly warped, but supposedly, nearly every welded object is warped, so I don’t feel bad.
Once the structural welding was done, I wanted to spend some time on aesthetics. The stand is made from rectangular tubing, and the ends of the tubes were open. I didn’t like that. It creates places where critters can live, and it looks unfinished. I bought myself some flat steel bar, cut it in pieces, welded it over the ends of the tubes, and ground them to make them look like solid bars. I’ll post a photo.
I guess I put in three hours on that today. I really enjoyed it. It’s fun to take hard, sharp metal and make it look soft and smooth.
As you can see, I haven’t painted the stand. I will probably want to add some features, so it’s a little early to paint. One feature often found on arbor press stands is a bin for catching broaches. A broach is a long cutter than makes rectangular slots in things. An arbor press is the standard tool for broaching. After you push a broach through your workpiece, it falls, so you need some way of preventing it from hitting the floor and being destroyed. I’ve always grabbed it with my hand, but that’s not the preferred method.
I haven’t added a bin yet because it seems to me it will be in the way if I want to use the area under the press for a long workpiece. I want to create a bin that detaches.
I originally planned to have a shelf between the legs of the stand. I may still do that. Alternatively, I might put a couple of bins on the sides, about 4″ wide by 4″ deep by 12″ long.
The original design also called for struts in front to prevent the stand from tipping, but I can’t make it tip the way it is now, so I think I’m going to omit them. A truly foolish person could make it tip, but I don’t plan to invite random people to use the press, so it shouldn’t be a problem.
If I make a bin or a shelf, it will give me a chance to use my SWAG Offroad finger brake. That would be neat. I’ve barely used it, and it’s a great tool. I put an air hydraulic jack on my hydraulic press, and my big compressor is here now, so using the finger brake should be a blast.
I’m very happy to have made the press useful again, but I’m even more happy to have it off the floor. Now I can resume ordering the shop. The mess out there is highly annoying. I bought myself a Harbor Freight bin cart just to get junk out of the way, and I may buy a second Harbor Freight tool cart just for mill and lathe tooling.
The more stuff you put on wheels, the bigger your shop will seem, and the cleaner it will be.
I lifted the press onto the stand without help. Ordinarily, I avoid lifting heavy stuff, but I couldn’t help myself. Every so often, I worry that I’m getting feeble. I decided to see if lifting the press was still a possibility. I have managed to do it during the stand-building process, and I haven’t gone to the ER yet. The press supposedly weighs 135 pounds, so I feel somewhat less feeble than I did before I picked it up. I still want to get a small shop lift, however. It should be easier to resist my silly impulses when I have the correct tool at hand.
I’ve been thinking about adding a new power tool to the shop: a single-lip cutter grinder. This is a machine that will let you sharpen and alter cutting tools such as drill bits and end mills. I didn’t think these grinders were that interesting until I saw that they could be used to make custom cutters. You can take a 1/2″ end mill, cut a slot around it, and turn it into a slot cutter. You can also relieve the shafts of end mills so they don’t rub your work when you make cuts deeper than the flutes are long. Of course, you can also sharpen things, and that’s a big deal, given the cost of carbide end mills.
Single-lip grinders used to be extremely expensive. Then the Chinese got ahold of them. Now you can buy a serviceable Chinese grinder for a fraction of what grinders used to cost. It won’t be a Deckel, but it will do everything a Deckel does. You can also modify it and de-Chinafy it, correcting whatever deficiencies it arrived with.
There are plans out there for making grinders, but the consensus seems to be that these grinders stink. People who have made them defend them, but the truth is that they’ve spent maybe 60% of what a Chinese grinder costs, and they’ve put in maybe 150 hours of work per machine, and they still have grinders others refer to as “fiddly.”
I don’t want fiddly. I want a grinder that works without a lot of who-shot-John.
Of course, if I get a grinder, it will need a stand. Hmm.
Now that the press is on wheels, maybe I can get the shop together.
I managed to get some workshop time in today. Very satisfying.
First, I worked on my arbor press stand. I believe I started on this in November. Four trips plus three holidays plus my general lack of competence interfered, but I’m back on it now.
I got myself a real welding table last year, and it came with a bunch of clamps. My hope was that clamping things down before welding them would prevent warpage. Turned out that was not the case. In reality, as far as I (now) know, warpage is prevented not by clamping things as they should be oriented, but by a) making the shortest welds you can get away with, b) skipping around as you weld so you don’t put too much heat into any one area, c) using thick material and adding supports when needed, d) clamping things so warpage will actually straighten them after they’re released, e) straightening crooked things with heat and force, f) adding and then grinding off additional welds that only serve to bend things back into the correct shapes, and g) using flame-straightening.
I clamped my parts to my welding table, and when I put the finished stand on the ground, it rocked. It wasn’t bad, but I wanted it to be better. I got fed up, cut it apart, and started over. I removed the top, but I left the base attached to the legs.
I made sure all the legs were the same length. Then I took 1″-square tubing and welded supports to the top of the legs so they would force the top straight when it was attached. I used a bunch of tacks to attach the supports, and I skipped around while completing the welds. In the end, I had something that was not noticeably warped.
When it came time to attach the top, I started with a lot of tacks. Then I added a bunch of short welds, skipping around as I welded. I did not make long pretty welds that covered all the seams. I know better. Long welds look great, but they cause warpage, they waste time, gas, wire, and money, they increase wear on your welder, and they’re just generally bad.
MIG wire welds have a tensile strength of 70,000 psi. In the past, I used to use over half a square inch of weld on joints that would probably never see 50 pounds of tension. I think it was a stupid idea. Fifty pounds of tension on half a square inch is 100 psi, or 1/700 of the weld’s ideal tensile strength. My guess is that I was overdoing it a little.
It seems obvious to me that you can’t look at your weld, estimate the tension it will experience, and use exactly enough weld material to match that figure. You would have tiny welds that would flex a lot. But I was probably using 5 or 6 times as much metal as I needed.
When I got my top attached, it appeared to be completely flat, but I still had some warpage on the bottom of the stand, which still had my original welds on it. The flat tubes on the bottom were bent upward at the ends. They weren’t bent much, but it bothered me. I flipped the table, put a bead of weld across each tube, and then ground the beads off. Three of the tubes are now straight. The remaining one has straightened somewhat, but it will need another bead before it’s perfect.
Because I didn’t use big, long welds, and because I don’t weld all that well to begin with, I had a lot of ugly joints. My solution was to grind the ugly off. It would be neat to have welds so pretty I wanted to leave them exposed, but that’s beyond my skills, and anyway, I believe it’s impossible when you use proper technique to prevent warping. I had to make multiple short welds instead of a few long ones, and joining short welds makes for ugly joints.
I’m going to keep adding weld and grinding it off until I’m happy with the way the stand looks.
Once the fourth tube is straight, I’ll have a nice arbor press stand which is ready for finishing touches, but because I didn’t use long welds, there will be a lot of areas that have gaps and so on. I have a solution for that. I plan to cram them full of JB Weld, which is an epoxy product which resembles metal.
Here is my theory: long, pretty welds only exist on Youtube, where people who make videos don’t actually have to make anything that’s straight, flat, or square. In real life, short welds are the way to go. You should make one short weld at a time and then let it cool. When necessary, you should join more short welds to them later to complete your joints, but much of the time, you should just leave them alone instead of overwelding. This means you will end up with gaps that have zero adverse effect on your project’s integrity yet which are unsightly and hard to paint over. Since you don’t need the structural strength of welded metal across those gaps, all you really need is a tough product which will fill them permanently without cracking or coming loose.
I’m going to grind my welds until nothing sticks out too much. I’m going to soften all the rough edges on the stand. Then I’ll take JB Weld or something and fill in all the gaps and gouges. Then I’ll paint the stand, and it will be wonderful.
Maybe this is a cheesy approach, but I’m going with it, because it seems smart. I don’t just think it will work; I know it will work.
After I was done with the work on the stand, I decided to do some machining. I have a bench grinder, and a long time ago, I machined a tool rest for it from aluminum. It works very well, but because the aluminum was too thick, it was impossible to orient it at a sharp angle to the wheel without opening a big gap between the rest and wheel. When you use a bench grinder, you never want a gap larger than 1/8″, because if you have a bigger gap, the skin of your finger can get sucked into it, and the grinder will then remove the skin from your finger like a sock from your foot. This is called “degloving,” and it’s pretty gruesome.
I have been dying to fix the rest, but the best tool for the job was a milling machine, and until recently, my mill was in Miami, far away where I could not use it. I tried to modify the rest with the belt sander and bench grinder, but I wasn’t happy with the results, so I stopped. Now my mill is here with me, so I can finally get on top of neglected projects.
I put two parallels in my mill vise to hold the rest level in the y-direction, I leveled it by eyeball in the x-direction, and I put a huge 2-flute HSS end mill in the spindle. I fired up the mill and cut a beautiful bevel in the rest. When I took it out of the vise, I saw that it needed some more cutting, so I inserted it in the vise again, leveled it by eyeball, and somehow managed to get it within a few thousandths of an inch of its previous orientation without measuring. I turned on the mill, cut a little more aluminum, and I was done. I would say the whole job took 10 minutes. Magnificent.
Now I need to get to work on spacers for the grinder wheels. I have CBN wheels. These are aluminum wheels with cubic boron nitride grit embedded in them. They are maybe 1.25″ wide at the hubs and rims, but in between, they’re thin, unlike ceramic wheels, which are of uniform thickness. The spacers on my grinder were made for ceramic wheels, so the outer rims of the spacers don’t reach the wheels to grip them. The only support is on the hubs.
The interior spacers are long tubes with disks on the ends. I could make new ones with deep rims to press on the wheels, or I could just make metal rings to fit between the original spacers and the wheels. The outer spacers are concave washers that also to be replaced or fitted with rings.
I’m wondering if I should get rid of my bench grinder guards. Their only purpose is to contain flying fragments when wheels explode, but CBN wheels can’t do that. The guards make grinding on the sides of the wheels difficult. People who don’t know any better grind on the sides of ceramic wheels, but it’s extremely dangerous, so grinder makers make guards that discourage it. Now that I don’t need the guards to contain fragments, I have some flexibility.
The guards support the grinder’s tool rests, so if I get rid of the guards, I’ll need to rig up new rest supports. I think it’s a good idea, though.
It’s neat to be able to use real tools again. I really missed them. I was helpless. A man without machine tools, a tractor, and several welders is basically a woman. I would go further. I would say that man is Elizabeth Warren.
I look forward to getting the arbor press stand fixed and putting casters on it. One less motionless object to get in my way in the shop.
The first productive thing I did was to close a Miami bank account I had been keeping open because of my dad’s estate. I had to close it because they refused to cancel a recurring transfer I set up a long time ago.
I had a house sitter, and he was being paid. I sold the house. The bank has a fairly primitive website, and for some reason, it did not permit me to cancel further transfers. I contacted the bank via secure email, and they were not helpful at all, advising me to contact Popmoney, the company that actually does the transfers. The responses I got were insulting to my intelligence and somewhat condescending. The lady I was corresponding with kept marking my problem “resolved” even though she hadn’t done anything except misunderstand me and give me useless advice.
I contacted Popmoney, and guess what they did? They connected me to the bank’s Internet department, where I got a guy who sincerely tried to cancel the transfers. Popmoney was more helpful than the people who actually work at the bank. Then I went out of town, came back, and found that the bank was emailing me to tell me another transfer was about to take place.
I went to their site and tried to move all of the money in the account to an account at another bank, but they have a $1500 daily limit, so that was out. Also, they don’t transfer money immediately, so I figured the transfer would go through before the account was emptied, and then I would have an overdraft when the final transfer to my other account went through.
I called them on the phone and told them to close the account. Suddenly, getting rid of the unwanted transfers was no problem. They did it right away. It was too late, though. I didn’t want to have to deal with them any more.
The lady on the phone asked me several intrusive security questions to establish my identity, and I answered all of them correctly. Then she told me I had answered them wrong, and she could not close the account over the phone. She said I was not allowed to try again. She said I would have to send a notarized letter directing them to close the account. I asked her to email me the address to send it to, along with whatever content the letter required. She said she could not email me.
I really try not to get angry at anyone these days, but I finally snapped. I asked her if the bank was living in the 19th century. I said I was sitting at the computer looking at an email from the bank, which seemed to prove the bank could, in fact, email me. They emailed me when they made the unwanted transfers. That was no problem at all.
I got off the phone, drafted a remarkably terse letter, went to my bank, which is a real bank, got the letter notarized, and dropped it off at the post office on the way home. Will it work? There is no way to know with these people.
I received another email from the bank, saying the transfers had been canceled. Okay.
I don’t want anger and unforgiveness in me, so I prayed and so on. I wonder what’s going to happen. It would be neat if they actually closed the account instead of doing more crazy things.
It’s funny; the people I dealt with at the local branch were great. It’s just the phone and Internet people who can’t get it together.
Miami is like a bad smell that won’t go away. I am still receiving emails from a city inspector over a code warning on the house I just sold. Today I had to send her a copy of the new deed to prove I’m not the owner. I’m not sure what the code people are thinking. They already knew I was selling the house, and you can’t fine someone for a code violation on a house he does not own. It wouldn’t help to put a lien on the house. It would land on the new owner.
With all that behind me, I finally got some time to work on the workshop. I moved my machine tools here three weeks ago, and the shop was still a mess this morning. I could barely walk across it. Things were piled everywhere. My main welding table was buried. Something had to be done, but the sale of the house, the holidays, and my trip to North Carolina got in the way.
Before the move, I drew up a diagram of my idea for arranging the shop, and I took a photo for my cell phone. Today I pulled up the photo and used it as a guide. I put my tool cabinets along the wall. I put the welding stuff in a corner past the machine tools. I put my belt grinders beside the mill. I put casters on my welding table. I even added a tiny remote switch to my phase converter so I wouldn’t have to plug it in every time I wanted to use a machine tool.
The shop is still not together, but it’s amazing how much better it is after a couple of hours’ work. I have a big area with my tool cabinets and most of my power tools for metal facing inward. I can see the floor. My welding table and main welder (God bless Harbor Freight) are next to each other in a convenient location. Everything except my big compressor is plugged in, and I can run a cord to the compressor if I need to use it before I run wiring to it.
I have much more room than I thought, so I’m very happy. I could even fit a surface grinder in there.
NO! I won’t think about that. I won’t.
I’ll try not to.
This is wonderful. I may actually be able to make some things now. I still have to finish my arbor press stand and the shop’s wiring, and I need to level the lathe, but I can work on projects before I get all that done.
It’s great knowing I’ll never have to worry about problems with a house in Miami again. Houses are much more stressful to own than other types of properties. I no longer have to think about problems with termites, mold, hurricane damage, vandalism, or burglary. I don’t have to pray trespassers don’t drown in the pool or trip in the yard. It’s a beautiful change. I’m hoping I’ll be able to think about the workshop and my other interests and obligations now.
I should weld something tomorrow just because I can.
I should have almost 5 months of acceptable workshop weather in front of me. I don’t know what I’ll do after that. It will get really hot in June. Perhaps a drywall ceiling and unit air conditioner are in order.
I don’t blog my travels in real time, so I am writing this on January 4, in Hickory, North Carolina, and I will publish it when I get back to Florida.
Today I went to an open house held by The Last Reformation near Connelly Springs, North Carolina. This is their second open house. They are leasing a new headquarters in hopes of buying it. They kept quiet about the location for a long time, but now it’s no secret, so I will tell you about it. It’s a former resort in the hills. It used to be known as Pine Mountain Resort, and it’s located beside a golf course which belongs to a gated community called Pine Mountain Estates.
It’s not clear to me how much property they own. An Internet source says something about 50 acres. They have a big hotel and a three-story restaurant which is maybe 200 yards away. The hotel is like a circa-1960 Holiday Inn. It’s a long building made of concrete and corrugated steel with Spartan rooms opening onto verandas. There is an office/lounge/cafe area in the middle, and they have a pool out back.
The main building needs a roof very badly. It was raining for part of the day today, and water was pouring in through various areas. They had rigged sheets of plastic up to divert it away from the building. If they can get the roof together, my guess is that they will have a perfectly serviceable headquarters. I’m not sure they understand how important a roof is. It’s more important than walls or a floor. When your roof leaks, everything under it will eventually be destroyed.
I don’t understand how the roof ended up like this. I know roofs deteriorate, but this one is like a sieve.
The restaurant’s roof seems to be in much better shape. I did not see any obvious problems.
The land is very nice. It’s in a very hilly area. The woods have obviously been timbered in the not-too-distant past, so most of the trees are under a foot thick, but there is a variety of hardwoods, and there are tall white pines. There are also lots of mountain laurels.
I drove to a hotel in South Carolina yesterday, and today I finished the trip. When I started out this morning, I was not all that far from Savannah, which appears to be situated in a swamp. As I drove, the landscape developed a little altitude, and I started to see real trees. At some point, there was a transition that marked the beginning of real Appalachian scenery, and I felt like getting out and kissing the ground. Given that mindset, it was a real treat to see mountain laurels. I considered grabbing a leaf to take home with me.
I don’t know why Appalachia is suddenly so attractive to me. It has to be God. I felt a thrill of relief when I crossed the Florida line on the way north, and it disturbed me. I love Ocala. I can’t tell you how grateful I am for my home. It’s perfectly normal to be glad you’re north of Miami, but I’m surprised to see that I was happy to get away from northern Florida.
It was a real treat to drive on the twisty roads on the final approach to the resort. I learned to drive on roads like that in Kentucky, and that’s why I don’t drive like a tourist up here. My family had a cabin in North Carolina in the 1970’s, and there were a lot of Florida people up there. My mother used to make fun of them for riding their brakes and creeping around curves. They had no idea what they were doing. I’m grateful I know how to drive here. It would be really nice to have a manual transmission here. Automatics don’t really work well with hills.
When I got to the property, there were a lot of cars there. TRL has students, and they live on the property, so they accounted for some of the cars. There was also a bus belonging to a family of Mennonites. Yes, there are now Mennonites who speak in tongues. I have to wonder how that goes over with their relatives.
There were a lot of people there. Kids were everywhere. I introduced myself to some people, and a lady named Christina took us for a tour. She’s from Denmark, like Torben Sondergaard and a lot of the TRL early adaptors. She showed us the roof issues.
Torben and his family live in one end of the hotel building, which, I suppose, is now a dormitory. Other rooms contain students and visitors.
I spent quite a while talking to a lady from somewhere on the North Carolina coast. She’s a student at the school. We had a long conversation with a local Chinese lady who became a Christian in 2015. We tried to give her guidance. She belongs to an Assemblies of God church, but that denomination, while tolerant of the Holy Spirit, is not in great shape. It spawned a lot of the money preachers.
At around 4 p.m., Torben gave a talk. He brought up a young man who went through their Luke 10 school. They have more than one program. The Luke 10 people divide into groups and go out and evangelize, relying on God to provide them with things like food and shelter. The young man had a wild testimony about the things God did for his team. I’ll just link to a video in which he tells the same story. There is no point in rehashing it in print.
Torben said TLR was about to come to Florida for a long campaign. They’re looking for people to let them stay in their homes. I asked God if I should volunteer. I have a big house, multiple bedrooms, and a pool for baptism. I felt the answer was that I should not offer, but that I should agree if they asked. No one asked, so that’s how that went.
They put a portable hot tub on the deck at the restaurant, and a bunch of people got baptized. It was below 50 degrees outside. I was impressed with their determination. Everyone came out of the tub speaking in tongues.
They also prayed for people in the restaurant. I wanted prayer. I have been having pain in the joints at the bases of my thumbs, and I think whatever spirit gave my mother rheumatoid arthritis has been after me. I wanted help with that. I also wanted deliverance from spirits of fear, unbelief, and worry. Seems like they come for me every morning.
A young Dane named Matt prayed for me. As he prayed, the problems with my thumbs got so faint I could not be sure they were still there. Oddly, almost all of the joint soreness went away about two days ago for no clear reason, so it was not easy to find it today in order to give Matt feedback. Anyway, he was very helpful. I feel some soreness now, so I think more work has to be done.
I have asked God if there is some problem with my personality that gives joint problems a right to bother me, but I believe he has told me that it’s just an opportunistic spirit that has no right to be here. Not every illness or evil spirit comes to you because of something you’re doing wrong.
Out of the blue, Matt asked if I had lower back pain. I do not. At least not chronically. I have strained myself from time to time, causing temporary problems. I told him all this, and he had me sit with my back against a chair so he could check to see if my legs were the same length. Christian healers typically do this for people with back pain.
It turned out my left leg was slightly shorter, so he told it to grow out. My leg twitched a little, and before long, both heels were level. He told me to walk around, so I did. I couldn’t say I felt any different, though.
I’m not going to tell you I was healed, or even that there was anything wrong with me. Just that my leg did twitch, and it did seem to grow out. I can’t swear it wasn’t the power of suggestion.
While he was talking to me, I started to feel a little dizzy. He and a young lady told any spirit that was causing it to be gone. I think it was just the Holy Spirit, however. It was NOT the power of suggestion. It was real.
Here’s something odd: I started to feel a little pain in my lower back (also real). It was very slight. I don’t feel it now. I started to wonder what was going on. You don’t expect to receive prayer for healing and then find you have a problem you didn’t have before.
He said it might be taking me some time to get used to the change. Don’t ask me to explain. I’m just telling you what happened.
I did not see anyone else get a miraculous healing, but I didn’t go around looking to see what was happening, and I left before the testimonies started.
I heard a lady say she was “from this area.” I had been marveling at the lack of Southern accents among those present, so I asked if she was from North Carolina. She said she was from Louisville. I guess “this area” was intended broadly. She said she and her husband had sold everything they had and bought an Airstream trailer. They went to Denmark and studied at the original Jesus Center with Torben.
I guess he affects a lot of people that way. Actually, I hope it’s the Holy Spirit and not Torben.
Sometimes I wonder if I’m burdened with too many objects and too much real estate. Many people give up all their worldly ties so they can travel and serve God. I don’t think he wants this for me, though. I want to be rooted in one place. I feel that he keeps telling me to have a house and keep my tools.
Among charismatics, there may be a tendency to condemn people who won’t give everything up and travel around, but God probably doesn’t require this of everyone. We all have different desires. I would go nuts, living out of a Winnebago. I want to own some soil, and I don’t want to look over my hedge and see my neighbor standing around in a tank top with a beer in his hand.
It really seems like Christians admire people who spend their lives traveling, and that they look down on those who don’t. There are so many people near you who need evangelizing; can you really say you need to go to Africa or Mexico? Africa is full of African evangelists, by the way. A lot of people don’t know that.
After all the healing and baptisms, there was a long period where I didn’t seem to connect with anyone, so I took off and headed for Chick-fil-A and my hotel. I felt that whatever God wanted to happen to me at the Jesus Center had happened, and that there was no point in hanging around. I didn’t make new friends. The only thing I said to Torben was “hi,” when he welcomed me.
I am still not planning to join TLR. It’s a denomination now, whether they know it or not. When you have classes, a curriculum, a headquarters, and a name, you’re a denomination. I can’t have a board of directors or a handbook between me and God. I think what they’re doing right now is right for many people, but I can’t get too close. Don’t ask me why.
I don’t think they’re frauds. I don’t think TLR is a cult, although it may become one if they don’t watch it. I’m just sure God does not want me to join.
Many of the people who attended the open house were Europeans. I suppose they knew Torben in Denmark. It seemed like most of the others were not Southerners. That surprised me, because Southerners seem to own charismatic Christianity, and the Jesus Center is situated in North Carolina. They told me they hadn’t gotten too close to their neighbors yet.
They call this place “The Jesus Center” and “The Ark.” I don’t know if they’ve settled on an official name. For a long time, I’ve believed that God was moving people to rural areas to keep them safe, and TLR clearly has the same idea. I’m sure urban mobs will be traveling around killing Christians before long, and I think God wants the elect to be so far from lazy leftist handout-lovers, they won’t have the gumption to get in cars and come to us.
The Ark is certainly a good place to be in that scenario. It must be 15 miles from the nearest limited-access highway, and you have to take narrow, winding roads to get there. Once you’re there, you can’t use your phone to get home unless someone lets you use their wifi to get it started. Angry mobs from inner cities will have a very hard time reaching places like The Ark. They’ll exhaust themselves in the cities, suburbs, and relatively accessible rural areas. If you’re too lazy to work for a living or take care of your family, you’re not going to work hard to reach people so you can persecute them. Places like The Ark will not be attacked until the easy pickings are exhausted.
You can see this principle in action today. When there are riots, the perpetrators, who are invariably leftists, don’t even leave their own neighborhoods. They destroy the local stores they depend on for food and other necessities, and then they complain that big businesses won’t open locations in their areas.
I can see why God wants me in an area like the one where The Ark is located.
Here is what Psalm 91 says: “Because thou hast made the Lord, which is my refuge, even the most high, thy habitation, there shall no evil befall thee, neither shall any plague come nigh thy dwelling.” It says, “A thousand shall fall at thy side, and ten thousand at thy right hand, but it shall not come nigh thee; only with thine eyes shalt thou behold and see the reward of the wicked.” People who have been moved out of cities will have to sit by and watch while the people they left behind are slaughtered. It’s very consistent with similar things that happened in the Bible.
Torben is a huge Trump fan. There are ignorant American charismatics who think Trump is God’s enemy and that Obama was a messiah figure, but Torben, a Dane, is aware that leftists are going to come after us, and he says Trump is our friend. He says persecution will fall on us after Trump leaves office, or at least after conservatives lose their political power. It’s amazing that he can see this while so many black, Hispanic, and coastal charismatics can’t. It’s strange to see a European from a left-leaning country see things so clearly.
Supposedly, charismatics in Europe are much more supportive of Trump. This is what I was told today. How can that be? I guess it’s because the charismatic church in Europe is already an underground movement used to rejection. Underground churches are supposedly stronger. It takes determination and sincerity to be a charismatic in Europe. Here, any lazy, worldly person can join a charismatic money church, listen to someone like John Gray or Richie Wilkerson, and continue to serve the devil.
I have no idea how to find the property God wants me to have, but I suppose locating it was never my job anyway. I’ll go back home and wait to see what he wants me to do.
I’m very glad I came to the open house. I hope one day I’ll have more strong Christian friends, and that I won’t have to take long drives to be among them, but until then, trips like this will be very helpful. Right now, there is no one near me who is really on the same frequency.
MORE
I am home. It’s January 6. I spent the night in Georgia, and I made it to my house this afternoon.
It’s great to be in my own house. I was getting a little too comfortable in hotel rooms. Before Christmas, I ordered myself some genuine Hampton Inn pillows, which are wonderful. If I keep traveling, I may find myself buying tiny bottles of shampoo and hangers that are permanently fastened to the rod.
Because I believe God has been telling me I’m going to move to Tennessee, I wanted to drive through some areas of the state after finishing up with TLR in North Carolina. One place that has caught my attention is Johnson County, where Mountain City is located. The elevation is high, which means nice summers, and unlike the higher areas farther south, it hasn’t attracted throngs of unpleasant people from Florida.
I was surprised to see that Mountain City was less than 60 miles from my hotel in North Carolina.
Yesterday morning I drove to Mountain City, passing through Blowing Rock, North Carolina, on the way. At first, the land was merely pleasantly hilly, but then I saw Blowing Rock clinging to the top of a big mountain in front of me. I hadn’t been there since I was a kid. I had forgotten what a crazy place it is. You have to wind your way up a very steep highway, right up the side of the mountain, to get there.
When I left the hotel, it was 40 degrees. On the way to Blowing Rock, I saw a truck with snow on its hood and roof. When I got into town, it was 29 degrees, and before long, I saw the external temperature bottom out at 28.
One of the negatives of the Mountain City area is that in order to get the cool summers, you get cold nights a lot of the year, and the winters are several degrees cooler than they are at lower altitude. I didn’t know how big the difference was until this trip.
The impression I got was that once you get up to Blowing Rock, you find yourself on a sort of plateau, and it continues into Tennessee. The Mountain City area seemed relatively flat, and it’s 1100 feet lower than Blowing Rock, which is on the very top of a mountain.
There isn’t much in the town. Just a few stores, a couple of gas stations, a courthouse, and so on. I went into the grocery store and bought apples, just to find out what I would be dealing with if I moved there. I wouldn’t starve, but I wouldn’t be able to count on croissants and baguettes.
I had to stop at a gas station to put air in my tires. In the cold air, they shrank, and the drop in pressure set off my car’s sensors.
I drove from Mountain City to Asheville, through some towns that were considerably smaller than Mountain City. The distance was about 95 miles. I saw a lot of houses. I wondered what the people did for a living. I wondered where they got their food. Surely they didn’t drive to Mountain City every week. Maybe they do, though. My grandmother used to drive to Lexington, Kentucky, for groceries, and she lived over 60 miles away. There was an IGA grocery store in her town, but it wasn’t always enough.
I’m not sure what to make of what I saw. The places I drove through didn’t look as promising as the other side of the mountains, in areas like Blount County. I don’t want to be in a city, but I don’t know if I want to be 90 minutes from the nearest town with over 10,000 people. Ocala has a population of around 60,000, and it’s big enough so you can buy an appliance or get your garage door fixed without major problems. I don’t want to be so far out I have to do everything for myself.
If I lived on the other side, I could always go into Knoxville if I needed to, without mounting a major expedition.
On the way out, I drove past Asheville, not Knoxville, which was a mistake. It put me too far east. I was trying to avoid driving through southeastern Georgia on the way home. Going north, I had gone through the area between Ocala and Jacksonville, which is pretty bad, and then in Georgia, I had driven through an endless expanse of swamp. Savannah, for all the romance people attach to it, appears to be in a swamp. It’s oppressive and creepy.
After I got through Asheville, my GPS still wanted to send me through the muck, so I went out of my way to go farther west. I must have added two or three hours to my trip by the time I was done, but I didn’t care. Driving through Brunswick, Georgia, once is enough for anyone.
After about 11 hours on the road, I gave up and got a hotel room. Took off again this morning, after more Chick-fil-A. I eat there out of principle, in spite of the fact that they quit supporting the Salvation Army. Leftists still haven’t forgiven them, so I haven’t stopped supporting them. Also, the food is great, and the way they treat customers gives me a real boost.
I did not feel good about re-entering Florida. That made me a little sad. I asked God if he was making me feel that way so I would be willing to move to Tennessee, and I felt that the answer was “yes,” so I asked him if he could motivate me with the positives of Tennessee instead of making me feel bad about Ocala, which is a beloved refuge. I think he agreed.
If you’re wondering why I’m so focused on moving, I will tell you one reason. Torben says God told him to move to America a long time ago. He didn’t listen. Then Danish TV made a dishonest documentary about him, people started confusing him with a preacher who was abusing people sexually, and the Danish legislature passed a law because of him, making it illegal to cast out demons in front of kids and disabled people. There was talk about taking away his children because of his doctrine. He and his family had to move in the middle of the night, with 8 suitcases. I want to go when God says “go,” at a leisurely pace, with all of my great stuff.
I feel God has told me to quit asking him exactly where to go. As I understand it, I’m to wait until I hear from him. It’s a little difficult to sit back and do nothing, after spending so many hours looking at houses on the web, but on the other hand, do I really want to do the work myself? No. Not if he’s willing to take it off my back.
I feel that God showed me something this week: it’s wrong to feel sure of yourself. If you feel you can handle any challenge, you will jump in front of God, take things out of his hands, and mess everything up. That’s hard to swallow, but it must be true, because the word says we are not to lean unto our own understanding.
It’s hard to get used to taking my hands off things and refusing to plan, but where did planning ever get me in the past?
You know nearly as much about my future as I do right now. I know it will be better than the past, and I know that I don’t have to have a plan in order to make it happen, so I am content.
I almost had a machining project today, but it looks like I may have to use hand tools instead.
I have a tractor. It has a bucket. There are brush forks on the bucket. They attach with turnbuckles that tighten chains around the bucket.
A turnbuckle (AKA “bottle screw” or “stretching screw”) is a tube with internal threads on each end. One thread is right-handed, and the other is left-handed. Screws go into both ends. When you turn the tube, both screws go in or out at the same time.
At some point in the past, someone with good intentions and not a lot of knowledge applied something like a Vise Grip to one end of one of my turnbuckles. There are matching gouges on two sides of it, showing where the tool was attached. I assume the purpose was to grab the tube and turn it. A pipe wrench would have been better (but still bad) because it wouldn’t have compressed the tube as much. I think. Anyway, it appears that the tube was narrowed slightly by the pressure, and this made it very difficult for the screw to go in and out. Because of this, I could not tighten the turnbuckle properly. I could only turn it so far, and then it became impossible.
I put off fixing this because I wanted to use the lathe. I wanted to grind a 60° threading tool, put it on a bar, run the bar into the turnbuckle, and follow the threads to remove material. This may not be the smartest way to fix the part; a tap would be faster. I wanted to use a machine tool, though. I’ve been deprived of machine tools for so long, I want to use them for everything.
Today I took the part off the tractor, mounted it in my bench vise, and used a breaker bar to remove the bound screw. That’s how tight it was. I had to push so hard, I had to be careful not to turn over my heavy workbench. When I got it apart, I was left with the turnbuckle body, which is the tube part. I chucked it in the lathe, and I found that the runout was something like 3 thousandths, which is fine. There was a lump on one side that went up to maybe 7 thousandths, but because it was only in one area, I assumed it was an anomaly I shouldn’t take into account.
Once I got the part chucked, I saw that it was very hard to see inside it. The part is black inside and out. It will be hard to put a cutting tool inside it and see well enough to register it in the existing thread.
I went to Ebay and ordered a used tap, just for the purpose of fixing the part. It will run me about $12. If I end up using it, the whole job should take under 15 minutes. The tap gives me a plan B. Once I’m done with it, I should never need it again, but $12 is a great price for fixing this part, and it never hurts to have extra cutting tools. I don’t know what a machine shop would charge to fix it, but I would have to drive all over and find someone who had the right tap, so I think going to a professional would be stupid even if it were free.
I may still use the lathe. It’s possible to line a tool up with an existing internal thread. I’ll just have to play around with it. Because it’s so dark inside the tube, I’m thinking of painting the inside. That would make it easier to see. One does not ordinarily paint things before machining them, but this is kind of a bubba job, so I don’t have to be persnickety about it. All I need to do is scrape maybe 10 thousandths out of the part, and it should function again.
I should be all set now. If I can’t make the lathe work, the tap will be here in a few days, and I’ll get the job done. It will be nice to have the fork attached properly for a change.
The excitement around here never stops. Yesterday I got my milling machine connected to my phase converter, and today I mounted my milling vise and trammed the vise and mill head.
I thought hooking the mill to the phase converter would be a 45-minute job. I don’t know why I make prognostications like that. It’s like begging to be disappointed.
The job consisted of drilling a hole in the phase converter cabinet, running a power cord through it, connecting the wires inside the cabinet, and putting a plug and receptacle in the cords between the phase converter and mill. It should have been a snap. Of course, something amazing happened and caused a ridiculous delay. The receptacle I bought turned out to be defective. What are the odds of that happening?
Modern receptacles are pressed together when they’re made, so you can’t get inside them to fix them. To attach wires, you run them through holes in the receptacles, and they slide into little clamps consisting of screws and rectangular nuts. The screws are supposed to have upset metal at the ends so you can’t unscrew them completely. I think you can see where I’m going with this. I loosened a screw to make room for a wire, and the nut fell completely off the screw, inside the receptacle. Game over. The screw was defective, so it came right out of the nut.
Right away, I was looking at almost an hour of additional time. I had to go to Lowe’s, return the defective receptacle, buy a new one, and drive home.
I got the mill hooked up, and even though it was not aligned and ready to use, I fired it up just to hear it and know it was alive.
Today I used my precision angle plate to tram the head of the mill. It was a pleasure. Slap it on the mill table, push it against the quill, rotate the quill until it’s flush against the plate, and tighten. Literally a 5-minute job. I don’t know why everyone doesn’t do it this way. I can’t find anything wrong with this method.
I stuck the vise on the table and used an Indicol holder to hold a test indicator against it. I decided to use an indicator from CDCO, which is a company that sells cheap Chinese machine accessories. Big mistake.
CDCO is great for things like tool holders, and when I saw their price on test indicators, I decided to give them a try. I have used cheap dial indicators (less precise than test indicators), and they have never given me a problem, so I figured a test indicator was a safe bet.
Tonight, I found that I could not get the numbers on the indicator to settle down. It was as though the indicator was losing its zero. Very strange. I got out an old European Tesatest indicator and used it instead, and I was done in a few minutes. It worked perfectly. So much for cheap test indicators.
It could me that I banged the CDCO indicator on something in the past and messed it up. I don’t know. I can’t be sure it was useless straight from the factory. But I’ve beaten the Tesatest up pretty good, and it works perfectly.
The upshot, tribulations and hindrances aside, is that I now have a functioning machine shop again. I need to level my lathe, but that’s a minor thing. It doesn’t have to be adjusted properly for small work. I should also install a switch on my phase converter so I don’t have to plug it in every time I use the machines. That’s a half-hour job, though.
I mean, it SHOULD be a half-hour job.
I’m learning.
Now I have no excuse not to go to the shop and arrange everything so it’s orderly. It’s obvious what I need to do. I need to come up with another excuse.
I think my first machining project should be to chase the threads on a turnbuckle that holds a fork on my tractor’s bucket. I think someone made the rookie error of putting a Vise Grip on it, tightening the threads on the turnbuckle’s tube. It’s impossible to tighten past a certain point. I would have to find a way to hold the part in a 4-jaw chuck, and I’d need to create an internal threading tool big enough for the work. I also have to figure out what size thread I’m dealing with. The screw part of the turnbuckle looks like it’s over an inch thick.
I guess I could measure the thread and try to find a used tap that will fit. That would save me time. A new one would probably cost somewhere around a hundred dollars.
Anyway, my workshop, though disorderly, is finally stocked with adequate machinery. I feel as though life has resumed.
Adjustments Turn Conversation Pieces into Working Machines
My workshop is a disaster area right now, due to the recent arrival of my compressor, mill, and lathe. The lathe is up and running, although I have not leveled it yet. The other two tools are still waiting for my help. I need to get things squared away, because I moved about half of the stuff in the garage in order to get the additional tools in, and I can’t get to things I would like to use.
Last night I went to Lowe’s and picked up $75 worth of electrical stuff to hook up the mill. I could have gotten out of the store for $33, but I bought two extra parts: a plug and a receptacle, both for the mill.
I have been trying to decide whether to use a VFD on the mill, as I did in the past, or to connect it directly to my 3-phase power supply. The only benefit of the VFD is that it allows me to work without firing up the huge power supply. I have an uneasy, irrational feeling that the power supply (phase converter) is fragile, so I avoid putting unnecessary hours on it. It’s probably bulletproof. It came from a serious company that makes industrial products.
If I use a VFD, I’ll have to run a cord from a wall socket to the VFD, and then I’ll have to run wires to the mill. In Miami, this was an okay setup, because the mill was next to a wall. I was able to put the VFD on the wall, and when I wanted to turn it on and off, I simply reached over and pushed a button. This time, my mill is out on the shop floor, so there is no convenient place for mounting a VFD.
I decided to go with the phase converter, so I have to cut a hole in the cabinet, hook a cord up to the phase converter, and run the cord to the mill. In order to make life simpler in the future, I’m going to put a plug and receptacle on the cord so I can detach and reattach it at will in the future.
I’m going to run the cord over the roof trusses and let it drop down to the mill. This will keep it off the floor.
Once the cord is hooked up, the mill has to be adjusted.
Bridgeport-style knee mills have rotatable heads. They can nod in the xy-plane, and they can turn in the xz-plane. This is a great feature, provided you’re not afraid to use it. In order to use a mill in the vertical orientation, it has to be “trammed,” which means it has to be set up so it’s perfectly perpendicular to the table from every direction. Tramming a mill is a pain in the butt. Generally, people use indicators that measure to within a thousandth of an inch, and they sweep their tables holding the indicators in the spindle. If the reading on the indicator changes when you move the indicator, your head is not perpendicular.
I learned a neat trick for tramming a mill quickly. People get mad at me when I mention it, but it works very well. Even if they can argue that it’s not as precise as a test indicator, which is dubious, it’s a very quick way to get you within half a thousandth.
I have something known as an angle block. It’s a big piece of iron with a handle. It looks sort of like a clothes iron, except it’s rectangular. The sides are square to each other to a high degree of precision. To tram your mill, you put the angle block on the table, lower your quill, and rest the quill against the block. If any light can be seen between the block and quill, the quill is not square to the table, so you adjust it.
My quill is 6″ long. Using this method, I can get it square to the table within half a thousandth over that 6″ length. If you put a light behind an angle block and a quill when they’re pressed against each other, you will be able to detect light coming through when there is less than a half-thousandth gap.
That’s not too shabby for a job that probably takes less than 10 minutes for both axes.
Once you get below a thousandth, it becomes hard to improve things. You’ll get everything lined up perfectly, and then things will move while you’re tightening the mill’s adjustment bolts, and you’ll have to loosen them and start over. How hard you want to work on it depends on how accurate you want to be. The difference between half a thousandth and a quarter of a thousandth (or whatever tiny amount you can manage) is not going to have any measurable effect on your work. No one will ever look at a part you milled and say, “Your mill is off by three tenths of a thousandth.”
Tram problems show up when you use wide tools like fly cutters and face mills. These things put flat faces on parts, and the faces can be two or more inches wide. Let’s see. If your tramming is out by half a thousandth over 6″, it’s off by a twelfth of a thousandth an inch from the spindle’s center of rotation, where a 2″ cutter is going to be most affected by your laziness. Hmm. That’s even more accurate than I thought it was.
To machinists, a twelfth of a thousandth is the same thing as zero. It’s an incredible degree of precision. A machine that can hold a tenth is considered top notch. No one in his right mind tries to do better than that on ordinary machines. Once you drop down close to a tenth of a thousandth, you’re getting into the territory of precision grinders, and you’re leaving mills and lathes behind.
I have used the block to tram my mill and then produced a faced part that appeared to have a perfect finish, so the process seems pretty reliable to me.
According to the video I embedded above, anything within a few thousandths is good, so it looks like the angle plate method is the way to go. The man who made the video is a respected machinist.
I have been told that a real expert will tram his head so it’s not quite square in the xy-plane, to allow for deflection when the work is under pressure, but that’s too much aggravation for me.
Milling machines are usually used with vises, just like drill presses. You can use clamps instead, but they’re a lot of work. Most machinists leave their milling vises on their tables all the time, except for unusual jobs. The big problem with using a vise is that it, like the mill’s head, has to be trammed. You don’t want a vise which is angled to the table.
I don’t know of an easy way to tram a vise. You put your test indicator on your spindle, you rest the tip on the vise’s rear jaw, and you move the vise back and forth while watching the dial. You bop the vise with a soft hammer until the dial stops moving. It’s maybe a 10-minute job. Again, as in the case of the mill’s head, everything will try to move when you tighten the vise down, so sometimes there is a lot of repetition.
I guess it will take 45 minutes to wire the mill up, and I would budget half an hour to get everything trammed.
Once all this is done, I can feel like a machinist again, and I may even have the motivation to start arranging my welding area.
Today I machined something. It was nothing great. Let’s be honest; I faced the end of a piece of aluminum and put two steps on the end. Whoo hoo. But I felt great anyway. I haven’t done this in over two years.
I’ll post a photo of my amazing achievment.
My mill and lathe arrived here on Tuesday. I’ve been so busy with a house closing and getting my workshop together, I have had very little time to do anything resembling using tools. I still have maybe 300 pounds of junk in my truck.
Yesterday I got the machines sort of ready to work. The lathe needed to have its connections to the phase converter restored, and I had to mount the DRO. That was about all I got done. The mill has a rotating head, like all Bridgeport-style mills, and in order to make moving the machine easier, I had rotated the head down onto the table, so I had to crank it back up.
I located my milling vise and 3-jaw lathe chuck so I could install them. They have been here less than two weeks. Of course, they had already started to rust. I don’t know what it is about this area. Everything rusts like crazy.
I cleaned them off and oiled the daylights out of them, and I did the same things to both machines. I would rather have oil everywhere than rust anywhere.
By the time I got done with all this, it was too late to do anything more.
Today I went back out, and I mounted the chuck on the lathe. I also mounted the wooden shelf unit I made to go on the headstock. This thing is very handy. It holds a chuck plus a load of toolholders and other doodads.
I also had to put the jaws back on the chuck. When I left Miami, the chuck had soft jaws on it, so today I reinstalled the hard factory jaws.
When the lathe was more or less together, the first thing I did was to turn it on, just to hear it spin. Wonderful.
I grabbed a piece of aluminum and turned steps into it with a carbide insert. It’s a little rough. I think the insert needs to be rotated.
The only thing I have to do now, lathe-wise, is to install the cast pucks it sits on and then level (straighten) the lathe. I have a Chinese precision level for this purpose. I don’t know how well it works, but I am reasonably confident.
The mill is going to be more annoying. I have to tram the head to the table, which is tedious. Then I have to mount the vise and tram it to the head. Equally tedious. I may put my rotary table on the mill table next to the vise. This is a smart idea if you mainly cut small parts. Moving a rotary table on and off your mill is a pain, so it’s nice to leave it in place. If you need to mill something big in the vise, you can just move the rotary table.
Once all the tramming is done, I have to connect the mill to power. I have two options. I can run a new wire to the phase converter, or I can reinstall the VFD I used in the past. The problem with the VFD is that it has no place to live. I used to keep it on the wall by the mill, but now the mill is far from the wall, so the wall won’t work. I could make some kind of stand, I guess. That would be strange.
If I wire it to the phase converter, life will be somewhat simpler, but I’ll have to run the huge phase converter every time I use the mill.
It’s probably the best way to go.
When I’m done, I’ll have a spare VFD. I already have a beautiful 2-HP motor gathering dust. You can guess what I’m thinking. I know you can. New belt grinder! Sure, I already have a belt grinder, but if I had two, I could keep two belts mounted at once, saving me precious, precious seconds when I want to change grit.
I would like to make myself a belt grinder simply because I feel bad about buying a prefab grinder the first time around. I fell prey to doubt. People talk about grinders as though they’re hard to build, but the truth is that they’re very crude, very simple machines. As I have often said, you could build a fine one from two-by-fours and plywood, plus aluminum pulleys.
My grinder is very nice, and it was cheap. I bought an Oregon Blade Maker (now Original Blade Maker), which is basically a steel box with two pulleys and an arm. It works just as well, and will last just as long, as an expensive industrial grinder. But you can’t turn it sideways to orient the belt horizontally. This is a bummer. Sometimes turning a grinder 90° can make life much simpler.
People like grinders with welded bodies. The truth is that you don’t need a welded body at all. A grinder held together with fasteners is just as good, and you can break it down when you need to move it or modify it. I would like to weld a grinder body together, but I’m not sure it’s the smart move. It may be more elegant, but a bolt-together grinder gives you more options.
I would like to do more stuff tomorrow, but it appears that my aunt, my cousin, and the cousin’s son are going to be here over Christmas, so I have to get the house ready. The garage is a total disaster right now because I’ve been pulling things off the truck and throwing them on the floor so I can get to other things I need. Luckily, my relatives aren’t picky.
I’m hoping to help them get closer to God. They are rejected, oppressed people.
Maybe I can squeeze out time to get the mill running. That would be beautiful.