Bench Trials
July 13th, 2015A Certain Amount of Bleeding is Good for You
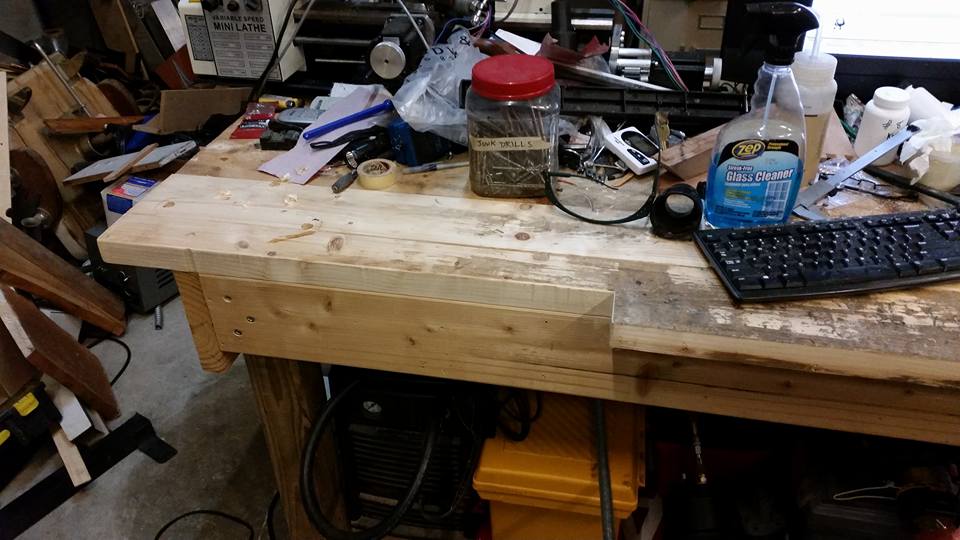
I have been fiddling around with my workbench.
I built it in maybe 2007. I did not know what a workbench should be like, so I guessed. I used pressure-treated four-by-fours for the legs. I put horizontal two-by-eights in several places for added rigidity, and I covered it with two-by-sixes laid flat.
I did not know much about joinery or routing, so I made an interesting choice. I took a router and made tongues and grooves on the boards that made up the top, and I shoved them together. The outermost boards had screws holding them down, and they held the other boards in place. I put one additional screw near the end of each inner board.
The tongues and grooves were not too good. I think I didn’t understand the importance of milling wood to make it flat and straight. When you have boards with curved edges and various types of warpage, they don’t mate up all that well. Now I have a few cracks that things fall into. Screws and drill bits, mostly.
The irony is that I thought the joinery would prevent things from falling. I didn’t want stuff to fall down between the boards and go right through so they landed under the table. Now it falls and gets stuck half an inch below the level of the top, and it tends to get covered with sawdust and other crap.
Yesterday I dug around between two boards and found a drill bit I had been missing for weeks, plus an unusual screw that fell out of a rotary table.
The workbench has its issues, but it’s very solid. You could literally park a car on it, if you could find a way to fit it.
It’s not a real woodworking bench. It’s just a general-purpose bench. I stuck a heavy 5″ mechanic’s vise on the left front corner, and I didn’t add any features that would help me work on wood. No dog holes. No wood vises.
Much later, I learned what woodworking benches were like.
Internet hobbyists are probably not the greatest guys to ask for advice when it comes to benches. Most of them have never had to make a wooden item in order to put food on the table, so they don’t know a whole lot about efficiency or what really works. They like benches that look fancy and have lots of cool joints in them. And sometimes they use hardwoods, which is apparently a mistake.
I’ve been studying up on this. Evidently, crummmy wood like pine and fir is the best choice for a workbench. It’s cheap. It’s relatively easy to work. You can glue long pieces together and make huge laminated boards without quality jointing; the wood is soft enough to deform when clamped, closing any gaps caused by warpage. You don’t need to run it through a jointer, which would be a chore.
Also, you should not sand a workbench top and make it super-pretty. If you do, stuff will slide around on it because it has no grip. Professional woodworkers will actually fix their benches when they get too smooth. There are planes made for this purpose. They have toothed blades. You take the plane, and you deliberately rough up your gorgeous surface so cabinets won’t slide off and shoot across the shop.
Hobby woodworkers tend to make benches with tops that are way too thick. When a top gets more than 3″ thick, you will start to have issues when you try to use holdfasts. A holdfast is a bent rod that goes through the top. It has a flat clamping surface on one end. The other end is straight. You push the straight end down into a hole in your bench, and it gets wedged and holds your work down flat so you can butcher it. If the hole is too deep, it won’t want to wedge.
On the other hand, a thin (1.5″) top like the one I have is bad, because it won’t work with many vises. An example is the Eclipse 10″ vise, which is a Czech copy of a vise made by Record. This thing is supposed to be screwed to the underside of a thick bench, with over a foot of hardward projecting horizontally underneath. The fixed jaw goes against the edge of the bench, and it’s pretty deep. If the side of your bench is 1.5″ high, you have a problem. Also, if you have a vertical board under the edge of your bench to support the top, you will have to cut holes in it for the vise hardward.
I have two vertical boards a few inches apart.
Seemed smart at the time.
I am not planning to make a new bench right now. I can’t think of an excuse, so I will just admit I’m lazy. Over the last day or two I’ve learned things that make it less intimidating, but during that time I made a choice to work with what I have, and I made substantial modifications, so I want to see how far I can go with the existing bench.
In my Google-powered research, I learned about something called a Moxon vise. This is a fat board maybe two feet long, with two acme screws in it. You put a screw through each end and mount a dial on the outside, and when you want to hold something, you put it between the board and your bench and tighten the screws.
It’s not rocket science, but it has a following, and to me, it looked a lot easier than performing major surgery so I could install an Eclipse.
Usually, these vises have screws that don’t move. The dials are threaded on the inside, so they move toward the bench as you tighten the vise. That leaves two huge bars of metal hanging out of the bench at waist level at all times, waiting to gouge you every time you walk by.
No. That will not do.
I decided to make a version with screws that turn. That would move everything close to the bench when the vise was closed.
To do this, I needed a fat fixed jaw pretty much flush with the side of the bench, and that meant hacking off the ledge that hung over the side. Here’s a photo of what I did with an ordinary saw from the hardware store, followed by a flush-cut router bit.
I am not great with a router, and the bench top (my reference surface) was not all that flat, so I got a few gouges. But I had to fine-tune it with a scraper and plane anyway, so to a large extent, the gouges went away.
I needed wood for the hole. I had a couple of really ugly two-by-sixes rotting in the backyard, so I cut usable pieces from them jointed and planed them, and glued them together to make one board.
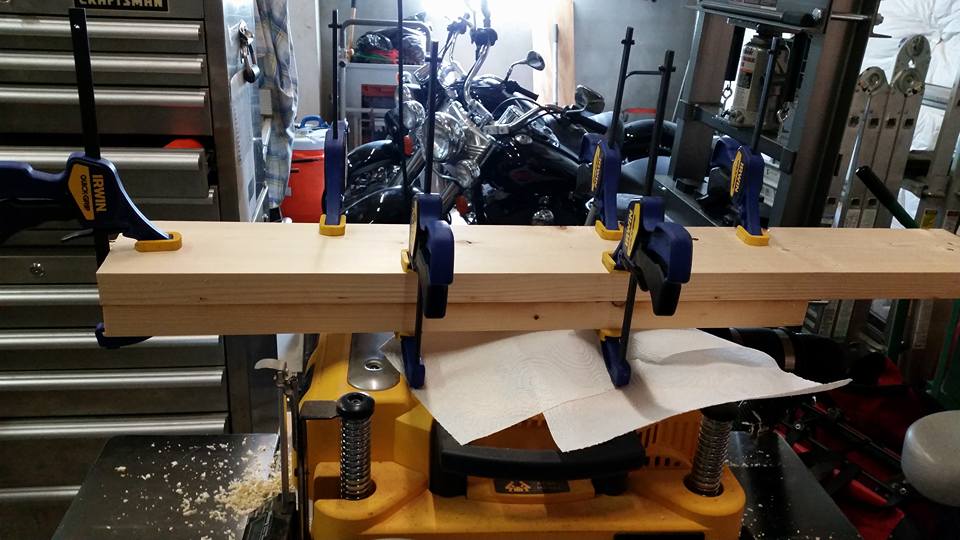
I drilled some holes in them and made recesses for screws, and then I attached them to the bench with lag screws. The result is really nice. I can’t stop looking at it.

I wanted a hardwood moving jaw, for some reason I don’t recall. I paid good money for three feet of maple and then cut it down, removing all the cracked and useless wood that always seems to come with lumber yard items. I plan to drill screw holes in it and add it later.
I also picked up a piece of 36″ threaded rod and two nuts. The usual choice is acme thread, but that’s not available locally, and I saw a piece of 3/4″ 60-degree threaded rod just staring at me at the hardware store, so stupidly, I bought it. Then I found out it won’t work.
I mean, yes, it will work, but the pitch is much finer than the pitch on an acme screw, so it will take a billion turns to open or close the vise a few inches. Also, 60-degree threads don’t work well with half-nuts.
A half-nut is a piece of metal with threads inside it, but they only go 180 degrees. If you took a nut and sawed it in half across the opening, you would have 180 degrees of threads, and you could drop it directly onto a threaded rod and get it to engage. You wouldn’t have to screw it in, because the nut would be open.
If you have two half-nuts, you can close them around a threaded rod in order to get a nut that works. When it’s closed, you can move the rod back and forth through the nut by turning it. When it’s open, you can move the rod freely without turning it. You can use half-nuts for quick-release devices. Open the nut to move the vise jaw (for example) quickly. Close it when you want to use the screw and apply force.
Lathes use half-nuts to move their carriages when machinists thread things. You turn a lever, the nut closes around a turning screw, and the carriage moves as the nut moves up the screw.
A 60-degree thread is sloped, obviously, so when it’s in a half-nut and you push or pull it, some of the force will be transferred outward, and the half-nut will try to open. Acme threads are pretty square, so they are less troublesome.
So now I have 36″ of useless threaded rod. I found acme rod online, and three feet of it are on their way to me now, complete with nuts.
This is too bad, because I had all sorts of neat ideas for a half-nut quick-release mechanism. But if you have acme threads, you don’t need a quick-release mechanism all that badly, because the coarse pitch makes things move pretty quickly as you turn the screw.
A famous woodworker named Paul Sellers has a series of Youtubes showing how to make a workbench top. It’s really not that bad. You plane a few pieces of cheap pine or fir just enough to make glue stick, and then you clamp them side-by-side. Eventually you get enough solid wood to make a benchtop, which you can plane and adjust.
It would be even easier for me, because I have a jointer and planer. I don’t insist on doing stuff by hand.
Nonetheless, I feel I should keep working on the bench I have, because it’s great experience. And if I have a bench that works, it will be there to use when I make a better one.
I have ideas for filling the cracks. I have an idea for a swinging TV arm to move my monitor out of the way when I need to use the whole width of the bench. A tail vise would be nice. Dog holes. A thin hardwood covering for the pine, to make the holes slower to open up and become useless.
It keeps getting better. To add the vise jaw, I had to move my power strip down low, where it should have been to start with. Putting a power strip at waist level sounds smart, but then you bump into it all the time, and you will step on the cords and pull them out.
The vise jaw is really beautiful. It goes to show that you can make very nice things with cheap wood. It looks much better in real life than in the photo. Makes me want to make more things out of inexpensive pine.
The photos show a lot of bright-looking areas. Those are places that have been planed. My planes are amazing; even the cheap one I restored. They whiz along like nobody’s business. I can actually do useful work with them. I am thinking of driving strips of wood into the bench’s cracks and planing them fair with the top.
It’s nice to have tools. It’s even nicer to be able to use them and get results.
If this project goes anywhere, I’ll post more photos. In the meantime, quit watching garbage on TV and eating Cheetos. Turn on Youtube, open a book, and learn a few things.
It won’t kill you.
July 15th, 2015 at 5:14 PM
All my bench building has been done to make reloading go better and easier on my poor spine. I found out a slick surface will let things slide around and off onto the floor, not a good thing with expensive small reloading gadgets. I now just use exterior grade 3/4 plywood and finish with polyurethane. Bench height is also critical if your standing and pulling the operating handle on a progressive machine for hours. I’m curious to see what you decide for a top covering that will hold up to the dogs.
July 16th, 2015 at 3:16 PM
I was thinking about that. Some people don’t worry about it. They just go with softwood. I don’t know if they have problems or not.
I considered making maple inlays and gluing them to the table. I could make squares a couple of inches in diameter and half an inch deep and sink them in. Or I could use aluminum, but that would be cheating.
What I really hate about my ammunition press is the ball handle. I want to make a straight one.
July 16th, 2015 at 5:46 PM
I have thought about making a “L” shaped handle by welding a bolt with a suitable roller to the existing handle.