Day 57 of Three-Day Guitar Build
January 11th, 2011Holes
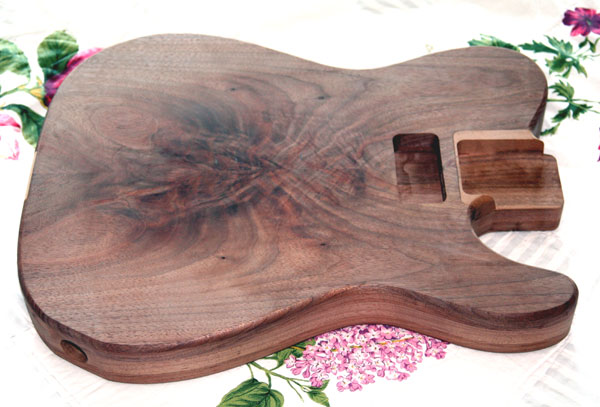
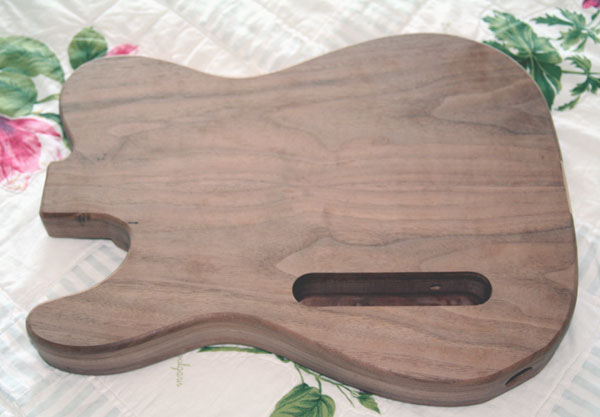
Here is the guitar body. I put a rout in it for the neck pickup, I routed out the control cavity, and I drilled passages that will connect both pickup cavities and the control cavity.
I just learned that the “correct” thing is to drill slantwise from the bridge pickup hole into the control area. Thank God I didn’t know that. I might have tried it and gone right through the back of the guitar. Instead I drilled down the centerline of the guitar from the neck pocket, all the way to the future location of the bridge pickup. This connects the pickup holes. Then I drilled a 7/8″ jack hole and inserted a 1/4″ bit and continued on to the bridge pickup area. That will connect the control cavity to the pickups. I’ll run the neck pickup wire through the bridge rout and into the control area, and the bridge pickup wire will go straight into the control rout.
Using routers is a nightmare. They jump and bite and act crazy. It’s just barely conceivable that their poor behavior may have some tenuous relationship to my complete lack of skill. But I doubt it.
I think I’m going to make a couple of tiny bowtie inlays from maple and stick them in the border between the light walnut inlay and the guitar body, above the neck pocket. This will make the pocket inlays look like something I did on purpose, instead of a massive screwup. Once it’s done, I’ll delete all Internet references to my mistakes and claim everything went perfectly. No one will ever know. Shhh.
For some reason, I inherited a bag of silver coins. I might inlay a couple of liberty dimes into the guitar, if I can find two from the years my parents were born.
Every choice I made added a new level of complexity to the project. Because of the rear control rout, I have to drill potentiometer and switch holes, and I have to create a walnut cover for the rout, and I have to cut a rabbet into the guitar to receive the cover. Ordinarily, you just make the hole in the front of the instrument and slap in a prefab metal cover that holds the controls.
Here is my conclusion: if you choose to make a clear-coated bookmatched Telecaster with a rear rout, you will multiply the woodworking time by about five. Seriously, I could make a solid-color body in two days.
The TV Jones pickups also added work. I had to figure out where to put them, and I had to use a special routing template. The templates I bought have holes for Fender-style pickups, but they’re useless for TV Jones jobs, which don’t even fit standard humbucker holes.
I’m hoping I won’t have to recess the Bigsby into the top, but after all the crap I’ve routed, it probably would not be a challenge. Maybe I should do it just to be a wise guy.
Sad news: I’ve learned that you can make a guitar neck using a router and a jig. This is sad, because it means I will probably go crazy and make a neck eventually. I’ve realized that fat necks work very well with electric guitars, even though they’re a horror on acoustics. I ordered a big neck from Warmoth, but I don’t think it’s as fat as the one on my amazing Burny LP clone, so I’m not totally happy.
I went nuts and ordered a jointer/planer. Then I came to my senses and cancelled the order. I improved my planer-jointing technique, and I decided to keep my money. Then I went nuts again. The planer/jointer is once again on the way. I face-jointed a couple of really squirrelly mahogany boards I stole from someone’s trash, and it was a nightmare, so the new machine started looking good again.
I got the planer working really well, apart from the problems with twisted wood. I learned how to completely eliminate snipe. I knew it was a good idea to pull up “a little” on boards as they entered and exited, but by experimenting, I have found that snipe disappears if you pull up a WHOLE LOT. You’re trying to simulate the action of the powerful rollers that hold the wood down, so you really have to apply yourself. I had been afraid that pulling up hard would drive the wood into the blades, but that doesn’t happen, because the roller closest to your hand prevents it. I guess if you have a three-foot-long board with increased leverage, you can apply too much force, but on a twenty-inch workpiece, you can pull like crazy.
I’m going to try to get the routing done today. Time to go out and buy even more piles of double-side tape, to hold stuff in place while I work.
If I can make my own necks, I may make a new guitar with headstock and body shapes that are completely original. Probably similar to a Telecaster, but with better fret access from above. I hate the Telecaster control plate. It’s inconvenient and jams the selector switch up against the volume knob. I’d probably rout from the rear again.
Wish me luck. More accurately, pray I don’t screw this up any more than I already have.


January 11th, 2011 at 2:16 PM
Readers will be able to tell their grandkids that they were there when you were blogging about the creation of the first Stevevarius.
January 11th, 2011 at 7:10 PM
Very nice so far. You’re right about Tele control plates & switch / knob interference: I flipped the control plates on my two Teles around so that the switch is toward the back of the guitar and I’m less likely to accidentally hit it with my hand when strumming rhythm. (On one of them, I also rewired the switch so it wasn’t mapped to the pickups “backwards” anymore after the plate-flip.)
But since I didn’t relocate the volume & tone knobs (yet), the volume knob is now in the awkward position between tone & switch, and the tone (which I never use anyway) is in the easy-access position. One day I’ll rewire all the controls on both my Teles for better ergonomics: volume knob closest to the neck for easy access, tone in the middle, and switch at the rear, mapped the right way ’round so the bat position corresponds to the pickup selection instead of opposite. Since you can just cut your own control holes and place them where you want, you can remap your knob & switch locations however you want them, and even adjust the spacing from the “standard” Tele plate positioning.
I’ve used old silver dimes as ornamentation on a couple of my guitars too, but nothing as fancy as inlaying them: I just Gorilla-glued single Mercury dimes to the backs of the headstocks of a couple of guitars that I put Warmoth necks onto — for purposes of identification in case of theft as much as anything else, since they’re not even visible to an audience when I play them. A silver coin would make a cool fretboard inlay, if you could find a way to shape it to the fretboard radius and smooth out the face of it enough to allow for note-bending without losing the design features. Some of those old silver coins are worn just about smooth enough …
I love the Warmoth “fatback” neck profile — I wear size XXL gloves and my arthritic hand hurts if I play a super-thin neck for a full 4-hour session. The fatback on my Strat-based “partscaster” is fatter than the neck on my Greco LP clone, and pretty close to the neck on my ’82 Explorer II. If they weren’t so costly I’d put a fatback on every bolt-neck guitar I own.
January 11th, 2011 at 8:38 PM
Great looking instrument.
Life will come to it, and you will not even know when and how, but it will have its own life. Remember, you are not “making” it. You’re building it, with a bigger hand guiding yours. Congratulations!
Steve, you will be very surprised by its sound, you will see!
January 11th, 2011 at 9:30 PM
Thanks for the encouragement. Next time: a chambered version with a handmade neck.
January 12th, 2011 at 3:41 PM
Alex – For the dime, all you have to do is recess it enough that you could cover it with a clear resin. Something low viscosity, for better clarity. No need for the dime to be flush.
January 12th, 2011 at 7:12 PM
It looks nice. I’m curious why you didn’t do one with plain wood for practice.
January 12th, 2011 at 9:46 PM
What an amazingly beautiful piece of woodworking.
January 12th, 2011 at 10:16 PM
Make time in the middle of it all to make me one guitar. Thanks!
January 12th, 2011 at 10:20 PM
I would love to make guitars for people, but you have to remember something: the parts and crap run at least $700.
.
Bodies are fairly easy, though, especially if they have the standard routs and aren’t finished.
January 13th, 2011 at 8:25 PM
Steve, I’ve been sourcing loaded pickguards, and so much other stuff. One has to be willing to spend time and money to have a nicely made custom guitar. I think your luthier life has started