Hammer Handle, Swizzle Stick…Whatever
July 9th, 2009“I Meant to Do That”
First up, an important message from former KISPer TC. He sent out an email requesting prayer for a fallen soldier:
Mark’s a good friend. He’s in Landstuhl Army Hospital after being shot in the head in Afghanistan.
Two other Georgia Guardsmen were killed on Monday, bringing the total to 7 KIA so far.
This has been a very costly deployment for the 48th Brigade so far, and it’s only a couple months into their 1 year tour.
Now, to less serious things.
Tyler Youngblood, proprietor of Projectsinmetal.com, noticed my post about the hammer I failed to make using his online plans. He took a moment to write a helpful comment, which I will repost here:
Hi Steve,
I’m sorry you’re having trouble with the soft faced hammer plans, but if it makes you feel any better, I scrapped the project twice before I got it right.
If I may make a few suggestions, maybe I can help. First, 304 stainless is far less forgiving than aluminum, which is what I made my hammer out of. It’s not as durable as stainless, but the hammer could be made fully functional by putting a pin into the head (the threaded head of my aluminum hammer comes loose with vigorous use). Locktite might also be an option. But I’m happy with the aluminum version for “light” hammering, which is what a soft faced hammer is good for anyway.
I didn’t turn the project between centers, but I had the benefit of a taper attachment, so that’s how I got the taper to work. If your compound slide has enough travel, you can definitely use that to put in your taper. Or you can buy/make a lathe dog for use with a proper face plate and do it that way. The only issue there is you mess with the alignment of the tailstock, which I try to avoid.
I’d suggest trying to use your compound to cut the taper. If you only have 2? of travel, change the taper to 2?. It would look different, but that’s fine, its your hammer.
Also, if you try to cut a taper using your compound, make sure to take light cuts. It sounds like you started cutting at the wide end of the taper, and by the time you got to the narrow end of the taper (3? later, up by the threads) you were cutting too much material. Instead, do it the other way. Start 1/4 inch back from the end of the taper and cut 1/4 inch in the direction of the threads, toward the radius. Your cut should gradually get a bit deeper, but since you’re only going 1/4? (and not 3?), the increased depth of cut shouldn’t be an issue. Once you have made that first pass, the rest of the cuts will be parallel to that first pass (thus no gradual increase to your depth of cut). After you’ve made that first pass of 1/4? or so, back your compound away from the part, then back along the axis of the taper you just cut. Your next pass should be 3/8? or so, then 1/2, …. all the way until your last pass takes a finish cut along the entire 3? taper.
It’s hard to explain. I really should make a video because it’s much easier if you see it done. As far as the radius goes, I used a tool with the proper radius to cut the taper, so when the taper was finished, the radius was already present. The radius on the end of the hammer was done with a file while the part was turning (make sure to hold the file backwards, with the tang facing away from you and cut from underneath the part, not on top – that way if the part rips the file out of your hand it will be pulled away from you). And of course, use a file with a handle whenever possible. No handle? Find an old golf ball, drill, and attach to the end of the tang. Tangs are sharp and dangerous.
You’ll need a mill to bore and tap the head of the hammer (where the handle attaches). You could do it on the lathe, but holding the part would require some significant workholding via the faceplate (I wouldn’t try it in a 4-jaw chuck, and a 3-jaw wouldn’t work at all). The threaded portions of the head where the faces attach are drilled on the lathe, but tapped after the larger hole is drilled, bored, and tapped on the mill.
For practice I single pointed the threads on the handle, but they can be cut with much less effort using a die. One of the scrapped handles was due to a mistake I made while cutting the threads.
Let me know if you’d be interested in me making a video of the process. I don’t really need another hammer, but I’d be happy to make a video if you think it would help (and if I can find the time).
Drop me a comment if you run into any other problems. I’d be happy to help in any way I can. I’m still learning too, so I remember how frustrating those first few projects were to master. But once you learn how to do all the steps in the hammer (turn down the dia, turn a taper, file a radius, knurl, single point (or tap/die) threads) you’ve got a very strong foundation and a good understanding of how the lathe works. That’s why the hammer, although difficult, is a great first project.
I’ve got another beginner project (a plumb bob) that uses hex stock, so if you’re interested in that (instead of the screw jack), let me know. Although the plumb bob is meant to be turned out of brass, not stainless. But stainless would work too.
Good luck!
That’s what I call service. I also got some good advice on the Chaski forum.
My biggest problem was trying to make the 3″ taper on the hammer handle. After I posted my whining, it occurred to me that I was probably cutting from the wrong end, and people have since confirmed this. When using a compound to cut a taper, start at the end where you have to remove the most metal. This way, the cuts are deepest as they begin, and they get shallower as you go. That will prevent problems with the cuts getting so deep the lathe throws up or whatever.
I learned a few other things. When trying to make a smooth transition from a straight piece into a taper which is thinner than the straight part, cut from the straight side. Say you have a taper that goes from half an inch to one inch, and you need a straight part one inch thick beyond the taper. You make the straight part too thick, and then you make the taper, and then you cut the straight part down, with cuts beginning at the end of the straight part which is farthest from the taper. The tool will cut off the excess metal from the straight part and then go into empty space as it hits the taper, leaving a smooth transition. At least, it worked that way for me.
I was told to use a file to make the small radii on the tool handle. That sure beats trying to grind a radius tool and then get it to make a perfect cut.
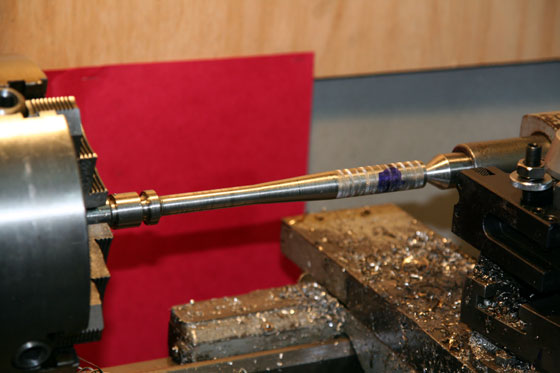
I blew the knurling. I am too lazy to get out my videos and see how it’s done, so I just winged it. No amount of skill can overcome true laziness. I know the knurls have to be perpendicular to the part, and the part has to be centered between the knurls. But I don’t know how to make them go into the same marks over and over as the part turns. I ended up with a surface that isn’t slippery, yet which would never be confused with real knurling.
I may dump this thing and use it for threading practice. It’s still a big piece of metal. There are lots of things I can make from it.
Here’s a photo of what I have. I put Dykem on it to help me line up the knurls.
It’s not good, but I learned a great deal while working on it. And I ran the tool post into the work, and I also ran the carriage into the chuck. No pain, no gain. I just wish I had realized the carriage was blocking the chuck before I took the housing off the lathe to find out what was wrong with it.
Here is the latest news about the milling machine:
Hi Steve,
Sorry, Mark said that he did answer me, I think maybe there was an email problem.
It did ship last week, the driver should be calling soon, he will get the information for me later today, he was not in the office right now.
Thanks again!
Mark is the importer. Man, this is exciting.
I emailed Og for advice about turning parts to specified dimensions. He sent photos of his latest project.
Yeah, I’m sure I’ll be doing this kind of stuff real soon. Notably, he used a crappy board for a base plate. I guess you never get too big for half-assed desperation jigs. I should start photographing the beauties I come up with.
Think I’ll take one of the bikes out and see if the wind blows the swarf out of my clothes. Sometimes I make splinters. Today I made several bona fide Slinkys.


July 9th, 2009 at 5:25 PM
Hi Steve,
A quick note on the knurl. It’s hard to tell from the picture, but are you allowing the knurling tool to run along the length of the handle? It almost looks like you knurled it in 1/4 inch sections, but that could be just how it looks in the photo.
When I knurl I engage the knurling tool by pressing it into the work with the lathe off. I check to see that both parts of the knurling tool are contacting the material with equal pressure. To do this, I turn the chuck one complete rotation (BY HAND) to see if both knurl marks look like they are penetrating to the same depth (i.e. make sure that one isn’t lighter than the other). If everything looks ok, rotate the chuck by hand another 1 or 2 full turns to make sure that the knurl from the second pass is overlapping the knurl from the first pass. If everything looks good, turn on the lathe on a slow speed (150-ish) and engage the power feed on the apron. Once you’ve reached the end of the knurl, reverse the power feed direction and go back over what you just knurled. You can add pressure before each pass by turning the dial on your cross slide a few thousandths. Keep going back and fourth like that until your knurl looks deep enough for your liking. Never back the knurling tool away from the work until the knurl is complete, otherwise it’s difficult to get the knurls to line up again.
The knurling tool doesn’t really cut the metal, it deforms it. But there will still be some chips of metal that come off the part. Coolant or compressed air can help keep those chips from being pressed into the knurl and thus produce a cleaner result.
One final thing that I should have mentioned from the very beginning. It’s worth knurling your handle before you cut the taper. That way you can use the upper portion of the handle (where you’ll eventually be cutting your taper) to test the knurl to make sure that everything is working properly. That way if you make a mistake you can back the knurling tool away from the part, move over 1/2″, and try it again (but you’re still practicing in the upper part of the handle.). Once you get the knurling tool set just right, knurl the whole thing. Any mistakes you might have made while setting up the knurling tool will be on the upper portion of the handle, which can then be removed when you cut the tapered portion of the handle.
Overall, I think you’re being too hard on yourself. Your handle looks just fine to me!
Tyler
July 9th, 2009 at 6:21 PM
I did do it in sections! How do you make the knurl go sideways?
July 9th, 2009 at 7:00 PM
I thought so! 🙂 No worries. You can probably even fix it if you turn it down another .010 or so and start over.
All you have to do to make the knurl go sideways is to engage the power feed (or you can do it by turning the feed dial by hand, but I think a power feed produces a better finish).
Step 1: Press knurls against the part with both knurls hitting the part tangentially and with equal pressure (rotate chuck 1 full rotation by hand to check for equal pressure, and then a few rotations by hand to ensure that the knurling groves overlap).
Step 2: Pick your slowest feed rate (you want the knurling tool to move slowly across the part, not fast). Pick a slow spindle speed (30, 50, 70, whatever, you can always increase it once you’ve made a successful first pass, but don’t increase it too much).
Step 3: Turn on lathe and engage power feed. The apron will move along the axis of the part at a slow rate, continually pressing the knurling tool into the part along the way. Magically the lines should continue to line up as long as they overlapped and looked ok in Step 1. When you get to the end of the length you’re trying to knurl, reverse the feed direction and move the knurling tool all the way back to the starting position.
Step 4: To increase the depth of the knurl, turn the cross slide dial a few thousandths so that the knurling tool presses into the part with a bit more force. Engage power feed and knurl back over your previous knurl, then reverse back to the starting position. Rinse and repeat as many passes as it takes to get the knurl to a satisfactory depth.
You can use cutting fluid, coolant, or compressed air to keep the tiny metal flecks that are produced from getting pressed into your knurl.
That’s it. If you really get stuck, send me an e-mail through my site and I’ll e-mail you my phone number. I can probably talk you through it faster than you could read this explanation. Also, you might try to YouTube knurling and see if there is a video that shows the process. If their isn’t maybe that’s another video I can produce for the site. It’s hard to know what videos people would get the most benefit from, but this might be one of them.
Hope that helps,
Tyler
PS, why can’t I get the space between paragraphs to show up in my comments? I’ve tried using but that doesn’t help. It would be easier to read the steps if they were spaced properly. Can you edit and fix it?
July 9th, 2009 at 7:04 PM
Remember, Don’t back the knurling tool away from the part until you’re completely finished. Keep the tool pressed against the part at all times as you knurl left and right along the part. If you back the tool off, you’ll never get it lined up again, and your knurls won’t overlap.
Ha, and the got edited out of my PS above, so no wonder that bit of HTML isn’t working, your comment editor removes it completely. It should have said, “I’ve tried using but that doesn’t help.” Any suggestions?
July 9th, 2009 at 7:08 PM
you just let the knurl bite and run the carriage down.
July 9th, 2009 at 7:08 PM
It removed it again and made the last bit bold. I give up. 🙂
July 9th, 2009 at 7:34 PM
There is something wrong with my css file. I have no idea what it is, though.