The Keys to My Kingdom
October 21st, 2022Think I’ll go Fire up the 8-Track
I’m so old, I am even behind the times when it comes to hanging pictures on the wall. Technology has left me in the dust again.
The people who built this house put a coat rack in the entrance beside the door to the garage, but they were not smart enough to put up a keychain rack. I have three gates, several vehicles, two tractors, and a bunch of locking tool chests. I also have door openers and gate openers. I was not happy with the mess and the time I lost looking for things. I decided to make a rack.
I thought I would just go to Amazon and order a Chinese rack, but Amazon’s racks are not very good. Generally, they have 4 or 6 hooks. That wouldn’t even get me through my vehicles.
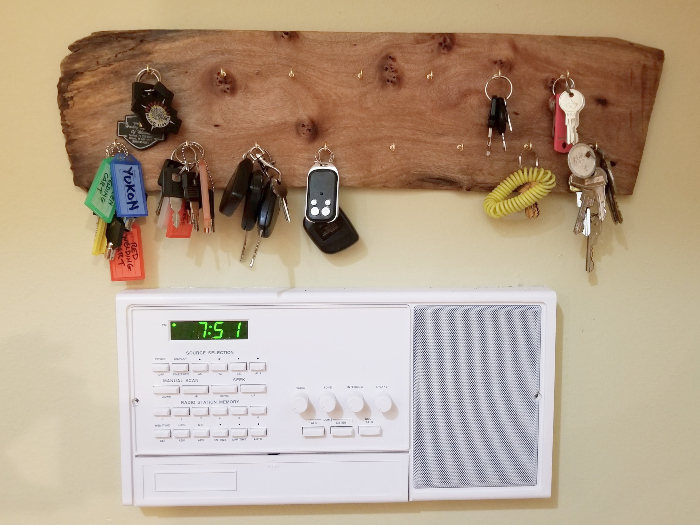
Back when I was in Miami, one of the few perks was free mahogany. Mahogany is native to South Florida. It was not introduced. The wood looks very good. There are tons of mahogany trees along the roads, and they fall over a lot, so it’s not unusual to find free logs in trash piles. This happened to me. I found a bunch of logs and cut short boards from them. I had no choice about the length. Tree trimmers don’t leave long logs.
I brought a few of the boards with me when I moved. I thought they would be nice for making boxes. A pretty box doesn’t need sturdy, uniform wood. It needs figured wood with lots of colors in it. That’s what I got.
I rummaged through the boards looking for something I could use to make a key rack, and I found an oddly-shaped piece that was highly figured and partially spalted. Spalting is rot, but it’s rot that doesn’t completely destroy the strength of the wood. It is often used in things like boxes.
I planed and jointed the board down to about 3/8″ in thickness, and I decided to use it as it was instead of cutting it up and using it in a fancy rack. As much as I hate Miami, I felt the board had history just as it was.
Ordinarily, I don’t like wood projects that are described as “rustic” or having “live edges.” I think these terms are excuses for laziness and lack of skill. But sometimes something looks better left alone.
I sanded it, applied Danish oil, and put 15 brass-plated hooks in it. Rack. All that was left was to hang it.
I didn’t want loops of wire sticking out above it where they could be seen, and I needed the rack to be held firmly to the wall. When you hang a picture, it doesn’t have to be held rigidly, but you don’t hang things on pictures. You have to touch a key rack, and if it moves while you’re fiddling with keys, it’s annoying, and it will swing and scratch the wall.
I decided to try Velcro. It would be hidden. It would hold the board firmly. I could put pieces up high and down low so the board would not be able to rock against the wall.
I put 4 little pieces of Velcro on the back, put the rack on the wall, and got to work redoing my keychains. While I was doing this, I heard a noise. The board had come loose. I tried pressing it against the wall harder, but a few minutes later it came loose completely and fell, knocking a chunk of spalted wood off.
Back to the shop.
I realized Velcro’s adhesive would not stick to Danish oil. It stuck to the wall just fine, to the point where I damaged the paint pulling Velcro off. On a board finished with Danish oil, it was a disaster waiting to happen.
I glued the missing chunk in, and it looked like it had never come loose. I went to the web and asked woodworkers for help.
Their answers were really bad. I think most of them were older than I am, and they had no idea how picture-hanging technology had changed.
One said to rout pockets in the back of the board and put little nail receptacles in them. This would hold the board up, but it would move around every time I touched the board.
Someone else suggested using a special router bit to cut keyhole-shaped recesses. These are hard to describe, but basically, one end of the recess is wide enough to let a nail’s head in, and the other end is skinny. You put the nail’s head in the big hole, and when your picture slides down due to gravity, the head is captured in the skinny end of the hole. Google it if you want to understand.
This would have been hard to do on a 3/8″ board, and I would have had to locate the nails in the wall very precisely, which is not easy. Then I would have had a relatively flimsy attachment which would have let the board move.
I started Googling, and I found out there are a bunch of new hanging systems. The 3M company has one called the Claw. It’s a flat piece of metal with two sharp points behind it. You push the sharp bits into the wall and hang your picture on the flat part. There are also tiny metal French cleats now. Look it up. It’s hard to explain. There is also a special Velcro system.
I decided to do it my own way. The problem was that the Velcro came off the board. I could fix that. I took the board and used acetone to remove the finish from parts of the back. Then I applied Velcro in 4 places. Then I stapled the Velcro to the board. Good luck peeling off now, Velcro.
The impact of my staple gun knocked another big piece of spalted wood off the board, bringing me close to cardiac arrest, but I found it and glued it back in.
The key rack is now back on the wall, loaded with keychains. I think it will be there when the sun dies. It’s easy to peel Velcro off if you pull perpendicularly to the surface it’s on, but peeling it by moving it sideways is basically impossible. The force on the Velcro is all parallel to the wall.
If you have stuff to hang on your walls, don’t do whatever you did 40 years ago. You are older and less hip than you think. Things you think happened three years ago happened during the last century. Certain shoes you think of as new are older than law school graduates. Go look up the new hanging technology. I didn’t use it, exactly, but I did something similar to it, and the old methods would have been unsatisfactory.
I hope the rack doesn’t fall off during the night, forcing me to come back and admit failure.
Of course, if I never told you, you would never find out.
It’s looking good right now.
God has helped me bring order to my shop, and I have been hoping it would spread to the house. Maybe it will.
October 23rd, 2022 at 1:15 PM
This is a really cool piece, and a good example of something that can be made with basic tools as well.
I’m actually one of those that tends to prefer naturalistic-looking pieces like what you made, in moderation of course. I think the reason there’s a pretty stable market for regular wood furniture and decorative items (not just the rough pieces, but ones that look like items you’d buy in a regular furniture store) is because of that desire to have something that is well-made and will last for decades. A lot of the pre-fabricated items that used to be made in furniture workshops just feel cheap and not well-made to me, probably because they’re composites of particle board and wood pulp rather than solid wood, or plastic.
Anyone who can build these types of things, from large furniture pieces to relatively simple functional items, has a tremendous head start towards self-sufficiency, in my opinion.
October 23rd, 2022 at 2:55 PM
Thanks.
I doubt I’ll ever put another “rustic” piece in the house, but this board called out to me.
It’s very strange that you can’t go to Amazon and find 50 racks with 15 or more hooks. A 4-hook rack serves no purpose.
October 23rd, 2022 at 10:02 PM
My solution is simple. Shiny brass wood screws. Bevelled holes in board snd screwed in flush. looks pretty and will never come loose.