Improve Your Projects With Fake Welds
July 23rd, 2022Then Keep the Truth to Yourself
My tractor problems came to a head this week, so I decided to hand it over to the local dealer. They truly surprised me with their willingness to help. With that off my mind, and with the gift of a rare day of bearable shop weather, I got back to making my second welding cart.
I did something interesting this time around. I used epoxy putty to fake nice welds.
Fabricators with no STEM education tend to overbuild everything, and because most amateurs have no STEM education either, they generally approve. I don’t. Using way too much material is a way of saying you don’t know what you’re doing.
I’ve seen all sorts of weldments that were way over the top. I’ve seen several inches of weld where one inch would have done fine. Using too much wire causes unnecessary distortion, it wastes wire, it wastes time, and it makes things harder to take apart and repair.
A steel weld has a tensile strength of 70,000 psi, so how much do you really need for your little project?
My new cart has 4 wheels, and I want one pair to be farther apart than the other to make the cart more stable. To accomplish this, I put a long crossmember under one end, and I welded the casters to it. To make it elegant instead of amateurish, I cut recesses into the bottom of the crossmember, welded 1/4″ plate rectangles into them, and I attached the casters to them.
The whole thing will rest on 1″-thick tubes, and I could not weld the casters to the tubes without a lot of fabrication unless I wanted one end of the cart to be 1/4″ higher than the other. With the plates set in recesses, the tubes and plates are 1″ thick, matching the tubes at the other end of the cart.
I used 4 3/4″ beads of weld to attach each plate to the crossmember. This was way more than I needed, but I couldn’t make the welds much smaller. When I was done, it looked fine, but it didn’t look anything like as good as long welds that completely filled the joints.
I got myself some epoxy putty, crammed it into the joints over the actual welds, and molded it smooth. Now after the paint goes on, it will look like I have gigantic welds, but I won’t have distortion or a half-empty wire spool. Pretty neat.
I spent some cash on JB Weld putty, but I don’t care. It was for fun. I could have used Bondo and saved money, I suppose.
Today I attached the upright tubes that will hold up the platform that restrains the tanks. There will be two shorter tubes in front of them. The rear tubes have to be long to use the original screw points on the tool chest I’m using as the heart of the cart.
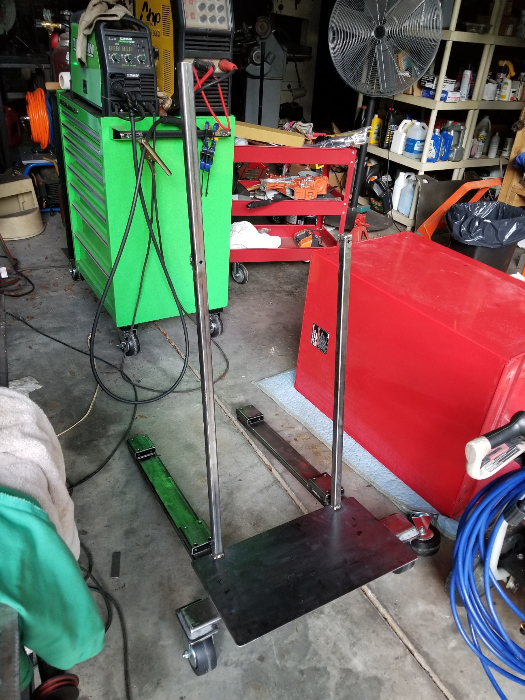
The tube on the left will be behind my plasma cutter, which will occupy one spot on top of the chest. This tube is long because it will hold up an air filter for the cutter. The filter has been bouncing around on the floor ever since the cutter was new.
All the hard work is done. Making the platform is easy, and so is attaching the front tubes. I’ll put some bits of angle iron on the platform to keep tanks from sliding, and I may add some similar features to receive the ends of TIG tubes, but I probably won’t. I will not be using this cart for TIG, so I don’t see any reason to clutter it with TIG stuff.
Once this is done, I can take my old cart apart and add a long crossmember to it. I may also lower the platform that restrains the tanks. It’s fine for 120-cubic-foot tanks, but shorter tanks are too low to fit. I didn’t think about that when I build the cart.
I have yet to see another cart on Youtube or anywhere else that appears to be as well-designed as mine. People do a lot of things that seem counterproductive.
Some people will take a small rolling chest and put a table over it. That makes no sense to me. Fabricating produces spatter, slag, and filings. If your welder and other tools are under your table, all that stuff will fall on them, and you won’t have much room under the table for things that project through it, like clamps.
A welder under a table will also be hard to work with. The dials and so on will be way down at knee level. Everything will be in the dark.
I have 5 angle grinders under my table, hanging on metal bars I added to it. This is no problem, because grinders are made to handle grit and crud. I considered putting a storage shelf down there, but it would fill up with nasty stuff in a hurry. Even if I used expanded metal to let things fall through, whatever I put on the shelf would be covered.
The grinders are incredibly handy. I have a grinding wheel, a cutoff wheel, a flap wheel, a stripper wheel, and a die grinder arbor on them. They’re connected to a power strip I attached to the table, so they’re always ready to go.
I’ve also seen people put tool chests inside extremely heavy tube frames. That’s crazy. Tool chests have frames built into them. An additional frame adds weight and size while providing no additional functions worth having.
Some people put clumsy hangers all over their carts. My cables drape over my tanks very nicely. Hangers would get in the way without doing anything the tanks can’t do.
Some of the Youtube carts I’ve seen remind me of Dr. Seuss’s Electro-who-cardio-shnoox. I may be spelling that wrong. All sorts of doodads and attachments that seem cool but actually get in the way and provide no benefit.
The dumbest cart I ever saw was a Chinese Snap-On. It’s basically a cabinet with a fixturing table on top. You shove your welder deep into the cabinet, and you weld on the table. Some poor Youtube guy bought it, and he was proud of it. The Snap-On disease leads to very poor decisions.
His welder was way under the cabinet where it was hard to get at, and he had about 4″ of useless space between the top of the cabinet and the underside of the table. The storage consists of three little drawers.
The table is about the same size as my $180 Northern Tool table, but it’s over twice as thick. Big deal. I weld heavy stuff just fine, and my table came with some useful clamps.
I have developed a lot of confidence on this table and the $56 table that preceded it, so if I want a new table, I won’t be afraid to build it myself, and it won’t cost Snap-On money.
The video guy paid $1400 for his welding station, and he truly believed he had done something smart.
Many, many people buy Snap-On products for the exact same reason women will pay $3000 for a Chanel purse. If you’re a woman and you’re thinking of marrying a man who loves Snap-On tools, make sure he’s rich, because he likes pouring money down the commode.
I don’t like the way Snap-On takes advantage of insecure blue-collar people who don’t understand the way money works.
Anyway, if the weather is bearable tomorrow, I may finish the metalworking on this cart, and then later this week I can do the paint. I can’t wait to finish it and get rid of the open cart it’s replacing.
I just realized I put those tubes on the wrong sides of the platform!
Oh, well. It’s always something. Looks like the job will be 30 minutes longer than I had hoped. I generally make one big mistake per day, so this is nothing unusual.
July 24th, 2022 at 4:29 PM
This is why I enjoy reading about your projects. You tell why you do something. Half of what we get now days is for appearance NOT function or because they don’t know what they are doing in the first place.