Bucket, Kicked
June 10th, 2022Next World to Conquer: Hydraulics
A couple of days ago, I finished converting the old bucket on my Kubota to SSQA. It took several days, and I would have been happier buying a new bucket. I couldn’t get the bucket before late summer, so I did what I had to do. The result is in the photo below.
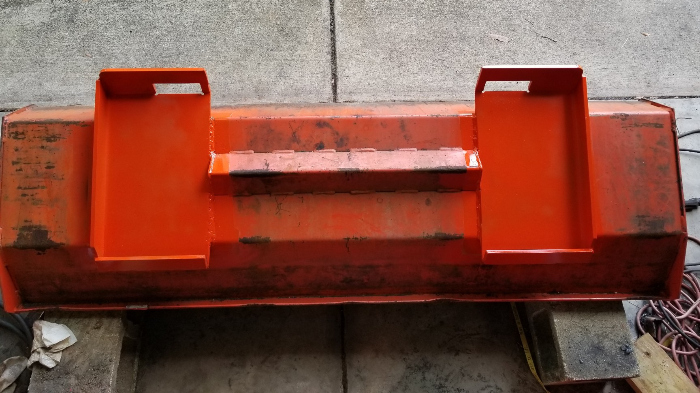
I primed and painted the areas on the back of the bucket that were involved in the project. A lot of paint burned off the inside of the bucket, too, but I don’t plan to do anything about that until I get the tractor working again.
The project looks solid. My only concern is that I may have gotten the geometry wrong somewhere, leading to problems I won’t notice until I use the bucket. There is no set of comprehensive guidelines for welding SSQA mounts to a bucket. Every job is a one-time deal, and you do the best you can. I set my plates so they’re about half an inch off the ground when the bucket is on its bottom.
If it turns out there is a problem, I fully intend to sell the bucket and buy a new one. I don’t want to do this project twice.
I tried to use plasma and propane to cut the old mounts off and cut up the mounting plate for installation, but I don’t have real propane skills, and I lacked the right cutting tip, and my plasma cutter isn’t great for thick steel.
I ended up using my 6″ Metabo angle grinder and cutoff wheels. It was a breeze. Actually better than plasma, unless you have CNC. The cuts were very accurate, and it only took a few minutes to cut an end off a 3/8″ plate 18″ wide. If you have to get in places where a grinder won’t go, plasma and torches are great, but for straight cuts in open places, they can’t compare to a grinder.
Welding was uneventful. I used 0.035″ Harbor Freight wire and my $500 Harbor Freight multiprocess welder. I think that’s what I paid. It may have been $600. That thing is great. I prefer it to my Lincoln MIG because it’s easier to use. It has a nice digital display, and the torch is not as bulky.
I used DNA and acetone to clean off most of the grime near the new plates, and then I taped everything else off. I hit the plates and their surroundings with Rust-Oleum primer from a spray can, and I followed up with some Rust-Oleum Kubota Orange implement spray paint I already had. Worked just fine.
Now I have to fix the leak which is draining my hydraulic fluid.
A few weeks back, I put wood on my burn pile, and I noticed the tractor’s wheels were straightening up during turns. I didn’t think much of it. For all I knew, it was normal. Now I think the leak caused it. Last week, things got much worse in a hurry. I saw little puddles of fluid under the front end. I knew something had to be done.
My tractor is an L3710 with an LA681 loader. It’s a nice 37-horse machine. Big enough for most jobs around the farm, although 60 horses would be nicer. Most people are using little tractors in the general region of 25 horses, so I feel blessed.
To find out where the leak was, I thought I had to remove the front end loader so I could remove the side panels and look into the engine compartment. I was wrong about this, but I didn’t know it. I tried to get advice. I saw a bunch of useless Youtube videos in which smiling men in clean clothes popped the loaders off their little Kubotas, and I figured I could do it, too.
They did this:
1. Raise loader and extend built-in support struts to hold it up when detached.
2. Lower loader until the struts and bucket touch the ground.
3. Manipulate bucket to loosen the two pins at the rear of the loader.
4. Pull pins out, holding them gently between one finger and your thumb.
5. Disconnect hydraulic hoses.
6. Back tractor away from loader.
7. Dismount tractor and button spotless white tuxedo jacket while calling for a martini.
I tried this method, and I found out it won’t work for the LA681. This loader has a built-in guard for the front of the tractor, and it’s made from 3/8″ steel. It’s very heavy. There are two additional pins that attach it to the front of the tractor.
On top of that, the rear pins were cemented in place by rust and friction. They had never been greased. I managed to bang them out and get them to slide easily with grease, but it took quite a while. I never took the front pins out, because I wanted to get confirmation that the skinny struts on the loader were strong enough to hold it up with the grill guard attached.
While I was fooling with this, some online people reminded me of something I had forgotten: it wasn’t necessary to remove the loader in order to get the panels off the tractor. They lifted straight up. I had done this before, to fix a shutdown apparatus that went off on its own, but I didn’t remember this when I got into the hydraulic problem.
I got the panels off and pressure-washed a lot of black oil and filth out of the tractor so I could see. Then I identified the source of the leaking fluid. When I turned the steering wheel, oil shot out of the rear of the steering cylinder.
Hydraulic cylinders are sort of like car cylinders, but they pump oil instead of air and fuel. Car pistons have rings to seal them against the cylinder walls. A hydraulic cylinder has a bunch of O-rings and seals to do the same thing. My cylinder probably has two seals in it. I looked up all the parts, and in total, there are 14. To fix the cylinder, I have to take it out of the tractor, open it up, install new seals and other junk, close it, and put it back in.
Fixing the cylinder itself looks pretty easy, although I may pay someone to do it because it’s possible to do it wrong, and then you’re stuck doing the job over. What’s difficult is getting the cylinder out.
The workshop manual says to remove the heavy steel bumper and the radiator. To do that, guess what else I have to remove. The loader, which is connected to the bumper.
I’m not positive I have to do all that. It may be that it’s possible to get the cylinder out without removing the loader, but the manual would naturally specify the easiest way for a tractor with no loader.
I really don’t want to pay a dealer. They will charge me to take the tractor in and bring it back. Then they will charge to remove and reattach the loader. They will charge to remove and reinstall the cylinder. They will charge to rebuild the cylinder. The labor and hauling charges would be pretty bad.
The rebuild alone will probably run over $200. The parts are expensive because Kubota likes money, and there would probably be half an hour of labor in it.
Optimally, I would like to get the cylinder out and reinstall it myself, relying on a mechanic only for the rebuild. Whether that will be possible remains to be seen.
By the way, a new cylinder runs almost $1100. For comparison, generic cylinders (which I can’t use) from dealers cost less than $200. Cylinders for other brands of tractors are in the same ballpark. One wonders why Kubota can’t come a little closer to that figure.
At least I can go ahead and order a Kubota seal kit for the cylinder, right? Wrong. Kubota doesn’t make one. You have to identify all the parts yourself from a parts manual and order them separately so they cost as much as possible.
I feel somewhat discouraged. I fixed the tractor’s inability to get up to speed in reverse, I installed an SSQA adaptor without help, and I made my own SSQA bucket. I thought I had beaten the dealers. Now the tractor’s first debilitating mechanical problem pops up, just when sailing should be smooth.
I should be making my own SSQA brush fork attachment right now instead of sweating over the pressure washer and struggling to get what should be simple answers.
Have I bitten off more than I should have? Am I doing things God would rather I didn’t get involved with? Am I piling needless burdens on myself? I am going to pray about that.