Hope Chest
October 13th, 2020Welding Junk Soon to be Off Table
It looks like my welding cart project is going to work perfectly.
To recap, I saw a kit for turning a Harbor Freight tool chest into a welding cart, and while I thought the idea was brilliant, the kit was obscenely expensive. Instead of spending $310 on a kit I would have to attach to a chest and then paint, I decided to spend more like $85 on metal and truck bed coating to make my own kit.
My plan was to run two rails under the chest and extend them out to support a platform for a welding bottle. I thought I could bolt the rails into the holes for the caster bolts. I found out there was a rim of sheet metal around the bottom of the chest, so I had to put something between the tubes and the chest in order to keep the tubes off the sheet metal rim. I decided to make 4 rectangles of thick aluminum and drill holes in them, but then I changed my mind. I had some tubing lying around, so I decided to use it instead.
I needed 4 spacers about 1/2″ tall, so I cut 1″-tall tubing in half. I decided to use the big angle grinder instead of the plasma cutter, mill, or propane torch. I have had problems making good cuts with plasma lately, and I didn’t feel like confronting the issue in the middle of a job. I have never used the propane torch for cutting, and this seemed like a bad time to figure it out. Cutting thin metal on the mill can be unpleasant, and holding metal while you cut it in pieces can be difficult. The angle grinder, on the other hand, is quick and easy.
I bought my 7″ Metabo grinder for cutting metal. I saw a Youtube video in which the same grinder bested a big band saw, so I snapped one up.
Today I clamped my tubing to the welding table, put a line on it to guide me, and dug right in. I suppose it took 15 minutes to make two 19″ cuts, separating the two halves of the tubing. The cuts weren’t extremely clean, but I was going to clean them on the belt grinder and bury the messy parts in weld, so it didn’t matter. Here is the tubing partway through the job.
![]()
Here is the tubing being sliced into 4 pieces.
![]()
Here are the pieces after deburring.
![]()
Positioning these things for welding was a breeze. I used a Vise Grip clamp to hold the pieces on the tubing, and I bopped them with pieces of metal to line them up perfectly. Then I tacked them at the corners, removed the clamp,and welded them in place.
![]()
Once that was done, I had to drill holes for bolts. The kit I didn’t buy leaves the tool chest casters in their original locations. I think that’s dumb. It puts your cylinder way on on a cantilevered platform. I’m going to put two of the casters at the end of the platform. That means I’ll need 24 bolts instead of the 16 the chest came with. I’m going to need 8 bolts for the casters on the side away from the cylinder, 8 to fasten casters to the platform, and 8 to fasten the tubes to the chest, using holes that were originally used to attach casters.
![]()
I scribed lines on the spacers, dimpled them with a punch, and drilled the dimples with a #26 drill. I followed with a unibit to open them up. Then I went through all three layers of steel with a 25/64″. I think that was the size. Whatever is one step bigger than 3/8″.
I attached one tube to the chest to see how it worked, and it was perfect. You can see it in the photo.
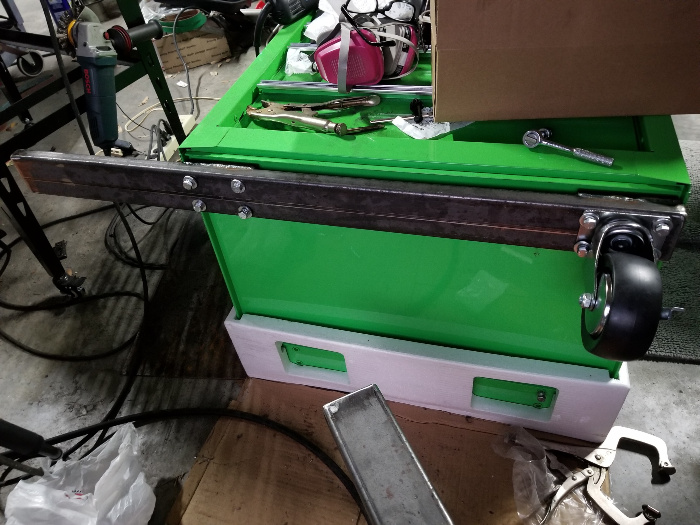
I forgot to put holes at the far ends of the tubes, so I have to do that tomorrow.
This is not a hard job, but it’s time-consuming because it’s hard to find metric fasteners around here. The original caster bolts are too short for the tubing and spacers, so I had to look for 60mm bolts. I needed 16, but I only found 10. I’m going to leave some of the holes empty until I get the bolts. They are in locations where one bolt per side will do just fine, so it’s not urgent.
I could not find M8 x 40mm bolts for the ends of the tubes, so I bought 5/16″ bolts, which cost maybe 20% as much at Tractor Supply. The diameter is nearly the same. Only the threads are different.
Tomorrow, I plan to attach the tubing to the chest, weld the platform on while the tubing is attached, detach the whole thing, add some tabs to keep the cylinder from scooting around, paint it with truck bed coating, and install it.
Why weld it while it’s attached to the chest? Because that way I know it will fit the chest after welding. The chest will hold everything in just the right position. Much better than clamping it to a welding table.
Once the platform is painted and installed, I can move all my welding junk to the chest and get one or two of my old carts out of the shop for good. Then I can install a bracket to hold a cylinder, along with some cord holders.
I said this was a one-day job, but I made it more complicated by welding spacers in and welding the tubing shut. I probably added three hours to the job that way. Then I had to run around looking for bolts.
Of course, painting adds a day, because you need to give truck bed paint 24 hours to cure. When I said this was a one-day job, I didn’t include time for the paint.
With my tools, I think you could do this job, apart from waiting for the paint, in 8 hours if you were even a little competent. You would just need to have everything ready so you wouldn’t have to run errands.
When I’m done with this cart, I plan to make a second one just like it. Then I can get rid of all my old welding carts. It will make a huge difference in the shop.
I also got rid of some junk today.
I have no garbage pickup, so I have to drive to “recycling centers,” i.e. places where things go on their way to be buried in a landfill. I’m sure a little bit of the waste gets recycled, but we all know greenies are liars. Most of my garbage disappears forever. In fact, if you try to recycle anything at my nearest recycling center, you can be fined. If the guy in front of you discards a beautiful dining room table, for example, you have to leave it in the rain so a truck can come crush it.
I call my local recycling center “the dump.” It’s a better description, because so little recycling happens. It’s just 6 compacting dumpsters and some areas for things like appliances and tires. The dump is great, because they don’t enforce the rules. You can put car batteries in the dumpsters, for example. I actually told an attendant when I saw someone do that, and he didn’t care at all, even though the battery disposal area is 50 yards from the dumpsters.
Here’s the real rule: you can put anything you want in the household garbage dumpsters, as long as it’s in a bag or you get it in there fast without rubbing the attendants’ noses in it.
They don’t let you dump construction waste. That’s a problem. Of course, you can cut it up and put it in bags, but that can be a big job. When you want to throw out things like lumber and old Corian, you have to drive a few more miles and drop it in the landfill. That’s where I went today.
I removed a Corian counter from my workshop, along with a bunch of naily wood. It sat in my yard for ages, behind the shop. I also had a heavy pallet I needed to get rid of. These things were getting on my nerves, but I didn’t look forward to lifting them. Today I finally did it. I put them in the special residential dumpsters at the foot of the landfill mountain, and soon they will be dumped on top, where I hope they will slide into Mother Gaia’s gullet and stick in it, sideways.
I forgot to take the bird bath. That was a big error. But I can probably dump it in the furniture area by the local place if I’m fast. Last time I took a bird bath over there, an attendant asked if he could have it.
That’s the story of my day. If tomorrow is even half as good, I will have nothing to complain about.