Time to Make my Stand
December 1st, 2019Horrible Fabbing Gives way to Merely Mediocre
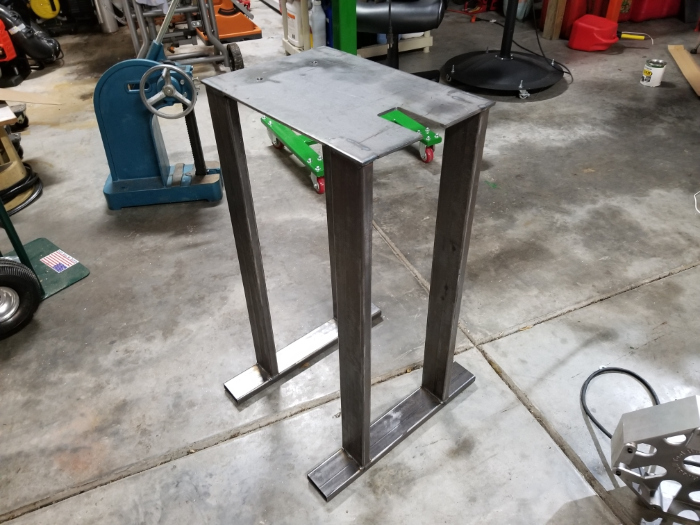
I’m working on my arbor press stand, using my new welding table. I quit for the Thanksgiving push, but now I’m out of the kitchen.
My arbor press is a Chinese beauty that weighs 135 pounds. It has to have a sturdy stand. Coming off my recent success with the bench grinder pedestal, I figured a mobile arbor press stand would be no problem.
I’m making it from 1″ by 3″ tubing and 1/4″ plate. It’s basically a box with a plate on top. I may also put a shelf halfway down.
The top needed a cutout. Arbor presses have forked bases so long workpieces can protrude below. I had to cut steel out of the top plate to match the fork in the press’s base.
Cutting the recess with a milling machine would have been quick and easy. I have not managed to motivate anyone to move my machines to me yet, so I had to use handheld tools.
I started with the plasma cutter, but it left a very crude opening. I used a 6″ angle grinder with a cutoff wheel to improve the recess, and then I finished it with my Dumore hand grinder and a carbide burr. The results were excellent. From 5 feet away, it looks like I machined it.

The press has two holes in it for mounting bolts. I didn’t feel like putting the heavy plate on the drill press, so I scribed locations for the holes with a square, and then I used a center drill, a jobber drill, and a unibit to finish them. They came out perfectly. Unibits are wonderful because they’re fast and they also deburr holes.
Welding has been tricky. I’ve seen people suggesting the use of fixturing tables and welding squares to hold metal in place so it doesn’t warp. I now have both products, and I can tell you that they’re not enough. Even if you clamp two pieces of steel so they’re at right angles to each other, they will move as soon as you remove the clamps. Clamping seems to reduce warpage, but it’s not the complete answer.
Frustrating.
I think I made a mistake in choosing to weld one part on at a time.
My stand has 31″ legs. When I attached the first two legs, they were 9-5/8″ apart near the plate. At the other end, they were 1/4″ closer together. I had to weld another tube across them at the far end, so I made a piece of wood 9-5/8″ long, wedged it between the legs to force them apart, and then welded. It did the trick, so the legs are parallel, but how do I know the legs are square to the plate?
Right now, the stand looks pretty good, but two opposite corners are slightly lower than the others, so it appears that the front legs and rear legs are not completely parallel. I think I can fix this when I weld the member that joins them. I can weld it to the center of one of the bottom tubes, and then I can force the sets of legs to line up so the new member is precisely centered on the other bottom tube. I’m probably only off by an eighth of an inch, so I’m hoping this will square the stand up to within a sixteenth or so. That’s a bullseye as far as I’m concerned.
If this plan doesn’t work, I can look into flame-straightening, or I can cut the stand up and start over. I have a gas rig for straightening, but I still haven’t found an acceptable deal on gas bottles.
I failed to do two important things before welding this thing up. I didn’t put in holes for the casters, and I didn’t weld in plates at the ends of the bottom tubes to make them pretty. I can still do all these things, but it will be a little more work than it would have been had I done it before the tubes were attached.
It should be a good stand. It will be very strong, and I’ll be able to roll it out of my way. It will be a lot nicer than the tool that sits on it.
Regardless of the fact that they don’t prevent warpage, the fixturing table and squares are very nice to have. This job would have been much harder without them. The table has already taught me something: I need a bigger table. This 3′ table is bigger than the 30″ Harbor Freight table it replaced, and I can see that 4′ is really about as small as you want to go. You need room for your project, your torch holder, a light, and some tools you won’t feel like storing across the room when you’re working.
The current table will be just fine for now, but I can see that a 2′ by 4′ table makes sense for the future.
I’m not sure how many projects you have to build before you stop warping things. This is my second arbor press stand, and I’m not there yet.
December 2nd, 2019 at 1:11 PM
You’r not listening….
Tac tac and tac again.
Preheat.
The warp follows the heat.
Measure as you weld and you will see at what level of weld time things start to move.
Watch Motor Trend shows doing body work, trying to control big panels when welding, It is much worse for thin metal.
Your longest weld is going to pull the most, so do it last to pull everything back to square.
This happens to everyone for the last 100 years, you can not just weld stuff together and expect it to come out square. You can not throw a Frisbee straight, yet you can make it land accurately every time with a curving path, same with a weld. Let it distort just figure out the last bead to pull to square.
This is the reason for TIG – control of heat input.
Pre heat is your friend, use an instant on propane torch with a trigger button and heat the area up with your left hand before you flip your helmet down.
December 2nd, 2019 at 7:18 PM
I listened. I thought you were saying something different!