I Traded Three Days of my Life for This
October 28th, 2019The Faint Smell of Competence is in the Air
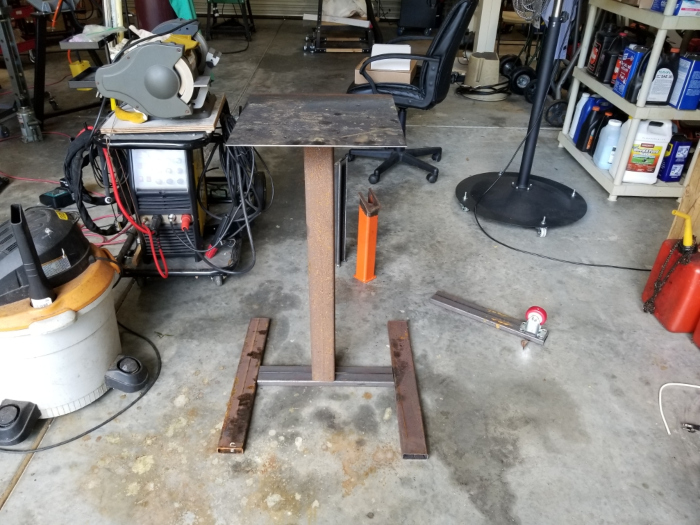
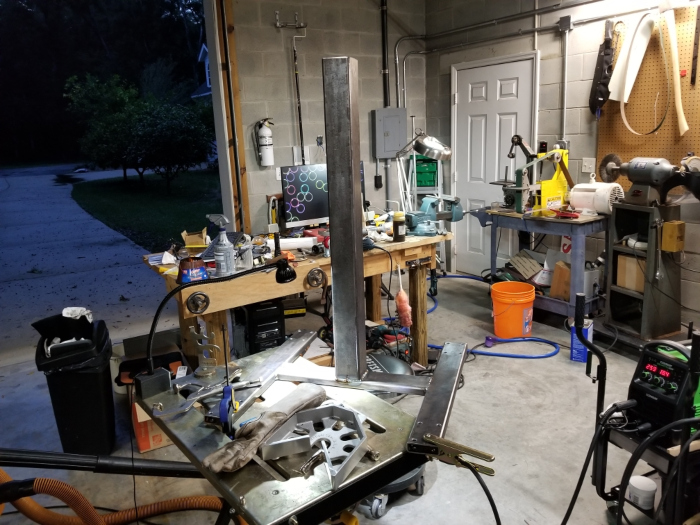
Yesterday I finished building my new bench grinder pedestal. I exaggerate somewhat. It still needs to be painted, and I’m thinking of grinding some metal down to make it look better.
It was a big job. Took two sessions over two days. I used aluminum welding squares made by Fireball Tool.
For a long time, I only had one welder. I had a Lincoln PowerMIG 180C, on a Lincoln cart. The cart was not good. It didn’t really fit the welder. I upgraded to a bigger two-tier cart from Eastwood. The Eastwood cart had a defective part, so I complained. They sent me a second cart for nothing. I fixed the defective cart, and I used it to hold my plasma cutter and bench grinder.
The cart was okay, but it was very low to the ground, and it was bulky and hard to maneuver. This is why I built a grinder pedestal. I wanted something higher and more nimble.
I didn’t want a heavy pedestal. One of the pitfalls amateur fabricators fall into is the belief that heavier is always better. In reality, one of the big goals of competent engineering is to reduce material waste. If you’re building, say, metal shelves, you don’t want to spend $50 per unit on steel when you can spend $15. I could have gone with heavy tubing, but I decided to use rectangular tubing with 1/8″ walls.
The pedestal only has one column. I used 3″ x 3″ square tubing. This stuff will support thousands of pounds, so the 90 or so pounds it will carry won’t challenge it at all. The only thing to be concerned about was rigidity, and it’s pretty hard to flex a 3″-square tube by pushing a piece of metal into a grinding wheel. By “hard,” I mean, “clearly impossible.”
You can buy cast iron pedestals that probably have walls 1/4″ thick. It sounds good when you’re telling your buddies about your cool new “beefy” pedestal, but if you make a pedestal that way, you’ve added weight and cost without realizing any benefit. You’ll regret it the first time you have to move it.
Speaking of moving, I was determined to have casters. The more things you put on wheels, the bigger your shop will seem. I had a set of casters on hand already, so I was ready to go.
For the top, I planned to use a 10″ square of 1/8″ plate. The metal dealer was not able to provide that when I showed up late on Friday, but they sold me a 16″ square that was a drop, so I saved some money, and I decided not to cut it down, because I could use the extra area for things if the need arose. Some people like to clamp fixtures in front of their grinding pedestals.
I have been afraid to weld complicated objects like this because of an experience I had with my arbor press. I made a stand for it, using scrap taken from a door at my dad’s old house. I lined the parts up well when I welded them, but when I stood the stand up, it wobbled. It was warped. I didn’t know metal would warp that badly when welded, and I didn’t know how to prevent it.
When you weld little things, warpage usually doesn’t matter. If you put a 5° bend in a part 8″ long, you probably won’t even see it. In a part three feet long, it’s different.
I want to create a welding table, or at least a set of legs and a frame for one. One of the purposes of a welding table is to provide a flat reference surface for projects. A lot of people use their garage floors, but concrete floors aren’t really flat. I had a problem. I wanted a welding table in order to allow me to weld things flat and square, but I needed a welding table in order to create a flat and square base…for the welding table.
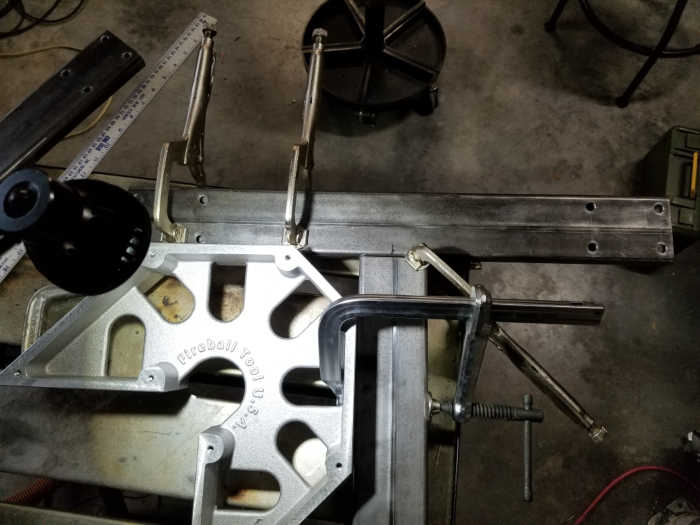
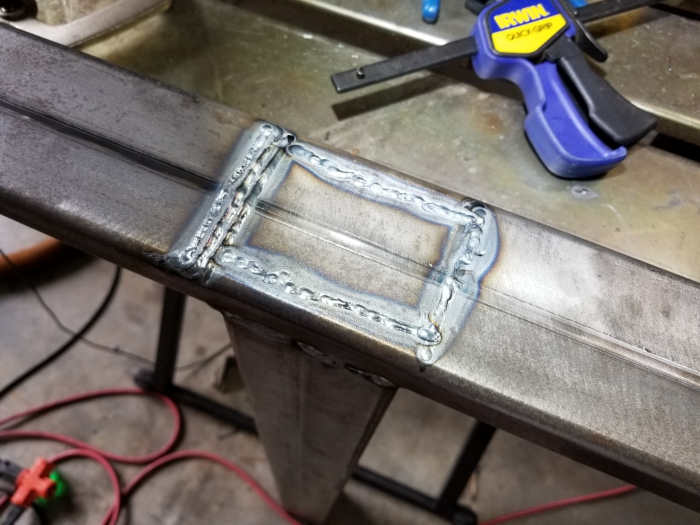
There are various ways to get around this problem. You can make your own jigs, which may or may not work. I chose the easy way. I bought myself two welding squares.
A little company named Fireball Tool produces a lot of innovative items for tool users. They make welding squares cast from thick iron and aluminum. They machine the castings to get flat surfaces and correct angles. You can clamp things to the squares before you weld them, and the squares will help them remain aligned until they cool.
Because the squares are cast iron and aluminum, welding spatter doesn’t stick to them very well. This is a plus.
I didn’t see why anyone would want cast iron. It’s heavy, it rusts, and it shatters. Sooner or later, I’ll drop any tool you give me. I don’t want to spend a lot of money on a square and then destroy it. An aluminum square may deform, but I have a milling machine and welders, so I can repair aluminum. Welding cast iron is not easy.
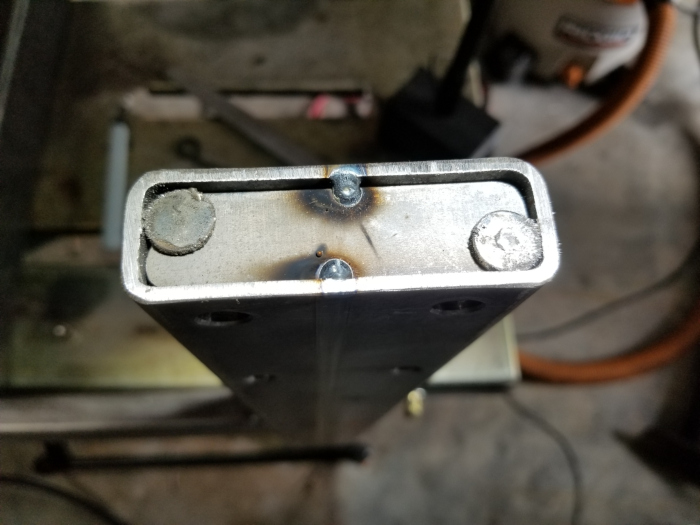
They make two main types of squares. One is an L-shape with a sharp outer corner. The problem with this is that the outer corner fits in the inner corner of whatever you’re clamping. You can’t get in there to weld. Their other product, the Mega Square, has another side, cut at 45° to the others, where the L-shaped square has a corner. You’ll understand when you see the photos. When you clamp steel to two sides of the Mega Square at 90° to each other, you can reach into the inside corner to weld.
I ordered two different sizes, figuring one would always be too small and the other would always be too big.
I chose to use my Harbor Freight Titanium Unlimited 200 multi-process welder. It’s extremely handy. I picked MIG because it’s the type of welding I do best.
First, I laid the metal out without welding it to see if everything looked right. It seemed okay.
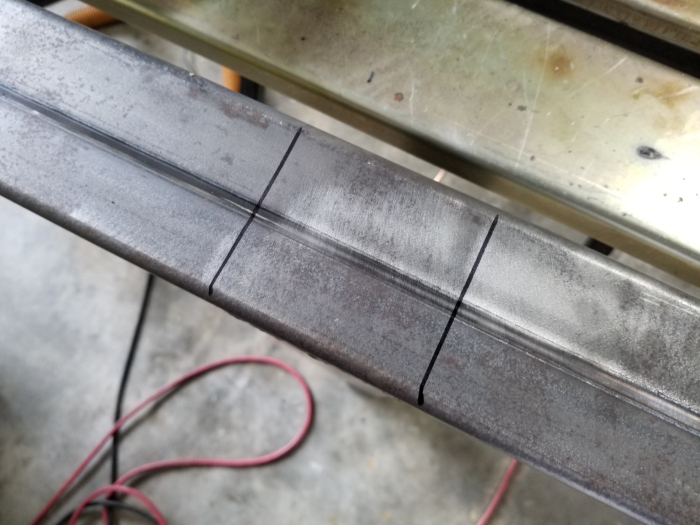
After that, I took an angle grinder and knot wheel and cleaned most of the rust off the steel. I then cleaned the parts with window cleaner. Raw steel is always covered with rust and black dust, so if you clean it before you work with it, you can avoid a lot of hand-washing and laundry problems.
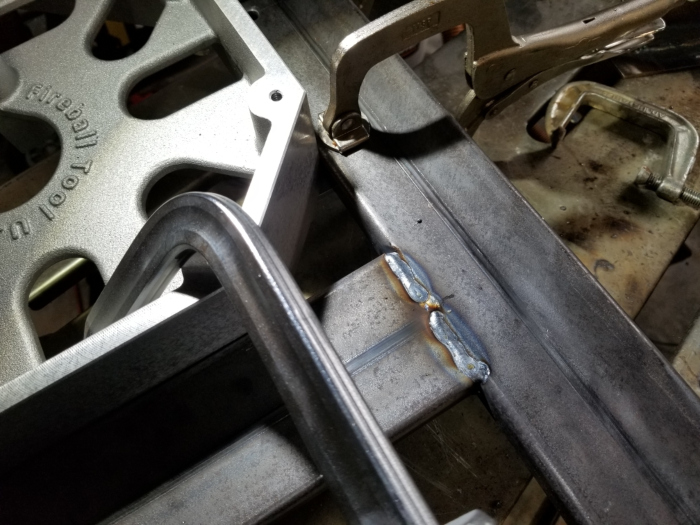
I followed the angle grinder with the belt grinder, deburring everything to get rid of sharp edges. I beveled things so the weld beads would fit in better. I wasn’t because I was worried about penetration. This project will never see significant stress. It doesn’t need perfect welds. The bevels will help assure that the welds are deep and strong, but that wasn’t the purpose.
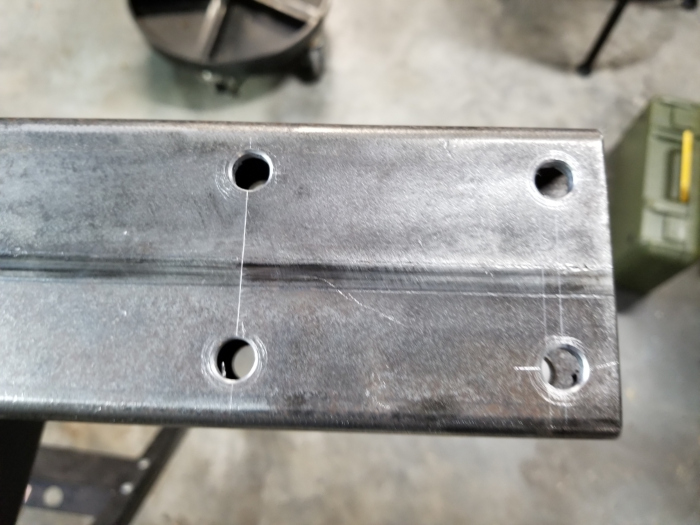
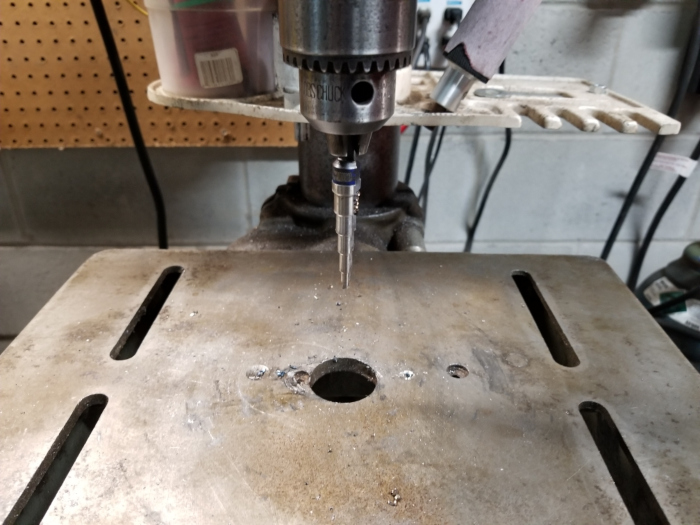
After the metal was cleaned up, I drilled holes for the casters. If I had waited until the pedestal was assembled, I would not have been able to get the parts onto the drill press, so I had to do it early. I used a machinist’s square, a carbide scribe, and a center punch to locate the holes. I started them with a center drill and finished them with a unibit. These things are great. It cut through both walls cleanly and accurately, and it even beveled and deburred the holes.
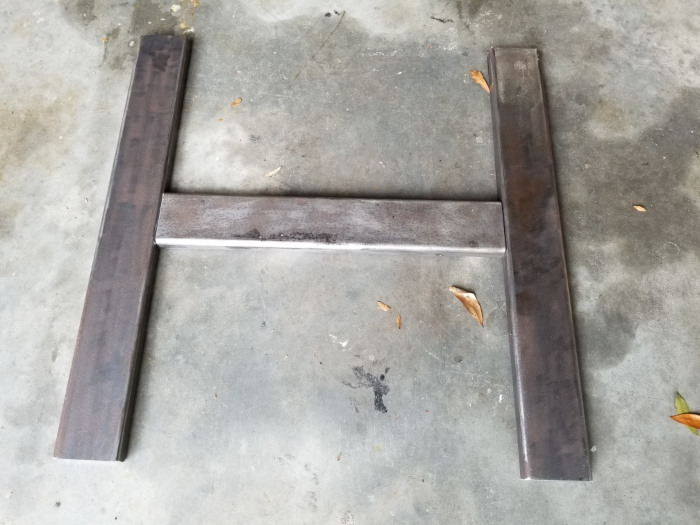
With all this done, I was ready to weld. I clamped two pieces of steel onto the big Mega Square and let fly. It worked perfectly. No distortion at all after the parts cooled.
It looks like there is hope I can build a table frame after all.
I followed the same process with the other side of the base, and then I put the whole mess on the table, clamped it as well as I could, and welded the column in place.
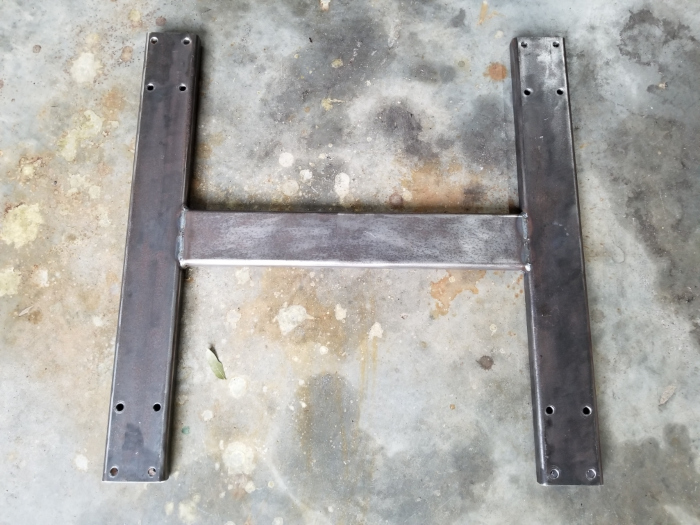

Everything went well, but I ended up bowing the piece the column attached to. I welded it pretty quickly, I didn’t let it cool between segments, and I didn’t clamp it straight.
The bow didn’t really matter. It was maybe 1/4″ over two feet. The bowed part was not going to be on the floor, so it could not make the pedestal rock. The pedestal was going to have a caster at each corner with the bowed part centered between them about 4″ off the floor. Still, I wanted to see if I could fix it.
I had heard about acetylene straightening. This is not the same thing as heating a piece of metal so you can bend it. When you do acetylene straightening, you heat a small area of a part just until it begins to melt. This expands the metal in thickness. When it contracts, it stays thicker than the surrounding metal, but it contracts in the plane of the wall you heated. This means it bends the part in the direction of the side you heated.
If you think you’ve done flame straightening with a propane or MAPP torch, you don’t know what flame straightening is. Read up on it. You can’t do it with propane or MAPP alone.
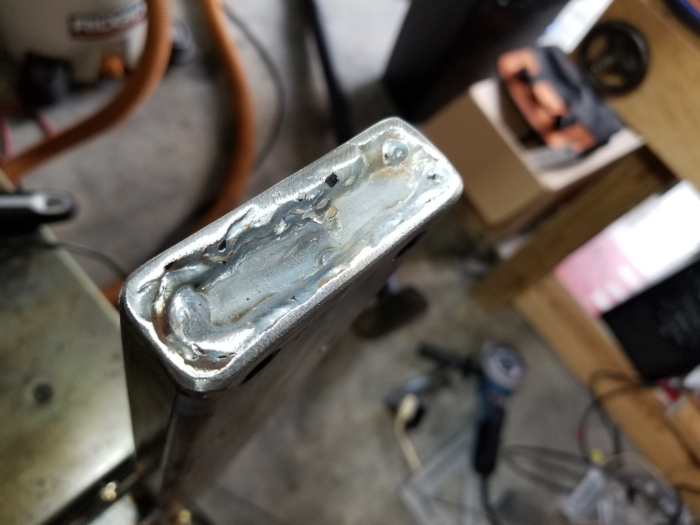
I have an acetylene outfit, but I don’t have tanks yet because I’m waiting for a good deal. It occurred to me that a TIG torch ought to work. I turned the pedestal upside-down, drew lines where I wanted to apply heat, and gave it a whirl. It worked great. The bottom tube is now straight. There is a tiny bit of bend between the center tube and a tube that has casters in it, but it’s so small, I felt that trying to fix it would be obsessive.
The TIG torch left some lumps on the steel, so I used a flap disk to make them less lumpy. They’re on the underside of the pedestal, so no one will see them.
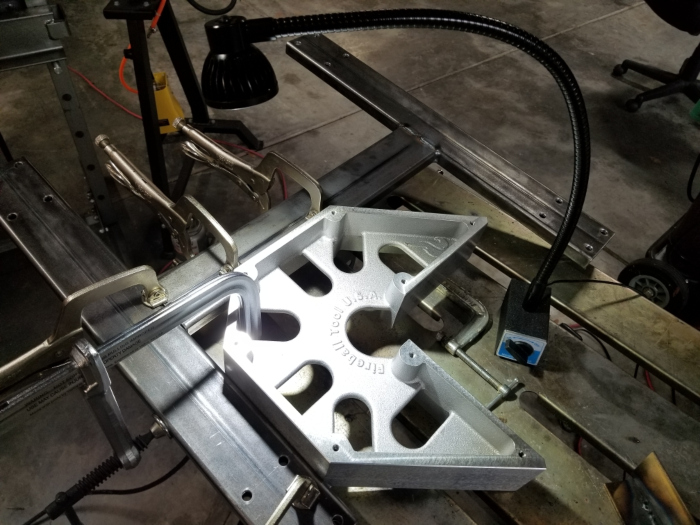
Attaching the top plate was hard. I could not use a square. I had to grind the top of the column carefully to make sure it was absolutely level. Then I attached it to the plate with a magnet, and I tacked the plate in place while sitting on the floor underneath it.
The top plate now has a slight bow. I decided not to try to prevent it, because I knew it would be forced straight when I bolted the grinder to it.
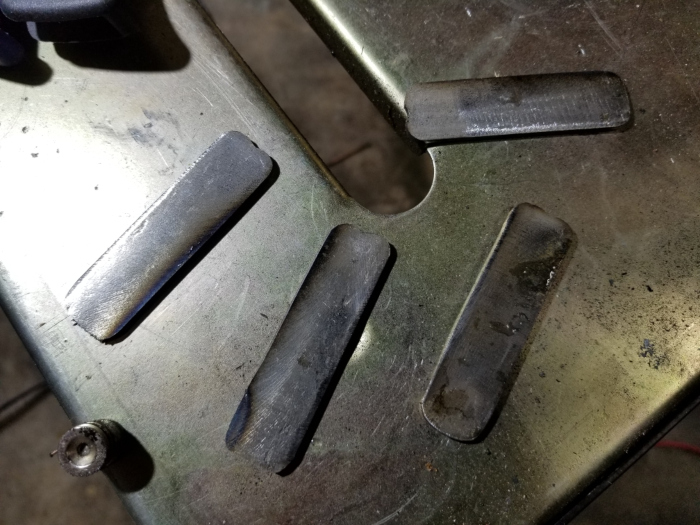
Now I had a pedestal, but I was not satisfied with the open ends on the bottom tubes. I made little plates and welded them in there.
This was scary, because I have had serious problems with weld control. For years, it has been hard for me to see anything but the arc when I welded.
A few weeks back, it occurred to me that I might have a vitamin A deficiency. I have had some gallbladder issues, and the gallbladder is what allows you to digest fat. Vitamins A, D, E, and K are fat-soluble, so if you don’t absorb fat, you can become deficient. I got myself some vitamin A and some lecithin, which emulsifies fat. I started talking both every day.
When I welded yesterday, I was able to see what I was doing. The difference was tremendous. Was it the vitamin A? I don’t know. I just know I’m not afraid to weld things I would not have touched a year ago. I had no problems welding the little plates in, apart from basic lack of skill.
I held the plates in with little magnets when I tacked them. I can’t tell you how useful these are for welding.
I may take the grinder and grind the ends of the tubes smooth, so it looks like they were never open.
I attached the casters and the grinder. Of course, I found that two of my screw holes were in the wrong places. This kind of thing always happens. I’m going to have to put two new holes in the top plate. I may weld the old ones closed, just because I can.
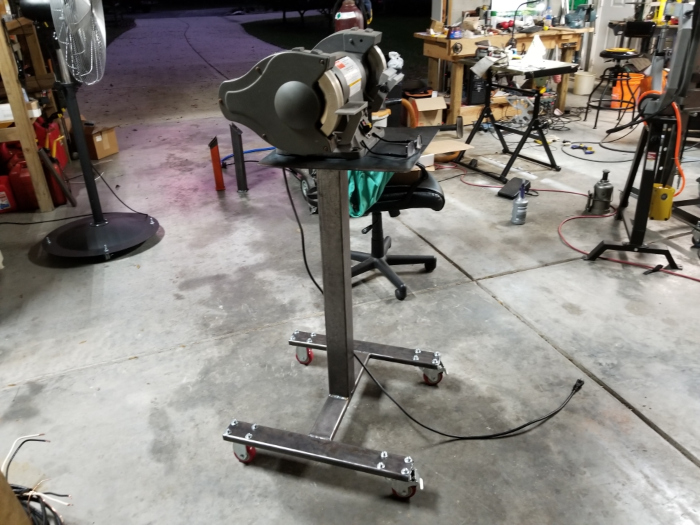
The pedestal is fantastic. You can jump on it without flexing it. It rolls very easily. The brakes hold it very firmly when you need to use the grinder. The platform is around 40″ off the floor, so the grinder is at a very convenient height. I love it.
I may add features. I would like to have a steel loop that holds a water bowl.
I bought primer and paint. I’m going to paint it forest green. This will take several days because the paint takes forever to cure. When I’m done, I’ll be sitting pretty. I’ll have a very nice stand I can move with ease, and I’ll be one step closer to getting rid of my extra Eastwood cart. My plasma cutter is sitting on it now, and it works, but I want something less bulky. Maybe another Harbor Freight Vulcan cart. They’re wonderful.
I should have my machine tools here in two weeks. I still have some wiring to do.
I think I’m going to buy a welding table top and forget about making one. The premade ones are just too good. I’ll be satisfied with fabricating a frame to hold it.
Things are looking good in the shop.
In other news, I had a pain in my wrist and hand this morning, and after watching some healing videos, I prayed for healing and commanded myself to be healed. The pain is almost totally gone. Really neat.
October 28th, 2019 at 8:45 PM
Hi Steve, Tom here, 15 year lurker. I have been using Penetrol to coat my projects. It is clear and is a metal primer for under paint but states on the can it is made to coat welds to protect them long term. I like to use it as a top coat on degreased metal with the foundry finish to have rust proofing and cool looking industrial finish. Goes on very thin with a 60% gloss.
Next, on all MIG welds use whatever you have to preheat the starting point and take the chill and moisture off the part. Your welds look like crap and this will make a big difference in strength and beauty of the finished weld
October 28th, 2019 at 10:35 PM
Tom, you need to let go and tell me what you REALLY think of my welds.
I realize the stuff I put in the end of the tube looks bad. It’s very awkward trying to get in a steady position to weld in there. You don’t know how happy I am just to be able to see well enough to keep the material in that little space. A month ago I would have been unable to do that.
The other two welds were not done continuously. I put tacks down and then welded to either side of them. I didn’t want big humps where the tacks were, and this was my best guess as to how to avoid it. This explains the appearance.
The TIG mess is not really welding. I just heated the steel with the torch. I wasn’t thinking much about how it looked because it will be hidden. I just heated it wherever I felt like it.
I have never heard anything about preheating for MIG and mild steel. I will have to read up. I was working in an 80-degree garage.
The welds aren’t porous, and they penetrated, so I am happy.
Never heard of Penetrol. If it will help the paint level better, I’m all for it.