Blow, Ill Wind
November 27th, 2016Five Bucks Buys You Nothing
I managed to make something in my shop today. Unfortunately, I was fixing something that broke, so technically, I came out behind. I spent time and materials on something that should have been working already.
I don’t care. I succeeded at something. This is the thing to focus on.
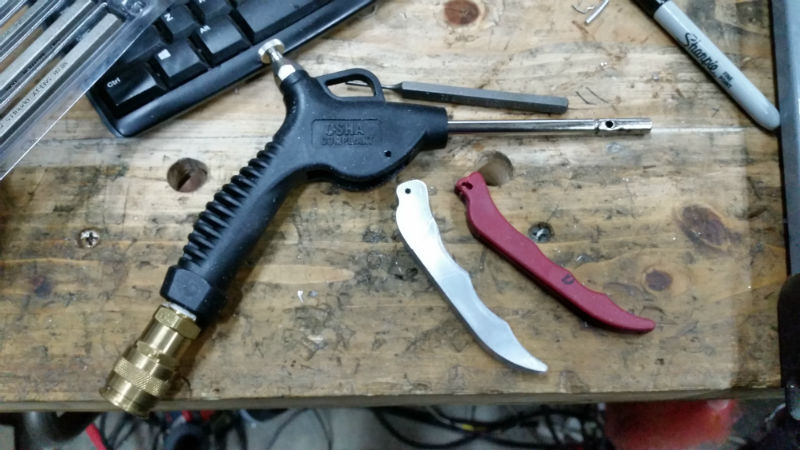
I bought a blow gun at Home Depot. It was cheap. It seemed like a great blow gun. The body of it was sturdy, and it appeared to be made well. Then I started using it. The first time I gave it any real use, the trigger broke off.
This was disturbing, because I had just made a major adjustment: I had decided to give in and use the blow gun on my machine tools.
People who use machine tools love to say you should never use blow guns around them, but of course, they all do it, just like everyone texts while driving. They say the air will blow crud into the machines’ workings and cause problems. That may be true, but guess what you get if you don’t use air? SPLINTERS. I have resisted using air, and I get metal splinters every single time I machine anything. I was tired of it. I decided to join the hypocrites.
The truth is that you can use air. You just can’t be stupid about it. Blow stuff away from gears and screws, not toward them.
I was machining something on the mill, and I used the blow gun to clear the chips before handling the part. I didn’t get a single splinter. I was able to get swarf out of places the shop-vac wouldn’t touch. The mill looked clean for once. It was great. Then the trigger ruined it all.
I took a look at the trigger. I was stunned by the cheapness. It’s literally like a plastic toy you would find in a cereal box. You could probably chew it in half in a few minutes. It’s flimsy plastic held on by a pin.
Yesterday I looked for a new blow gun. I hoped to find something decent locally, without driving all the way to Harbor Freight or Northern Tool, but my hopes were crushed. The only two major hardware stores in this area–Lowe’s and Home Depot–didn’t have anything I liked.
Today I decided to make a new trigger from aluminum. I had a square piece of aluminum about 4″ on a side and 1/2″ thick, and I figured I could cut a trigger out of it.
Sadly, my vertical band saw is not set up for metal. If you use a band saw for metal, you have to set special blades aside for it, because it dulls them, and after that you won’t want to use them on wood. That’s a hassle, so I don’t bother with it.
If the band saw had been available, I could have traced the outline of the trigger on the aluminum and used a 1/4″ blade to cut it out. Because I didn’t have a 1/4″ blade just for metal, I had to do the next best thing. I went around the tracing of the trigger with a big drill bit. The holes sort of approximated an outline of the part. I only did this on one side of the trigger, for reasons I now forget. Then I used a hack saw to join all the holes and free one side of the part.
To get the rest of the waste out, I mounted the part vertically in the mill and used a 1/2″ end mill to cut most of the crap out. After that, it was time for the belt grinder.
The belt grinder is a phenomenal addition to the shop, because I can shape metal freehand with it, very quickly, and I’m not limited to steel and iron. If you use a bench grinder on non-ferrous metal, you’re asking for an accident that could kill you.
I fired the belt grinder up and spent maybe an hour reducing the metal to the shape of the trigger.
When I was pretty close, I checked the thickness of the part. The opening in the gun was 0.440″ wide, and the part was 0.470″ thick. My answer was to mount the part vertically in the mill again and cut 0.025″ off the sides. I didn’t thin the entire part. Just the areas that had to swing into the gun handle.
After that, I put the old trigger on top of the new one and used a transfer punch to copy the pin hole location to the new trigger. I put a center drill in the drill press, measured the pin’s thickness, and used a #31 drill to make a hole through the new trigger. I used the center drill to deburr both ends of the hold so the pin would find its way in.
After that, it was just a matter of smoothing off the finger depressions, sanding down the marks left by the 60-grit grinder belt, and making the trigger look nice.
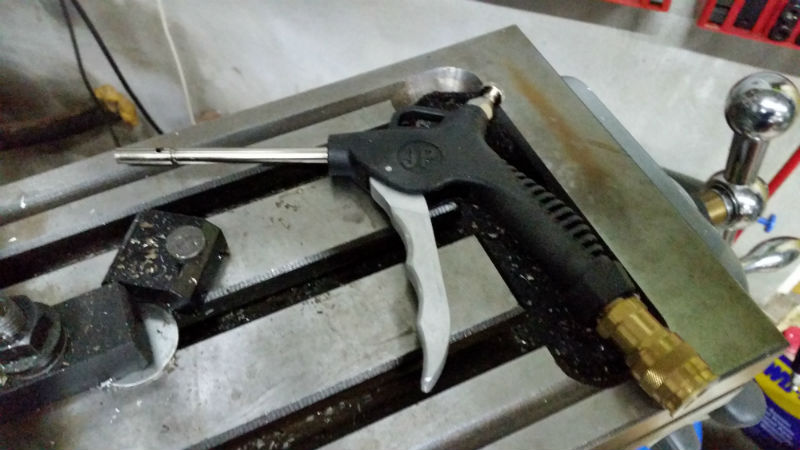
Now I’m done, and I have a perfectly good $5 tool that only took two hours and lots of work to fix. Somehow it seems like something there doesn’t add up, but hey, I won.
The gun still leaks air where the coupler screws in. I hope pipe dope will fix that. If not, I will have to take the blow gun outside and get medieval on it.
I have the tools for that.
November 30th, 2016 at 6:12 PM
Few things as satisfying as fixing a problem yourself, the right way.