Hurry up With That Wrench, Larry
October 23rd, 2017John Deere Manuals are Full of Little Jokes
Yesterday I really screwed up. I tried to do the responsible thing, reading a machinery manual instead of doing things however seemed right at the time. I should have known better!
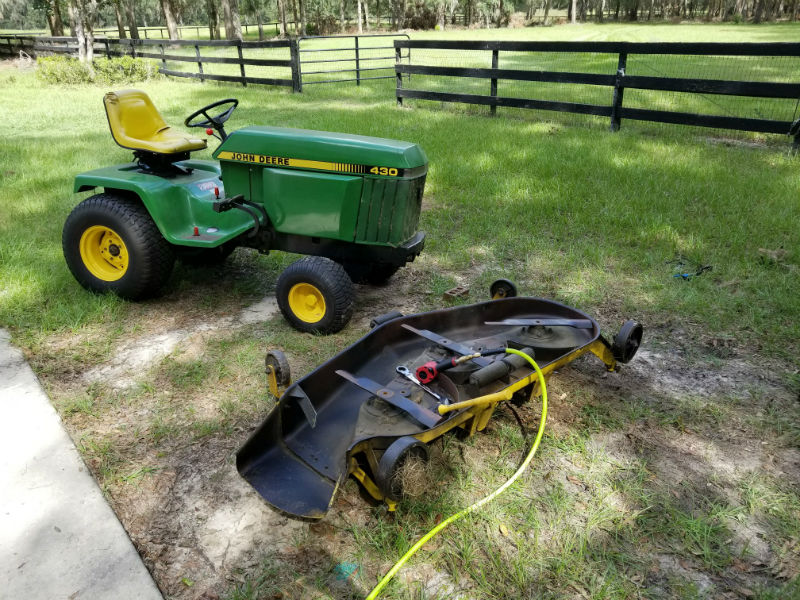
I have a John Deere 430 garden tractor with a mower deck. I don’t know why it’s called a deck. It’s a big flat attachment that connects to the underside of the tractor. You can’t stand on it, like a ship’s deck or the deck behind your house. In any case, it probably weighs over 200 pounds, and it has three blades on it. Once in a while, the blades have to be sharpened.
My yard is bahia grass. This is a somewhat disappointing, very tall grass which a friend of mine has compared to leather. It’s very tough. When I first arrived here, I started using the mower, and it seemed like it was pushing the grass over on its side and tearing some of it. It did not appear to be cutting very well. I read somewhere that bahia grass requires very sharp blades, so I resolved to figure out how to sharpen mine. Also, I hit a stump or an exposed rock the first time I mowed, and I felt like I needed to see what it had done to the deck. A big spark shot across the yard when I hit the obstruction, and I assumed that was a bad thing.
The previous owner said he used ramps to lift the mower so he could work on it. That seemed like a bad idea, so I looked at the manual. I was aware that farm machinery manuals tend to be highly optimistic (i.e. full of it) concerning the difficulty of servicing equipment, but I decided to take a chance. The manual said you pull some pins, turn a lever, disconnect the PTO driveshaft, turn the wheels, remove one wheel and slide the deck out. Child’s play!
Yeah.
My first bad move was to put the tractor on grass. I was going to have to flip the deck over once I got it out, and I did not want to do that on concrete. I did not consider the immense difficulty of moving a heavy item on three smallish wheels on soft dirt. But before I get to that, I will talk about the other problems.
First, there is a bizarre assembly with two arms on it, attached to the front of the tractor. The arms attach to the deck from the front. You have to push a pin and pull a lever to make the front of the attachment drop out. No problem! I tried to push the pin. It was frozen. I banged on it with a punch. When I finally got it moving, it bounced. It was a spring-loaded pin with a detent you have to activate to hold it in the out position, and the detent doesn’t work, so it keeps popping back into the hole, preventing the lever from turning.
When I mastered that, I found that the lever did not want to turn. The lever turns a rod with two circular flanges on it, and the flanges fit between two flat plates. The engineers in Japan apparently decided it was important to have tremendous friction between the plates and the outsides of the flanges, so they made them with an interference fit. Picture an axle with two wheels (the flanges), turned by a lever on the hub of one wheel. Then picture two brick walls, pressed up against the wheels from outside.
Turning the lever was impossible, until I got out my 3-foot pipe wrench. What about a breaker bar? Well, the lever points downward when you get it rotated, so a breaker bar would be pointed toward the center of the earth. In order to avoid obstruction, the bar would have to be about an inch and a half long, defeating the purpose of increasing leverage.
I got the attachment to fall, and then I pried out the spring-loaded J-pins that held the arms onto the deck. They’re supposed to move freely. Ha.
I got all the other pins out, and then I had to remove the driveshaft from the PTO. The driveshaft telescopes “freely” (again, ha), and there is a collar on the front end that compresses some ball detents to keep it in place. The collar moves…freely. Unless it’s impacted with thick, black, greasy dust from mowing. I had to work it and work it. I pulled the deck backward and forward by hand. I moved the tractor up and back. Finally, the coupling fell off the PTO.
When I had everything loose, I pulled the deck sideways in the soft dirt, which was not easy at all, and then the little gearbox in the middle of the deck hit the inside of the frame of the tractor.
To get this stupid thing out, you have to jack the tractor up maybe two inches. This is not in the manual. John Deere’s little joke.
No problem. I had a farm jack.
I put the farm jack on the right front axle and started raising the tractor. As I raised it, the jack leaned closer and closer to the cowling. Great. It was going to gouge the crap out of it. I found a towel and shoved it in there and continued jacking.
Eventually, I got the deck to slide out, and then I decided to lower the tractor for safety reasons. It would not budge. It was perfectly happy to go up. Down was not an option.
I went to the shop PC and got on the web. Guess what? Farm jacks freeze up so they can only be raised. There are two sprung pins in the mechanism, and whenever you use your farm jack, you’re supposed to lube the snot out of them before you start. Otherwise, you can end up with a heavy load suspended in the air, with no way to get it down.
I used WD-40 and lithium grease (because WD-40 evaporates), and I got the jack to work.
I have a policy of never lifting anything heavy. First of all, lifting is work. Apart from that, it’s a great way to ruin your old age. One lift can screw up up for life. Unfortunately, I had no help, so I picked up the front of the deck and rolled it on its back. I will not be doing that next time. If it had been fifteen pounds heavier, I don’t know if I could have done it.
The blades were held on by three huge hex bolts. I tried a wrench, but they were on there pretty good, and it was just about impossible to hold the blades still. When I turned one bolt, all three blades moved. I got out my impact wrench and fired up the small compressor, and thanks be to God, the bolts came right out.
The blades didn’t look bad at all. I saw a John Deere manual online, and it said the cutting edge was supposed to be a flat surface 0.4 mm wide. In other words, much duller than a butter knife. I have no idea why that would be desirable. I would guess that the unsharpened blades were considerably sharper than that when I took them off. I wasn’t having it. I went to my small belt grinder and created edges that were sharp enough to slice bologna. It’s not easy to put a really good edge on steel that thick. I was satisfied. I went through the horror of disassembling and detaching the deck, backward, and after maybe 3 hours of work, total, I had a tractor ready to mow.
Supposedly, you should use a torque wrench to put mower blades back on. Yeah, sure. Thanks for that great tip. I’m all over it.
I used the impact wrench.
I still have a lot of sticks and twigs in my enormous yard because of Hurricane Irma. I asked some forum people if I needed a landscape rake, and one said I should just run over the twigs with the mower. I decided to take his advice. Now I know how to fix blades, so I don’t care what happens to them. I ran right over everything I saw, up to 3/4″ in thickness. Whatever the blades hit, they dealt with. Good enough.
Hmm…the Internet says this deck weighs 300 pounds. Yeah, that feels about right.
There was one bright spot in my ordeal. The smiley spider from my front door showed up to help. I am told his name is Larry. Not sure how helpful he was, but it was good to know he was in my corner.

Larry says I should get a smiley tattoo to match his own, but for the moment I have decided to pass.
October 23rd, 2017 at 1:49 PM
The tractor works well to give a sense of scale for Larry. Man, he’s a big one, isn’t he?
I don’t recommend you get a tattoo, but if you do, you could get one of Larry.
October 23rd, 2017 at 2:48 PM
It’s a small tractor, so maybe the comparison flatters Larry. He’s a little over an inch across.
October 23rd, 2017 at 6:14 PM
I keep having flash backs of Home Improvement. Just missing the man sounds after handling a tool.
October 23rd, 2017 at 8:54 PM
Ya live in Floriduh fer crissakes, soak every metal part in oil, frequently or it will seize solid midway through the next rainfall. At least you are far(ther) away from salt air.
All my friends in Ft.Lauderdale seem to have “outdoor” workshops, tools neatly lined up on a board under a sheet of durock or some other wavy roofing material, every blessed one uniform brown rust coated, drives me nuts. Almost cried when I saw what a shopsmith looks like under those conditions.
October 23rd, 2017 at 9:15 PM
Having made a living for a while operating a landscaping and maintenance business, couple of things. I always had two or three sets of extra blades that I kept sharpened and ready to go, seemed to make things easier. Also, once you start sharpening them you’ll need a blade balancer. Just a cheap, under $10 item that will keep things smooth and go easier on bearings. Sharp blades are a must as well, every couple of mowings or so if you want a really clean cut. YMMV
October 23rd, 2017 at 9:44 PM
So one more vote against dull blades.
I did balance the blades. The Deere manual said to rest them on a nail or something, so that’s more or less what I did.
October 23rd, 2017 at 9:56 PM
Spare sharp blades. Absolutely. I have four sets I rotate out. The oldest ones get used in the fall when they will encounter acorns and walnuts and other blade-damaging stuff.
October 23rd, 2017 at 10:54 PM
JD TV commercials show the mower deck lying on the lawn, the cute blonde drives the front wheels over it and stops with the mower centered under the tractor. Then the dozen JD gnomes that live under the deck lift and attach it.. Then the CB drives off.
She also pushes a button and the JD gnomes detach the mower and again she drives over it and away.
Maybe you should get a cute blonde? Or a wig….
This was another job you should get the orange tractor involved. Use the forks to lift and move the mower deck.
Use the force Steve Skywalker; hydraulics! lol
October 24th, 2017 at 10:38 AM
You are right about the tractor. I can’t pick the mower deck up with it, but I could lift the tractor onto jackstands.
While I was Googling about my deck, I found a reference to a JD deck that attaches and detaches all by itself. Only $3000. My bet: it’s a crock.
October 24th, 2017 at 3:31 PM
John Deere green is a good color for Larry!
October 29th, 2017 at 7:35 PM
Don’t just sharpen the blades. But periodically pressure-wash (blast!) the accumulated vegetative crust which builds up under the deck. Clean it down to paint or bare metal.
Rust grows and hides under that crust, and it also can really degrade the mowing efficiency by fouling the under-deck aerodynamics. This, has the effect of seriously slowing down the ejection of cut grass blades, stems and particles, which only accelerates the crusty build up under the deck.
As for sharpening, just be glad you don’t have a reel-mower attachment hanging off of the rear PTO. Beautiful cut results. But more than a small chore in the sharpening thereof.
Along with the spare (sharp) blades, a handful of spare pulley belts would likely come in handy, too.
But yeah, that 300 lb. deck is a thing. Post Hurricane Ike, when I had to refinish my gun-safe, I’d built a one-time, wooden cradle for it which let me alternate it from vertical to horizontal, as a solo effort. Maybe some kind of half-roating cradle would let you hook up the deck when horizontal on the ground, and then with just a long lever, let you roll it up to a 90 degree vertical, and lock it in for some belt-level maintenance work?
That’d be a fixture worth the welding-up. Done right, it’d last the life of the deck, or the Deere, or of you on the farm.
Done exceptionally well, you might even want to protect the design, and etc. Make it adjustable to fit a variety of decks, and maybe you’ll end up with a rather marketable design.
I have the sketch in my mind.
Jim
Sunk New Dawn
Galveston, TX
October 29th, 2017 at 8:51 PM
Jim, thanks for the tips. The deck doesn’t accumulate much crud. It has a shiny, blackish layer of rust on it. The bush hog develops a crust on the upper surface, however.
I hadn’t thought about making a device to roll the deck. Considering how hard it is to remove from the tractor, I think I’m better off finding a way to raise the tractor itself.
As long as we’re exchanging tips, have you seen the Youtube videos of guys breaking into gun safes with angle grinders? Two minutes. Very disheartening.
October 30th, 2017 at 2:29 PM
…As long as we’re exchanging tips, have you seen the Youtube videos of guys breaking into gun safes with angle grinders? Two minutes. Very disheartening.
Yessir.
Standard, unprotected gun safes are easy pickings to those in the know. But, you, amigo, have the tools and skills to harden them beyond compare.
For your standard 60″Hx24″Wx20″D safe, weld-up a vertical “coffin” to surround the safe on five sides, with 3/16th steel, or 1/4 in. if you’re feeling especially protective. Make sure the mounting holes in the bottom of your safe, align perfectly with holes in the bottom of the aforementioned “coffin”.
The assembly, securely bolted down, changes that 2 minutes with the grinder, into hours, maybe even days. Moreso if you can find a way to harden the steel plates, after welding.
Another trick, if building a structure around a safe, is to design a well reinforced concrete enclosure, to also surround the safe on five sides, with no less than 3 in. of concrete of *at least* 5,000 psi compressive rated strength.
Put lots n’ lots of 1/2 in. rebar into that concrete matrix, too.
Regarding those mounting bolts? Buy the most highly rated, high-strength, high quality fasteners that the clerk at Fastenal can dig up. Again, if you’re building a structure, put threaded “receiving” nuts into the steel rebar system, so that those bolts can snug down and be lock-washered into near-permanence.
No “safe” is truly break-proof. All they can do is to either buy time, or offer enough discouragement for a breaker to choose a softer target.
Mine lacks the surrounds. But, it’s on security video, and is heavily bolted through steel reinforcing bars, to a house piling (telephone pole) driven some 36 ft. into the ground.
They might grind their way in, but they’re NOT gonna loop a steel cable over it and yank it through the wall with a truck.
Popular method that, for lightly built frame houses.
Oh, and if the safe makers would use some of the high-buck epoxy based carbon-concrete concoctions between the steel and the fireproofing, well, the grinders would be out of business.
Problem being the doubling of the price of a safe.
Frankly, it’d be fun to see you make your own home-brewed Graffunder grade vault.
They’re not grinding their way into that one in anything much less than a week of work.
Pity, booby-traps are right out.
Jim
Sunk New Dawn
Galveston, TX